Alright, picture this: it’s 2 a.m., the house is quiet, and you’re scrolling through endless snack ideas while the fridge hums like a lazy cat. You’ve tried that “quick banana‑bread‑in‑a‑minute” hack, you’ve burned a batch of oatmeal cookies, and somehow you’ve ended up with a half‑eaten bag of plain peanuts staring at you like a judgmental friend. I dared a roommate to a midnight snack showdown, and the loser had to bake something that could “stop a traffic jam.” That’s how the 5 Ingredient Peanut Butter Cho was born—an accidental love child of a dare, a pantry raid, and a serious craving for something that feels like a hug and a high‑five at the same time.
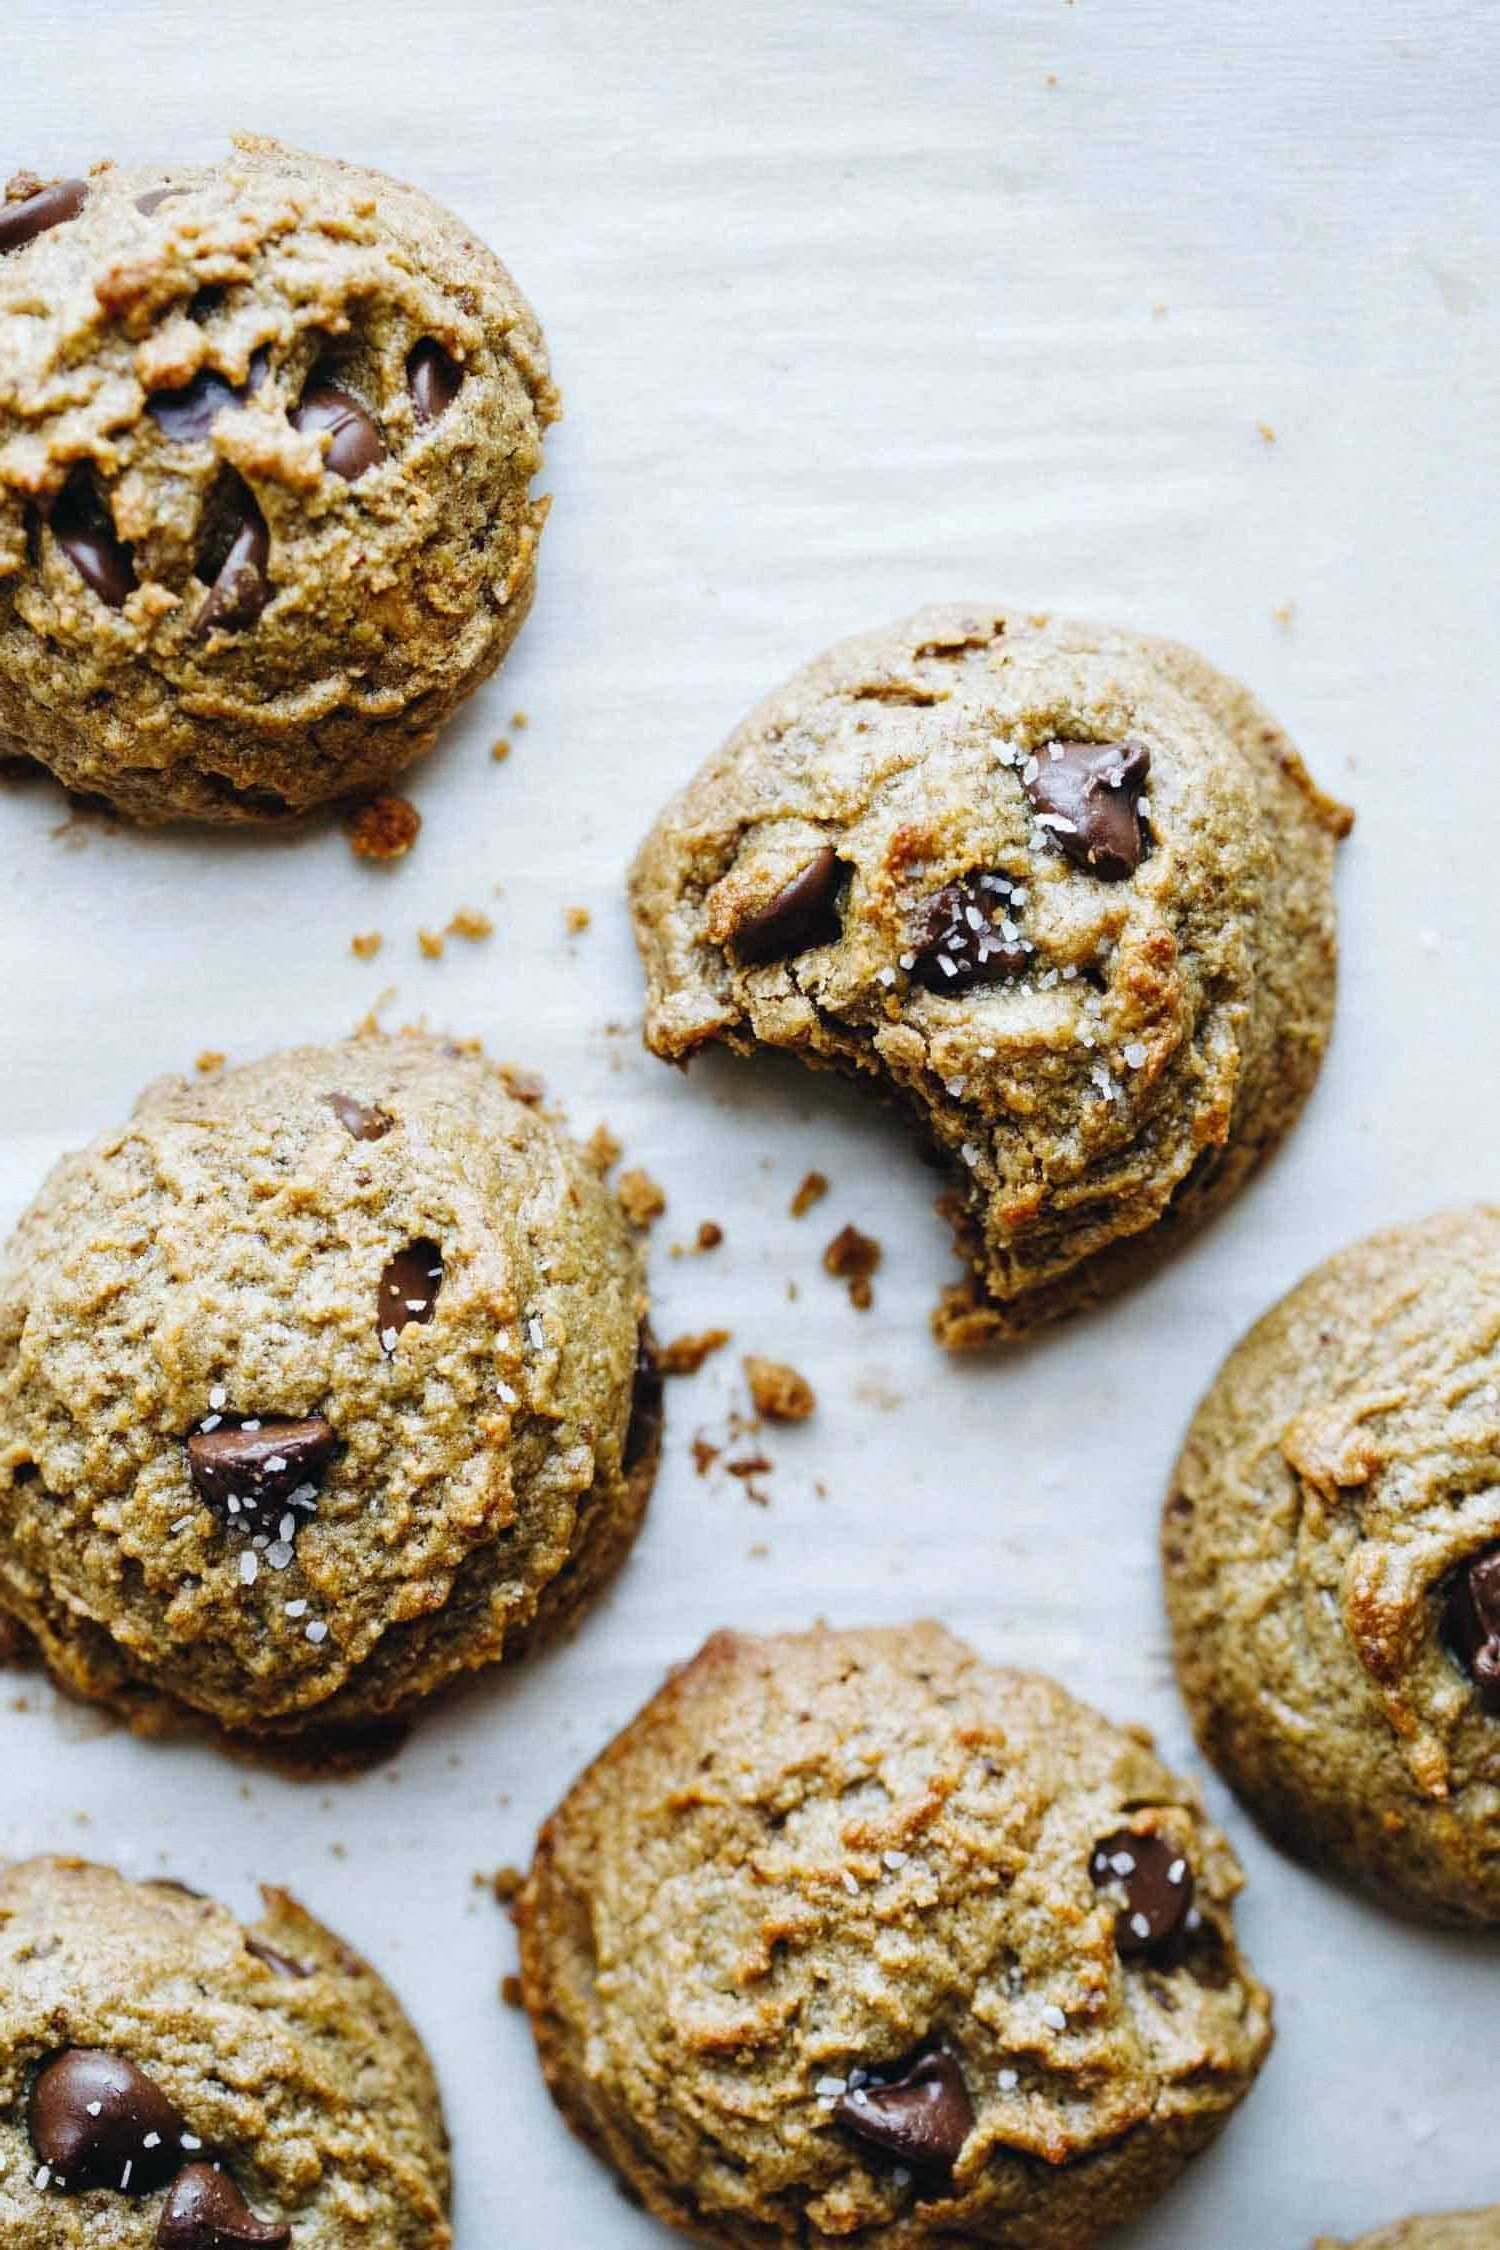
The first whiff of that butter‑rich dough hitting the countertop is like a warm blanket sliding over a chilly shoulder—instant comfort, no questions asked. The aroma of toasted peanuts mingles with the faint caramelized sugar, while the chocolate chips glisten like tiny sunrise promises waiting to melt into gooey pockets. You’ll hear the soft “whoosh” of the mixer as it folds everything together, and you’ll feel the dough’s sticky, slightly tacky texture cling to the spoon like a loyal sidekick. When the cookies finally slide out of the oven, the edges will crack just enough to give that satisfying snap, and the centers will stay soft enough to bend under a gentle press, almost like a chewy pillow you can actually eat.
Why does this version stand out from every other peanut‑butter‑chip cookie you’ve ever tried? First, it drops the unnecessary fluff—no baking powder, no vanilla extract, no extra flour to “balance” anything. We’re talking pure, unadulterated flavor that lets the peanut butter shine like a star on a black‑tinted stage. Second, the technique uses a “melt‑then‑mix” method that gives the cookies a crisp‑edge, chewy‑center texture that most recipes simply can’t achieve. And finally, the secret weapon? A pinch of sea‑salt added at the very end, which amplifies the chocolate’s depth and makes the peanut butter taste like it’s been toasted over an open fire.
I’m about to spill the beans (and the butter) on a tiny trick that most home bakers overlook: a quick 30‑second stovetop caramelization of the sugar before it meets the peanut butter. This not only boosts the flavor but also creates a subtle caramel crust on the cookie tops that crackles like fresh autumn leaves. I dare you to taste this and not go back for seconds—because once you’ve experienced that perfect balance of sweet, salty, and nutty, you’ll be forever changed. Let me walk you through every single step — by the end, you’ll wonder how you ever made it any other way.
What Makes This Version Stand Out
- Taste: The combination of creamy peanut butter and melty chocolate chips creates a flavor duet that feels both nostalgic and novel, like your favorite childhood snack meeting a gourmet twist.
- Texture: A crisp, caramelized edge gives way to a soft, chewy center that practically melts in your mouth, delivering that “crunch‑then‑soft” sensation you crave.
- Simplicity: Only five ingredients, no fancy equipment, and a single bowl—perfect for busy weeknights or lazy weekends.
- Uniqueness: The brief stovetop caramel step is the game‑changer that most store‑bought mixes completely miss.
- Crowd Reaction: These cookies have a reputation for disappearing within minutes of cooling, earning them the nickname “the vanishing act.”
- Ingredient Quality: Using natural, unsweetened peanut butter and high‑quality chocolate chips elevates the entire profile without extra sugar.
- Cooking Method: Baking at a high temperature for a short burst locks in moisture while forming that coveted caramel crust.
- Make‑Ahead Potential: Freeze the dough balls for up to a month; they’ll bake just as beautifully later, making this a perfect make‑ahead snack.
Alright, let's break down exactly what goes into this masterpiece...
Inside the Ingredient List
The Flavor Base
Peanut butter is the heart and soul of these cookies. I insist on using a natural, unsweetened variety—no hydrogenated oils, no added sugars—so the nutty flavor remains pure and the texture stays creamy. If you substitute a commercial “creamy” peanut butter, you’ll introduce extra sugars that can make the cookies overly sweet and cause them to spread too much. The best peanut butter is one that you can stir with a spoon without it clumping; look for a brand that lists peanuts as the sole ingredient, and give it a quick taste—if it feels like a dessert on its own, you’ve hit the jackpot.
The Sweet Symphony
Granulated sugar does double duty: it sweetens and, when caramelized, creates that signature crunchy edge. I recommend a fine, white cane sugar because it melts evenly and forms a smoother caramel. If you’re feeling adventurous, a 50/50 mix of brown and white sugar adds a subtle molasses note, but remember that brown sugar brings extra moisture, which can soften the cookie’s outer crust. Skipping the caramel step entirely will still give you a decent cookie, but you’ll miss that magical snap that makes the cookies unforgettable.
The Texture Crew
All‑purpose flour provides structure, holding the dough together while allowing the cookie to spread just enough during baking. Use a light hand when measuring—spoon the flour into the measuring cup and level it off with a knife to avoid a dense, heavy cookie. The egg acts as a binder and adds a subtle richness; it also helps the dough achieve that perfect “soft‑center, crisp‑edge” balance. If you’re allergic to eggs, a flax‑egg (1 tbsp ground flaxseed + 3 tbsp water) works as a decent substitute, though the texture will be slightly less airy.
The Unexpected Star
Chocolate chips are the surprise fireworks that explode in each bite. Choose semi‑sweet or dark chips for a balanced flavor; milk chocolate will make the cookie overly sweet, while high‑cocoa chips can add a bitter edge that competes with the peanut butter. If you’re vegan or dairy‑free, there are excellent dairy‑free chocolate chips that melt just as nicely. Toss the chips in at the very end of mixing—this prevents them from melting into the dough and losing their distinct pockets.
The Final Flourish
A pinch of flaky sea salt is the final whisper that elevates the entire cookie. It brightens the sweetness, accentuates the nutty undertones, and creates that subtle “pop” you feel on the tongue. Don’t overdo it; a little goes a long way, especially when you’re already using a salty peanut butter. If you use a salted peanut butter, cut the added salt in half and you’ll still get that perfect balance.
Everything's prepped? Good. Let's get into the real action...
The Method — Step by Step
- Preheat your oven to 375°F (190°C). While the oven warms, line a baking sheet with parchment paper; this prevents sticking and makes cleanup a breeze. The high temperature is crucial—it creates that instant caramel crust on the edges while keeping the centers soft.
- Grab a medium saucepan and add the 1 cup granulated sugar. Set the heat to medium‑low and stir continuously. After about 30 seconds, you’ll notice the sugar beginning to melt and turn a light amber. Keep an eye on it—once it reaches a deep amber, remove it from heat immediately to avoid burning.Kitchen Hack: Use a silicone spatula; it slides under the caramelized sugar without scratching the pan.
- While the caramel cools slightly (just enough so it doesn’t scorch your fingers), whisk in the 2 cups natural peanut butter until the mixture is smooth and glossy. The caramel will melt into the peanut butter, creating a thick, buttery base that smells like a dessert bakery.
- Add the 1 large egg to the bowl, beating gently until fully incorporated. The egg will bring the dough together and add a subtle richness. At this point, the mixture should look glossy and slightly thick, like a spreadable fudge.
- Fold in the 2 cups all‑purpose flour using a rubber spatula. Stir just until the flour disappears; you’ll notice the dough becoming a bit firmer but still manageable. Watch Out: If you see flour pockets, keep mixing—over‑mixing will make the cookies tough.
- Now, gently fold in the 1 cup chocolate chips. The chips should stay whole, creating pockets of molten chocolate that will burst during baking. If you’re using frozen chips, let them sit at room temperature for a few minutes so they don’t melt prematurely.
- Add a pinch of flaky sea salt and give the dough one final stir. The salt will sit on the dough’s surface, later popping up as tiny crystals when baked, delivering that perfect sweet‑salty contrast.
- Using a tablespoon or a small ice‑cream scoop, portion out dough onto the parchment‑lined sheet, spacing them about 2 inches apart. The dough will spread slightly, but not dramatically, thanks to the egg and peanut butter binding it.
- Slide the sheet into the preheated oven and bake for 10‑12 minutes. Watch for the edges to turn a deep golden brown and start to pull away from the parchment. The tops should be set but still look slightly soft—that’s the sweet spot.
- Remove the cookies and let them cool on the sheet for 2 minutes, then transfer to a wire rack. As they cool, the edges will crisp up while the centers stay chewy. Kitchen Hack: If you want ultra‑crisp edges, bake an extra minute, but keep a close eye—over‑baking turns them brittle.
That’s it — you did it. But hold on, I’ve got a few more tricks that’ll take this to another level. Stay with me here — this is worth it.
Insider Tricks for Flawless Results
The Temperature Rule Nobody Follows
Most home bakers preheat to 350°F, but the magic really happens at 375°F. The higher heat creates that instant caramelization on the edges while the interior stays soft. If you live in a high‑altitude area, bump the temperature up another 10°F to compensate for lower atmospheric pressure, which can cause slower browning.
Why Your Nose Knows Best
When the caramel reaches a deep amber, you’ll smell a buttery, toffee‑like aroma that’s unmistakable. Trust that scent; it’s a reliable indicator that the sugar is at the perfect stage. If you rely solely on a timer, you risk either under‑caramelizing (flat flavor) or burning (bitter). Your nose is the ultimate kitchen thermometer for this step.
The 5‑Minute Rest That Changes Everything
After mixing, let the dough sit for 5 minutes at room temperature. This short rest allows the flour to fully hydrate, resulting in a more cohesive dough that spreads evenly. Skipping this rest is a common mistake; I once baked a batch straight away and ended up with unevenly puffed cookies that tasted “raw” in the middle.
The “Cool‑Before‑Bake” Trick
Chill the dough balls for 10 minutes before baking. This firmes the butter and peanut butter, preventing excessive spreading and giving you a thicker, cake‑like interior. A friend tried skipping the chill and got flat, wafer‑thin cookies that crumbled too easily.
The Double‑Layer Flip
For an extra chocolate burst, press a second handful of chips onto the tops of the dough balls right before they go into the oven. The heat will melt this top layer, creating a glossy chocolate “cap” that shatters delightfully when you bite. It’s a small step that makes a massive visual and textural impact.
Creative Twists and Variations
This recipe is a playground. Here are some of my favorite ways to switch things up:
Spicy Heat
Add a pinch of cayenne pepper or a dash of chili powder to the dough for a subtle heat that pairs beautifully with the peanut butter’s richness. The spice awakens the palate and makes the cookies perfect for an evening snack with a cold glass of milk.
Nutty Medley
Swap half of the peanut butter for almond butter, and sprinkle chopped toasted almonds on top before baking. This creates a layered nut experience—creamy interior with a crunchy almond finish.
Double‑Chocolate Dream
Replace half of the chocolate chips with cocoa nibs and add a tablespoon of unsweetened cocoa powder to the flour. The result is a deeper, slightly bittersweet chocolate flavor that balances the sweet peanut butter.
Oat‑Boost
Stir in ½ cup rolled oats for added texture and a hint of chewiness. This variation works great for a breakfast‑style cookie that can be paired with yogurt or a smoothie.
Vegan Victory
Replace the egg with a flax‑egg (1 tbsp ground flaxseed + 3 tbsp water) and use a plant‑based butter substitute. The flavor remains largely the same, and you’ll have a fully vegan treat that still boasts that caramelized edge.
Storing and Bringing It Back to Life
Fridge Storage
Place cooled cookies in an airtight container and store them in the refrigerator for up to 5 days. The cool environment keeps the chocolate from blooming and maintains the chewy interior. If you notice the cookies drying out, add a slice of fresh bread on top of the container; the bread’s moisture will revive them overnight.
Freezer Friendly
Freeze dough balls on a parchment sheet for 30 minutes, then transfer them to a zip‑lock bag. They’ll keep for up to 3 months. When you’re ready, bake them straight from the freezer, adding an extra minute to the bake time. This trick is perfect for spontaneous cookie cravings.
Best Reheating Method
To revive a day‑old cookie, preheat a skillet over low heat, add a tiny splash (about a teaspoon) of water, and place the cookie in the pan, covering it for 30 seconds. The steam restores softness while the bottom crisps up again. Avoid microwaving; it makes the cookie rubbery and kills the caramelized edge.