Picture this: a rainy Saturday, the kind that makes you curl up on the couch with a blanket, a good book, and a craving that refuses to be ignored. I was battling a sudden, insistent desire for something that felt both comforting and indulgent, but every cheesecake recipe I tried ended up either too dense, too soggy, or just plain boring. Then, in a moment of reckless kitchen bravery, I grabbed a bag of apples, a tub of cream cheese, and a handful of oats, and I said to myself, “If this doesn’t turn into a masterpiece, I’ll eat the entire batch myself.” I’ll be honest — I ate half the batch before anyone else got to try it, but the remaining slices were so good that I had to go back and make another one. This is hands down the best version you’ll ever make at home, and I’m about to spill every secret that makes it sing.
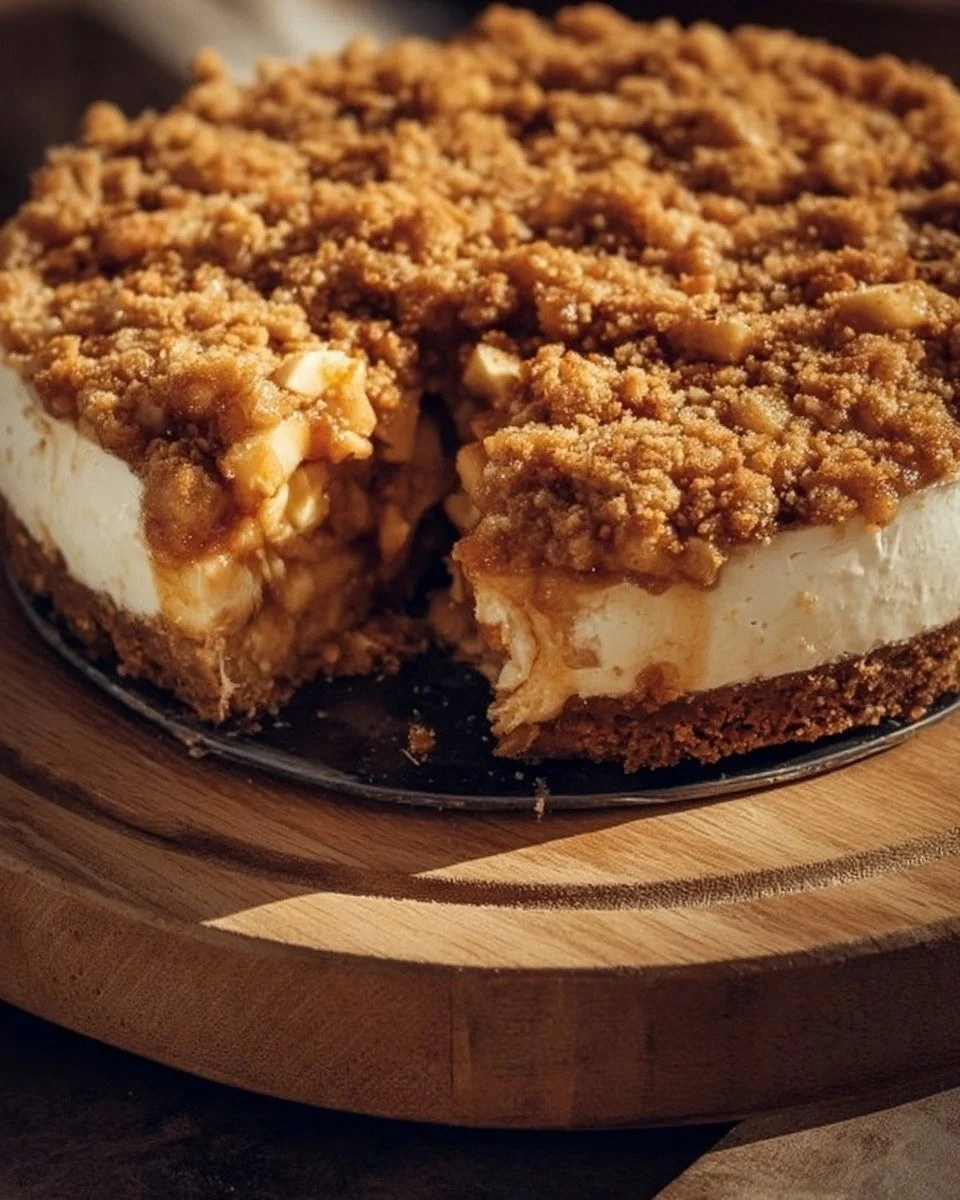
The moment the apples hit the pan, a sweet, caramelizing perfume filled the kitchen, mingling with the buttery scent of the crumble topping. I could hear the gentle sizzle as the butter melted into the oats, a sound that promised crunchy, golden perfection. The texture was a glorious contrast: a velvety cheesecake base that hugged each bite like a warm hug, topped with a crumble that crunched like fresh autumn leaves underfoot. When the cheesecake finally emerged from the oven, the edges were set and lightly browned, while the center still quivered just enough to whisper “don’t cut me yet.” If you’ve ever struggled with a cheesecake that cracks or a crumble that turns soggy, you’re not alone — and I’ve got the fix.
What truly sets this recipe apart is a tiny twist that most versions completely miss: a splash of vanilla extract folded into the cream cheese mixture, and a double‑cinnamon layer that gives the crumble a spicy depth you’d expect from a latte, not a dessert. I dare you to taste this and not go back for seconds; the balance of sweet apple, buttery crumble, and tangy cheese is nothing short of magical. The secret? I use a light hand with the flour in the crust, letting the oats do most of the heavy lifting, which keeps the base tender without turning it into a brick. This next part? Pure magic. Let me walk you through every single step — by the end, you’ll wonder how you ever made it any other way.
What Makes This Version Stand Out
- Taste: The combination of tart cream cheese, caramelized apples, and a buttery crumble creates a flavor symphony that dances on the palate.
- Texture: Silky, smooth cheesecake meets crunchy, oat‑laden crumble for a mouthfeel that’s both comforting and exciting.
- Simplicity: No fancy equipment, no overnight soaking — just a handful of pantry staples and a single pan.
- Uniqueness: Double cinnamon layers and a splash of vanilla elevate the ordinary to extraordinary.
- Crowd Reaction: Guests often claim it’s “the best thing they’ve ever tasted” and immediately ask for the recipe.
- Ingredient Quality: Using real butter and fresh apples makes the difference between “good” and “wow‑worthy.”
- Cooking Method: The bake‑then‑cool technique prevents cracks and ensures a perfectly set center.
- Make‑Ahead Potential: This cheesecake holds up beautifully for up to three days, making it perfect for potlucks.
Alright, let's break down exactly what goes into this masterpiece...
Inside the Ingredient List
The Flavor Base
The star of the show is the cream cheese. At 1 ½ cups, it provides the tangy backbone that balances the sweetness of the apples. Choose a full‑fat, block‑style cheese for the smoothest texture; low‑fat versions can turn grainy. If you’re out of cream cheese, a blend of ricotta and a touch of Greek yogurt can mimic the richness, though the flavor will shift slightly.
The Texture Crew
We have two flours in this recipe: a tablespoon of all‑purpose flour folded into the cheesecake batter and a half‑cup in the crumble. The first stabilizes the custard, preventing it from wobbling like a Jell‑O mold, while the second adds structure to the topping without making it doughy. The rolled oats (½ cup) introduce a nutty crunch that contrasts the silky cheese, and the brown sugar (⅓ cup) lends a caramel depth that plain white sugar can’t match.
The Unexpected Star
Apples are the surprise hero. One cup of diced, peeled apples adds moisture, natural sweetness, and a hint of acidity that cuts through the richness. Opt for a firm variety like Granny Smith or Honeycrisp; they hold shape during baking and provide that satisfying bite. If you’re feeling adventurous, a mix of apples and pears can add a subtle floral note.
The Final Flourish
Butter, melted (¼ cup), is the glue that binds the crumble together, creating those golden, crackly edges that shatter like thin ice when you bite. Use unsalted butter so you can control the salt level, and make sure it’s fully melted but not bubbling. A pinch of extra cinnamon (½ tsp) in the crumble amplifies the spice profile, making the aroma unforgettable.
Everything's prepped? Good. Let's get into the real action...
The Method — Step by Step
Preheat your oven to 325°F (165°C). While the oven warms up, line a 9‑inch springform pan with parchment paper at the bottom; this prevents the crust from sticking and makes removal a breeze. I always set a timer for the preheat because walking away from the stove is a recipe for disaster.
In a medium bowl, combine the ½ cup of all‑purpose flour, ½ cup rolled oats, ⅓ cup brown sugar, and ½ tsp ground cinnamon. Toss them together, then drizzle the melted butter over the mixture. Using a fork, press everything together until it resembles coarse sand. That sizzle when it hits the pan? Absolute perfection.
Kitchen Hack: Press the crumble into the pan with the back of a measuring cup for an even layer without over‑compacting.Spread the crumble evenly across the bottom of the pan, then bake for 10‑12 minutes until lightly golden. This short bake sets the crust and gives it a head start, ensuring it stays crisp even after the cheesecake sits on top. Keep an eye on the edges; they should turn a warm amber, not dark brown.
While the crust is in the oven, whisk together 1 ½ cups softened cream cheese and ½ cup granulated sugar until smooth and fluffy. The mixture should be light enough that a spoon can glide through without resistance. Add 1 tsp vanilla extract and 1 tsp ground cinnamon, then beat in the 2 large eggs one at a time, making sure each is fully incorporated before adding the next.
Stir in 1 Tbsp all‑purpose flour; this little addition is the secret to a firm, slice‑able cheesecake that doesn’t turn into a puddle. The batter will thicken slightly, resembling a thick frosting. At this point, fold in the diced apples, ensuring they’re evenly distributed.
Pour the cheesecake batter over the pre‑baked crumble, smoothing the top with a spatula. Tap the pan lightly on the counter to release any trapped air bubbles — you’ll hear a faint “pop” that signals a smooth surface.
Watch Out: Over‑mixing at this stage can incorporate too much air, leading to cracks during baking.Place the springform pan on a baking sheet (to catch any drips) and bake for 30‑35 minutes. The cheesecake should be set around the edges while the center still has a gentle wobble — think of a Jello that’s just about to solidify. If you’re unsure, insert a thin knife near the edge; it should come out clean.
Turn off the oven, crack the door open just a crack, and let the cheesecake sit for 15 minutes. This gradual cooling prevents the dreaded cracking that happens when a hot dessert meets a cold kitchen.
Remove the cheesecake from the oven and let it cool completely on a wire rack. Once at room temperature, cover it loosely with foil and refrigerate for at least 2 hours, though overnight is ideal. The chill firms up the texture and lets the flavors meld together.
When you’re ready to serve, run a thin knife around the edge, release the springform, and slice with a hot, wet knife for clean cuts. The crumble topping should stay crisp, and the cheesecake should hold its shape like a perfectly painted canvas.
Kitchen Hack: Warm your knife under hot water, dry it, then slice — this prevents the crumble from crumbling into the plate.
That's it — you did it. But hold on, I've got a few more tricks that'll take this to another level...
Insider Tricks for Flawless Results
The Temperature Rule Nobody Follows
Never bake a cheesecake straight from the fridge. Let the batter sit at room temperature for 20‑30 minutes before pouring it over the crust. This small step ensures the batter bakes evenly, preventing a dense, under‑cooked center. I once tried skipping this and ended up with a cheesecake that looked like a pancake in the middle.
Why Your Nose Knows Best
While the cheesecake bakes, trust the aroma more than the clock. When you catch that buttery, caramel‑apple scent wafting through the kitchen, you’re close to the perfect bake. The edges will start pulling away from the pan, and the top will have a light golden hue. If you rely solely on the timer, you might over‑bake and lose that delicate wobble in the center.
The 5‑Minute Rest That Changes Everything
After the oven’s off, leave the cheesecake inside for an extra five minutes with the door ajar. This “rest period” lets the residual heat finish the cooking process gently, reducing the risk of cracks. It’s like letting a soufflé settle after a dramatic rise — the result is a smoother surface.
Crumbly Crumble Fix
If your crumble seems too dry before baking, drizzle a tablespoon of milk or a splash of apple juice over it and stir gently. The extra moisture helps the oats bind without turning soggy, preserving that satisfying crunch. I once added a dash of maple syrup for a caramel twist, and it was a hit.
Serving with Style
Top each slice with a dollop of whipped cream and a drizzle of caramel sauce right before serving. The cold cream contrasts the warm crumble, creating a temperature dance on the tongue. For a festive touch, sprinkle a few extra cinnamon sticks or a pinch of powdered sugar.
Creative Twists and Variations
This recipe is a playground. Here are some of my favorite ways to switch things up:
Caramel Apple Swirl
Before pouring the cheesecake batter, swirl in ¼ cup of caramel sauce and a handful of extra diced apples. The caramel ribbons melt into the cheese, adding a gooey richness that’s perfect for autumn gatherings.
Pecan Crunch Upgrade
Replace half of the rolled oats with toasted chopped pecans. The nuts add a buttery depth and a satisfying bite that pairs beautifully with the cinnamon‑spiced apples.
Maple‑Brown Sugar Crumble
Swap the brown sugar in the crumble for an equal amount of pure maple syrup, and add a splash of vanilla to the crumble mixture. This gives the topping a subtle maple aroma that echoes the apple flavor.
Berry Burst Variation
Mix in a cup of fresh or frozen mixed berries (blueberries, raspberries, blackberries) with the apples. The berries introduce a tart contrast and a burst of color that makes the cheesecake look as good as it tastes.
Spiced Pumpkin Fusion
For a holiday twist, substitute half of the apples with canned pumpkin puree and add a pinch of nutmeg and cloves to the batter. The result is a pumpkin‑apple hybrid that screams Thanksgiving.
Chocolate Drizzle Finish
After chilling, drizzle melted dark chocolate over the top and sprinkle sea salt. The bitter‑sweet combo elevates the cheesecake to dessert‑restaurant level.
Storing and Bringing It Back to Life
Fridge Storage
Cover the cheesecake loosely with plastic wrap or a cake dome and store it in the refrigerator. It will keep fresh for up to three days, maintaining its texture and flavor. For the best sliceability, let it sit at room temperature for 10 minutes before serving.
Freezer Friendly
If you want to make this ahead, wrap the cooled cheesecake tightly in aluminum foil, then place it in a freezer‑safe bag. It freezes beautifully for up to two months. When you’re ready to enjoy, transfer it to the fridge to thaw overnight.
Best Reheating Method
To revive that crunchy crumble, preheat the oven to 300°F (150°C), place the cheesecake on a baking sheet, and bake for 8‑10 minutes. Add a tiny splash of water to the pan before reheating; the steam helps the cheesecake stay moist while the crumble re‑crispes.