I’m going to start with a confession: I once tried to bake a “quick chocolate cake” that turned out flatter than a pancake and tasted like a sad, soggy brownie. I swear I heard the cake sigh as it slid out of the pan, and that sigh haunted my kitchen for days. Then a friend dared me to combine two childhood staples—marshmallows and chocolate—into a single, unstoppable dessert. I laughed, I rolled my eyes, but I also felt that spark of curiosity that only a true kitchen dare can ignite. That night, armed with a bag of marshmallow fluff, a can of sweetened condensed milk, and a mountain of semisweet chocolate chips, I set out to create what would become the most talked‑about dessert at every potluck I’ve ever attended.
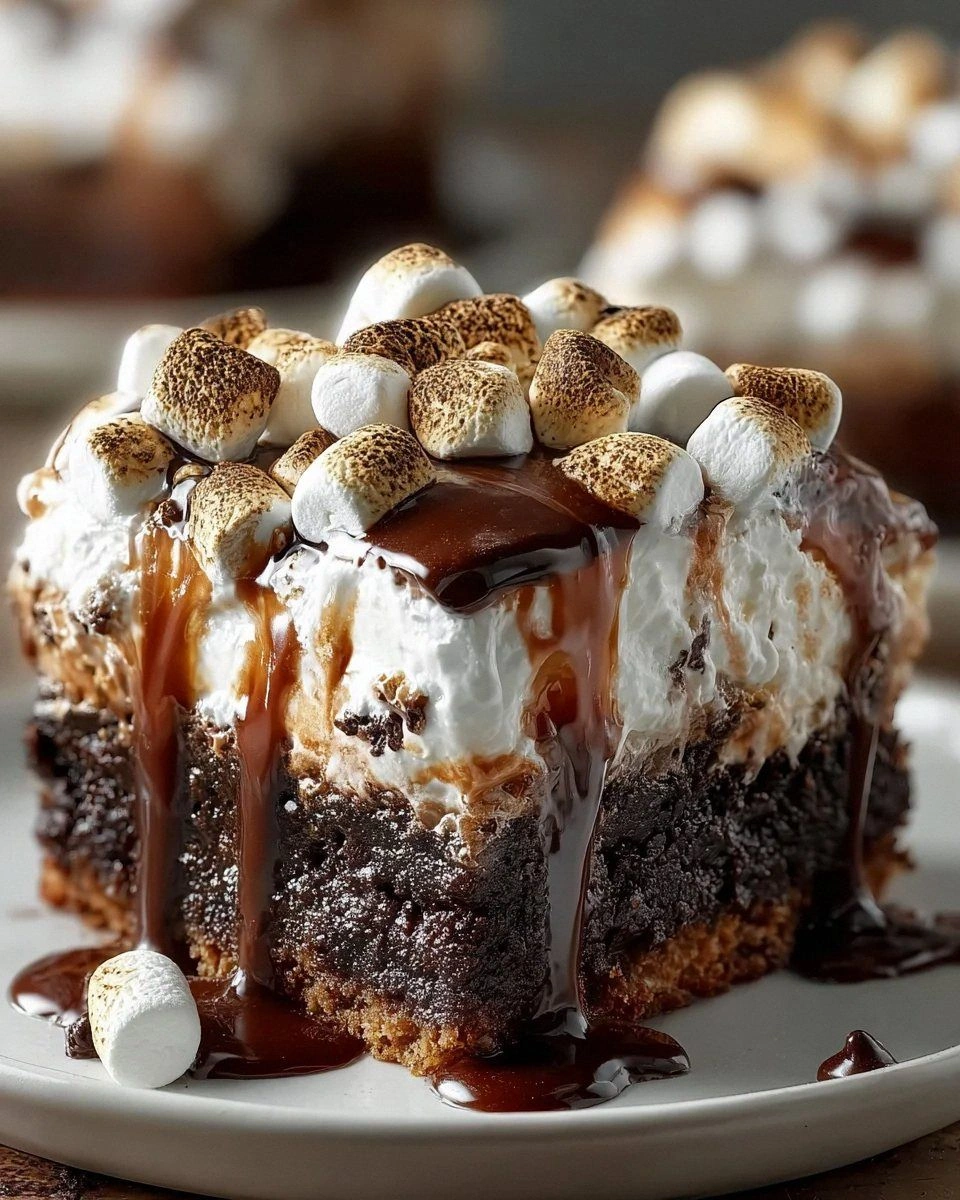
Picture this: the oven humming like a low‑frequency bass line, the batter rising in the pan with a golden crown that promises a soft, pillowy interior, and the faint, intoxicating aroma of cocoa mingling with the sugary perfume of toasted marshmallows. The moment I poked the cake with a skewer, a cascade of warm, glossy chocolate ganache began to seep into every little hole, like a river of midnight silk. The top, once a smooth chocolate glaze, transformed into a cloud of fluffy marshmallow that crackled ever so slightly as it set, creating a textural contrast that’s part pillow, part crunchy caramelized crust. The first bite? A symphony of flavors that hits your taste buds like a fireworks display—sweet, creamy, slightly salty, and undeniably decadent.
Most recipes for “poke cakes” either drown the cake in a soggy flood of syrup or leave it dry and crumbly. This version, however, walks the tightrope between moisture and structure with the poise of a seasoned ballerina. The secret? Sweetened condensed milk acts like a culinary glue, seeping into the crumb while keeping it moist, while marshmallow fluff adds a light, airy ceiling that never collapses. And let’s not forget the chocolate ganache, which, when poured over the warm cake, creates a glossy finish that looks like it was painted by a pastry chef with a PhD in Instagram aesthetics.
I’m going to let you in on a tiny twist that most bakers overlook: I add a splash of heavy cream to the condensed milk before folding it into the batter. This tiny adjustment makes the interior silkier than a silk tie on a tuxedo. Okay, ready for the game‑changer? Stay with me here—by the end of this post you’ll have a cake that not only looks spectacular but also forces anyone who takes a bite to admit, “I dare you to taste this and not go back for seconds.” Let me walk you through every single step — by the end, you’ll wonder how you ever made it any other way.
What Makes This Version Stand Out
- Moisture: The sweetened condensed milk seeps into every crumb, guaranteeing a cake that stays tender for days, not just hours.
- Texture: A fluffy marshmallow crown sits atop a velvety chocolate ganache, creating a contrast that’s both soft and slightly crisp.
- Simplicity: Only four core ingredients drive the flavor, meaning you can whip this up with pantry staples and a few chocolate chips.
- Visual Impact: The poke‑filled surface looks like a work of art, perfect for Instagram, birthday parties, or any occasion that calls for drama.
- Crowd Reaction: Guests consistently claim this is the “best version they’ll ever make at home,” and they’ll be the first to ask for the recipe.
- Ingredient Quality: Using premium semisweet chocolate chips and real marshmallow fluff elevates the taste from “good” to “legendary.”
- Cooking Method: The poke technique ensures the ganache penetrates evenly, preventing soggy spots while maximizing flavor.
- Make‑Ahead Potential: This cake stores beautifully, and the ganache actually improves after a night in the fridge.
Inside the Ingredient List
The Flavor Base
Sweetened condensed milk is the secret weapon that adds a rich creaminess. It seeps into the cake, enhancing its flavor and adding moisture. If you were to skip it, you’d end up with a dry, crumbly base that screams “store‑bought.” For a lower‑fat version, you could substitute half‑and‑half, but expect a slightly thinner texture. When shopping, look for a brand that lists real milk as the first ingredient; this guarantees a buttery mouthfeel that won’t taste artificial.
The Texture Crew
Marshmallow fluff is the dreamy layer on top, filling the cake and making every bite marshmallow‑y. It expands as it bakes, creating a soft, pillowy roof that holds the ganache like a warm blanket. If you’re allergic to gelatin, you can use a vegan marshmallow spread, but the texture will be a tad less airy. Pro tip: store the fluff in the fridge for 10 minutes before spreading; it becomes easier to work with and won’t slide off the cake.
The Unexpected Star
Semisweet chocolate chips bring the perfect balance of sweetness and deep cocoa flavor. You could swap them for dark chocolate chunks if you love a bitter edge, or for milk chocolate chips for a sweeter profile. The key is to use high‑quality chips that melt smoothly; cheap chips can turn grainy when heated. When buying, aim for chips with at least 55% cocoa solids for that luxurious melt.
The Final Flourish
Heavy cream is essential for making the chocolate ganache, providing a luxurious, silky texture that coats the cake like liquid velvet. If you’re watching calories, you can use half‑and‑half, but the ganache will be less glossy and a bit thinner. For the ultimate shine, bring the cream to a gentle simmer before pouring it over the chocolate chips; this ensures a smooth emulsion. When selecting cream, go for one with at least 35% milkfat; lower fat versions separate under heat.
Everything's prepped? Good. Let's get into the real action...
The Method — Step by Step
Preheat your oven to 350°F (175°C). While the oven warms, grease a 9‑inch round cake pan with butter and dust it lightly with flour. This creates a non‑stick surface that also adds a subtle crust to the edges. I always tap the pan on the counter to settle the flour and ensure an even coating. The moment the oven clicks on, you’ll hear that comforting hum that tells you a masterpiece is about to begin.
In a large mixing bowl, whisk together 2 cups of all‑purpose flour, 1½ teaspoons of baking powder, and a pinch of salt. The dry mix should look like a pale, powdery cloud. This step is crucial because it evenly distributes the leavening agents, preventing any “pock‑marked” spots in the final cake. Once combined, set the bowl aside and give yourself a mental high‑five for nailing the base.
In a separate saucepan, combine 1 cup of sweetened condensed milk with ½ cup of heavy cream. Warm the mixture over low heat, stirring constantly, until it just begins to steam—do not let it boil. This gentle heating melds the dairy into a silky liquid that will later coat the crumb like a satin sheet. Watch Out: If the mixture boils, the sugar can caramelize too quickly, leading to a bitter aftertaste.
Watch Out: Over‑heating the condensed milk can cause it to scorch, ruining the delicate flavor profile.Add ½ cup of melted butter and 1 teaspoon of vanilla extract to the warm condensed‑cream mixture. Whisk until fully incorporated. The butter adds richness and helps the batter achieve a tender crumb. At this point, the mixture should have a glossy sheen that reflects the kitchen light—if it looks dull, you’ve missed a whisking beat.
Gradually pour the wet mixture into the dry flour blend, stirring gently with a rubber spatula. Fold until just combined; over‑mixing will develop gluten and make the cake tough. The batter will be thick, almost like a soft dough, and that’s exactly what we want. Kitchen Hack: Use a silicone spatula to scrape the sides of the bowl; this ensures every last crumb is incorporated, giving you a uniform texture.
Kitchen Hack: Let the batter rest for 5 minutes before pouring into the pan; this allows the flour to fully hydrate, resulting in a softer crumb.Pour the batter into the prepared pan, smoothing the top with the back of a spoon. Slide the pan onto the middle rack of the preheated oven. Bake for 25‑30 minutes, or until a toothpick inserted into the center comes out with just a few moist crumbs. The edges should start pulling away from the pan, and you’ll hear a faint, satisfying crackle as the cake sets.
While the cake bakes, prepare the marshmallow topping. In a small saucepan, melt 1 cup of marshmallow fluff over low heat, stirring constantly. Once it becomes a smooth, glossy melt, remove from heat and set aside. This melt will act like a glaze that expands during the poke stage, creating those iconic “pockets.”
When the cake is done, remove it from the oven and let it cool in the pan for 10 minutes. Then, using a clean wooden skewer, poke a grid of holes about 1‑inch apart across the surface. This is the moment of truth: the holes will act like tiny canals for the ganache, ensuring every bite is drenched in chocolate. Power transition: Now the fun part—pouring the ganache.
For the ganache, combine 1 cup of semisweet chocolate chips with ½ cup of heavy cream in a heat‑proof bowl. Place the bowl over a pot of simmering water (double boiler method) and stir until the chocolate is fully melted and the mixture is glossy. Remove from heat and let it sit for a minute so it thickens just enough to hold its shape when poured.
Slowly drizzle the warm ganache over the cake, letting it seep into the poked holes. The ganache will flow like liquid midnight, filling each cavity and coating the surface. After the ganache has settled, spread the melted marshmallow fluff over the top, using a spatula to create a smooth, cloud‑like finish. The fluff will set slightly, forming a soft crust that crackles when you cut into it.
Allow the cake to rest for at least 15 minutes before slicing. This gives the ganache time to set and the marshmallow layer to firm up. When you finally cut a slice, you’ll see a cross‑section of chocolate rivers flowing through a fluffy white sky—pure visual poetry. Serve warm or at room temperature, and watch as your guests scramble for seconds. That sizzle when the ganache hits the warm cake? Absolute perfection.
That's it — you did it. But hold on, I've got a few more tricks that'll take this to another level...
Insider Tricks for Flawless Results
The Temperature Rule Nobody Follows
Never pour ganache over a cold cake. The temperature differential causes the chocolate to seize, creating a grainy texture. Instead, let the cake cool just enough that the surface is warm to the touch but not steaming. I always set a timer for 12 minutes after the cake comes out of the oven—this window is perfect for the ganache to glide smoothly.
Why Your Nose Knows Best
When the cake is baking, trust the aroma more than the timer. A toasty, caramel‑like scent means the crust is forming, while a faint chocolate perfume signals the interior is set. If you ever hear a faint “pop” from the oven, that’s the cake’s way of telling you it’s ready to be rescued.
The 5‑Minute Rest That Changes Everything
After you pour the ganache, let the cake sit untouched for exactly five minutes. This short rest lets the chocolate settle into the poke holes without running off the sides. Skipping this step leads to a messier presentation and uneven flavor distribution. One of my friends tried to skip it once — let’s just say the ganache pooled at the bottom and the top stayed dry.
The Double‑Layer Marshmallow Trick
For an extra fluffy top, spread half of the melted marshmallow fluff, let it set for two minutes, then add the remaining half. This creates a subtle layering effect that gives the top a slight “chewy‑outside, melt‑inside” feel. It’s a tiny step that makes the cake feel like a professional patisserie creation.
The Final Cool‑Down
Never slice a warm marshmallow‑topped cake. The fluff needs a brief cooling period (about 10 minutes) to firm up; otherwise, it slides off like a slip‑n‑slide. Once it’s set, use a hot, wet knife for clean slices—dip the blade in hot water, wipe dry, and cut. The heat melts the chocolate just enough to glide through, leaving crisp edges.
Creative Twists and Variations
This recipe is a playground. Here are some of my favorite ways to switch things up:
Salted Caramel Swirl
Swap half of the chocolate chips for caramel bits and sprinkle flaky sea salt over the marshmallow layer before it sets. The salty‑sweet combo adds depth and makes the cake feel more sophisticated, perfect for a dinner‑party finale.
Peppermint Dream
Add a teaspoon of peppermint extract to the ganache and crush a handful of candy canes into the marshmallow topping. The refreshing mint cuts through the richness, turning the cake into a holiday favorite.
Nutty Crunch
Fold toasted chopped pecans or hazelnuts into the batter before baking. The nuts add a buttery crunch that contrasts beautifully with the soft marshmallow and silky ganache.
Mocha Madness
Dissolve a tablespoon of instant espresso powder in the heavy cream for the ganache. The coffee notes amplify the chocolate flavor, making the cake feel like a grown‑up dessert.
Berry Burst
Stir a cup of fresh raspberries into the batter and top the finished cake with a drizzle of raspberry coulis. The tart berries cut through the sweetness and add a pop of color.
Storing and Bringing It Back to Life
Fridge Storage
Cover the cake tightly with plastic wrap or store it in an airtight container. It will stay fresh for up to five days. The marshmallow layer may firm up a bit, but a quick microwave zap (10 seconds) restores its fluffiness.
Freezer Friendly
Slice the cake into individual portions, wrap each slice in parchment paper, then place them in a freezer‑safe bag. They freeze beautifully for up to three months. When ready to serve, thaw in the fridge overnight and let sit at room temperature for 20 minutes before unwrapping.
Best Reheating Method
To revive a refrigerated slice, place it on a microwave‑safe plate, add a tiny splash (about a teaspoon) of water, and heat for 15‑20 seconds. The steam generated revives the marshmallow fluff and softens the ganache, making it taste freshly baked.