I still remember the Great Holiday Baking Disaster of 2019. There I was, standing in my kitchen at 11:30 PM on December 23rd, surrounded by what looked like a crime scene made of melted chocolate and crushed candy canes. My attempt at some Pinterest-perfect peppermint dessert had turned into a sticky, crystallized mess that wouldn't even release from the parchment paper. I was ready to throw in the towel and buy store-bought cookies for the family gathering. But then, in a moment of desperation, I grabbed a package of Oreos from the pantry and thought, "What if I just... simplified?"
What happened next was nothing short of Christmas magic. Those humble sandwich cookies, when blitzed with cream cheese and kissed with peppermint, transformed into the most addictive little bites I'd ever tasted. The first batch never made it to the family party because my husband and I stood at the counter, popping them like potato chips, making those involuntary "mmm" sounds that only happen when something is truly spectacular. I dare you to taste this and not go back for seconds — actually, I dare you to stop at just one.
Since that fateful night, these Peppermint Oreo Truffles have become my signature holiday treat. Friends start asking about them in October. Coworkers drop hints like, "So, are you making those... you know... those amazing things again this year?" Even my chocolate-hating nephew scarfs them down. This is hands down the best version you'll ever make at home, and I've tested dozens of variations to prove it. The secret lies in balancing the chocolate richness with just enough mint to make your taste buds dance without feeling like you swallowed toothpaste.
Picture yourself pulling these out of the refrigerator, the glossy chocolate coating catching the light like tiny edible ornaments. The whole kitchen smells like a winter wonderland — chocolate, mint, and sweet nostalgia all wrapped up in one perfect bite. Stay with me here — this is worth it. Let me walk you through every single step — by the end, you'll wonder how you ever made it any other way.
What Makes This Version Stand Out
Perfect Balance: The magic ratio of chocolate to peppermint means you get that cool, refreshing sensation without feeling like you just brushed your teeth. Most recipes get this completely wrong, dumping in way too much extract and ending up with something that tastes like liquid candy cane. We use just enough to make the chocolate sing.
No-Bake Winner: Your oven gets to sit this one out, which means your kitchen stays cool and your energy bill stays reasonable. During the holidays when your oven is working overtime on turkey and cookies, this recipe is a welcome relief that still produces show-stopping results.
Make-Ahead Marvel: These little gems actually improve after a day or two in the fridge, making them perfect for holiday prep. I'll be honest — I ate half the batch before anyone else got to try it, and the ones that survived were even better the next day.
Kid-Friendly Fun: Rolling these into balls is like edible Play-Doh time. The kids can smash the Oreos, roll the centers, and drizzle the chocolate. Yes, it gets messy, but that's half the fun. Just prepare yourself for the inevitable "quality control" sampling that happens with each batch.
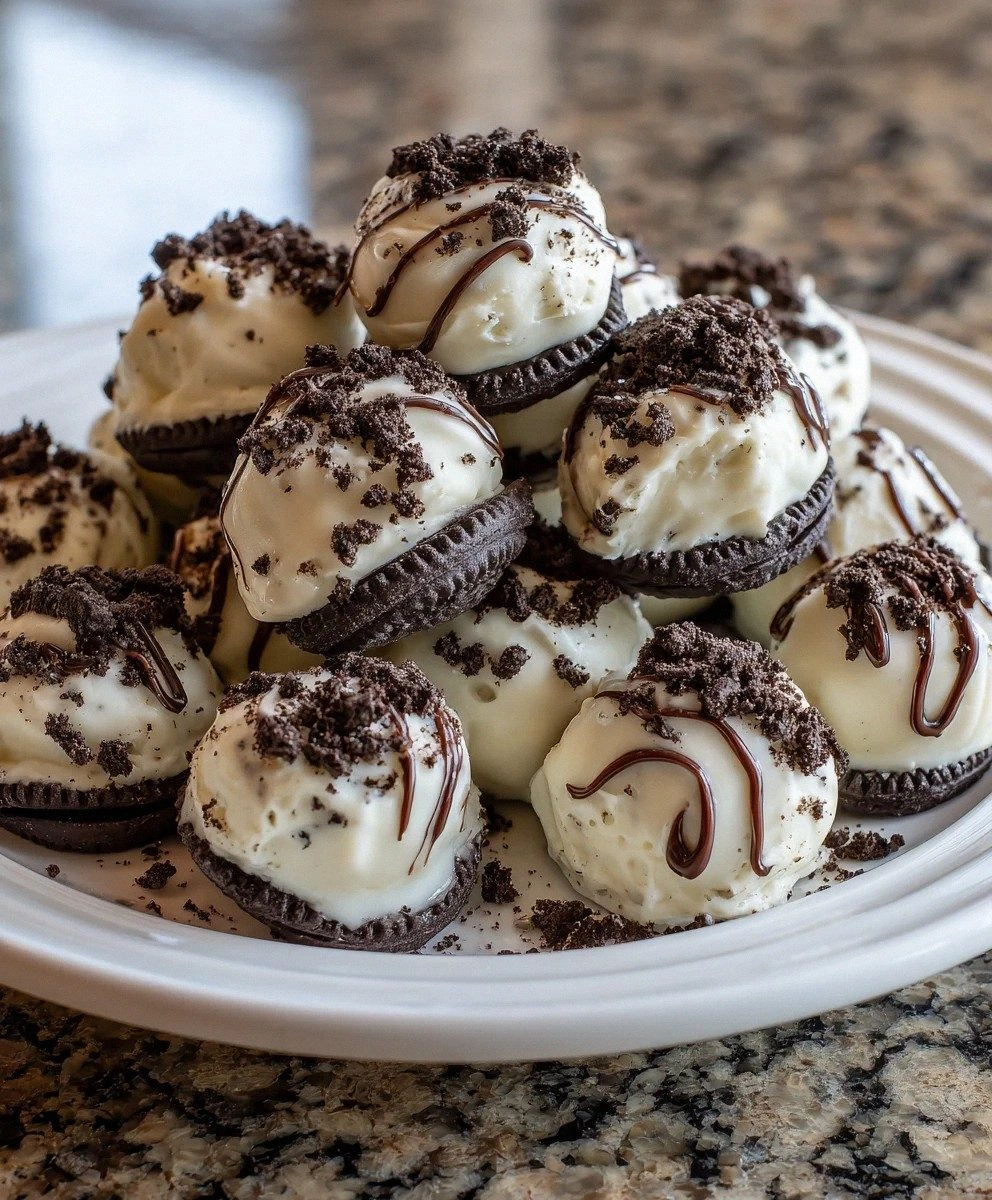
Texture Paradise: The contrast between the crunchy cookie crumbs in the creamy center and the solid chocolate shell creates a three-texture experience that most recipes miss entirely. That first bite gives you snap, then smooth, then the satisfying chew of the cookie pieces.
Gift-Giving Gold: Packaged in a pretty tin with some parchment paper and ribbon, these look like they came from an upscale chocolatier. Your recipients will think you spent hours tempering chocolate and using fancy equipment when really, the hardest part was waiting for the chocolate to set.
Inside the Ingredient List
The Flavor Base
Oreo cookies aren't just cookies — they're engineered flavor bombs with the perfect chocolate-to-cream ratio and just enough salt to make the chocolate pop. When you blitz them into fine crumbs, you're creating a chocolate base that's more complex than plain cocoa powder could ever be. The cream filling adds sweetness and acts as a built-in binder, which means we need less added sugar. If you've ever struggled with dessert recipes that taste flat or one-dimensional, the solution has been sitting in your cookie aisle all along.
The Texture Crew
Full-fat cream cheese brings luxurious richness that low-fat versions simply can't match. It's like the difference between whole milk and skim — technically similar, but one creates a decadent experience while the other leaves you wanting. The fat content helps carry the peppermint flavor throughout the truffle, ensuring every bite has that cool, refreshing note. Room temperature cream cheese blends seamlessly with the cookie crumbs, creating a dough that rolls smoothly without cracking. Skimp on the fat content and you'll end up with a crumbly mess that refuses to cooperate.
The Unexpected Star
Espresso powder is our secret weapon — it doesn't make these taste like coffee, but it amplifies the chocolate flavor in ways that'll make you wonder why every chocolate dessert doesn't include it. The bitter compounds in coffee bind with the bitter compounds in chocolate, creating a more complex, sophisticated flavor profile. It's like turning up the volume on your favorite song — same song, just richer and more satisfying. Just a pinch makes the difference between "these are good" and "I need the recipe right now."
The Final Flourish
High-quality semi-sweet chocolate for coating isn't just about being fancy — it's about chemistry. Cheap chocolate contains more fillers and stabilizers that prevent it from melting smoothly, leaving you with a dull, streaky finish that cracks when you bite into it. Good chocolate melts into a glossy pool that sets with a professional-looking shine and that satisfying snap when you bite through it. The coconut oil addition helps thin the chocolate slightly, making it easier to coat evenly and giving you that thin, crisp shell that shatters like thin ice when you bite through it.
The Method — Step by Step
- Start by pulsing your Oreos into fine crumbs using a food processor. If you don't have one, place them in a zip-top bag and go to town with a rolling pin — it's therapeutic and works just as well, though your arms might hate you tomorrow. You want the texture of coarse sand, with no large pieces remaining. Those bigger chunks will create weak spots in your truffles where they'll fall apart when you try to coat them in chocolate later. The whole process should take about 30 seconds in a processor or 3-4 minutes of aggressive smashing.
- Add the room temperature cream cheese to your cookie crumbs in a large bowl. Okay, ready for the game-changer? Use your hands for this part. I know, I know — it feels weird at first, but your hands are the best tools for feeling when the mixture is perfectly combined. Squish and squeeze until you have a uniform dough that looks like chocolate play-doh. There should be no streaks of white cream cheese remaining, and when you press the mixture together, it should hold its shape without crumbling. If it's too dry, add a teaspoon of cream cheese; too wet, add more cookie crumbs.
- Now comes the flavor moment — add your peppermint extract and espresso powder. Start with less peppermint than you think you need; you can always add more, but you can't take it away. Mix these in thoroughly, then take a tiny taste. The mixture should taste like Thin Mints' sophisticated older cousin — minty but not overwhelming, with depth from the coffee. If you can't taste the mint, add another drop or two and mix again. Remember, the flavor will intensify slightly as the truffles chill, so stop just before it tastes perfect.
- Time to roll! Scoop out heaping tablespoons of the mixture and roll between your palms into balls. They should be about the size of a ping-pong ball — any larger and they're awkward to eat, any smaller and you're making truffle-popcorn. If the mixture starts sticking to your hands, wash them with cold water and dry thoroughly. The cold helps prevent sticking, and clean hands make prettier truffles. Place them on a parchment-lined baking sheet as you go.
- Chill your rolled truffles for at least 30 minutes in the refrigerator. This step isn't optional — it's what transforms them from squishy blobs into firm, coatable centers. During this time, the cream cheese firms up, the flavors meld together, and you'll find yourself opening the fridge door every ten minutes to peek at them like they're some kind of chocolatey baby birds. If you're in a hurry, 15 minutes in the freezer works, but the texture won't be quite as perfect.
- While the truffles chill, set up your chocolate coating station. Chop your semi-sweet chocolate into small, uniform pieces — they should be roughly the size of chocolate chips. This ensures they melt evenly without burning. Set up a double boiler (a heatproof bowl over barely simmering water) or use the microwave in 20-second bursts. Add the coconut oil when the chocolate is about 75% melted — it helps everything come together smoothly and gives you that professional shine.
That's it — you did it. But hold on, I've got a few more tricks that'll take this to another level...
Insider Tricks for Flawless Results
The Temperature Rule Nobody Follows
Room temperature isn't just about the cream cheese — everything works better when it's not fighting temperature shock. Your chocolate should be warm, not hot. Your truffles should be cold, not frozen. Your kitchen should be cool enough that the chocolate sets but not so cold that it seizes instantly. I keep my kitchen around 68°F when I'm making these, which seems to be the sweet spot. A friend tried making these during a heat wave and ended up with chocolate that wouldn't set and truffles that melted into puddles. Learn from her mistake and check your thermostat before you start.
Why Your Nose Knows Best
When you're adding peppermint extract, trust your sense of smell before your taste buds. Hold the bottle about 6 inches above your mixing bowl and add it while stirring. The aroma should hit you immediately — if it's overwhelming from that distance, you've added too much. The perfect amount creates a gentle minty cloud that makes you want to breathe deeper, not one that makes your eyes water. This method has saved me from peppermint disasters more times than I can count, especially when using different brands of extract that vary in strength.
The 5-Minute Rest That Changes Everything
After you mix your truffle base, walk away for five minutes before rolling. This brief rest allows the cookie crumbs to fully hydrate from the cream cheese, creating a more cohesive mixture that's easier to roll and less likely to crack. It also lets the espresso powder dissolve completely, so you don't get bitter pockets of coffee flavor. Use this time to wash your hands, clear your workspace, and maybe sneak a spoonful of the mixture (chef's privilege, obviously). When you come back, the dough will have transformed from slightly crumbly to perfectly pliable.
The Chocolate Coating Secret
Here's what separates amateur truffles from professional ones: the thickness of your chocolate coating. Too thick and they're clunky and overly rich. Too thin and they crack when you bite into them. The perfect coating should be just thick enough to provide a satisfying snap but thin enough that you taste the truffle center immediately. The trick is in the temperature — your chocolate should coat the back of a spoon in a thin, even layer. If it's thick like pudding, it's too cool. If it runs off like water, it's too hot. That sizzle when it hits the pan? Absolute perfection.
Storage That Actually Works
Most people store these in the fridge, which dries them out and makes the chocolate bloom into an unappetizing white film. Instead, keep them in an airtight container at cool room temperature for up to a week. The chocolate stays glossy, the centers remain creamy, and you don't have to wait for them to come to temperature before serving. If your kitchen runs warm, store them in the coolest room of your house. My grandmother used to keep hers in the basement pantry where it stayed a perfect 60°F year-round — smart woman, my Nana.
Creative Twists and Variations
This recipe is a playground. Here are some of my favorite ways to switch things up:
The Double Chocolate Dream
Swap out regular Oreos for the chocolate-filled ones and use white chocolate for coating. The result is a triple-threat chocolate experience that's visually stunning with the white coating and dark cookie specks. Add a tiny bit of orange zest to the white chocolate for a sophisticated flavor twist that makes grown-ups swoop in for seconds.
The Winter Wonderland
Stick with the original recipe but roll the finished truffles in powdered sugar instead of the white chocolate drizzle. They look like tiny snowballs and the powdered sugar gives them a soft, elegant finish that melts on your fingers. Package these in a clear bag with silver ribbon for a gift that looks like it came from a high-end boutique.
The Mint Explosion
Add crushed candy canes to the truffle mixture itself, not just on top. The crunchy bits create little peppermint pockets that burst when you bite into them. If you really want to go wild, use mint Oreos as your base and add a drop of green food coloring to make Grinch-themed truffles that'll disappear faster than you can say "bah humbug."
The Peanut Butter Cup Mashup
Replace half the cream cheese with peanut butter for a chocolate-mint-peanut butter situation that shouldn't work but absolutely does. The peanut butter adds richness and a savory note that prevents the sweetness from becoming overwhelming. Kids go crazy for these, and adults pretend they don't like them while secretly eating half the batch.
The Boozy Holiday Version
Add a tablespoon of peppermint schnapps or white crème de menthe to the mixture. The alcohol prevents these from freezing solid, so they stay creamy even straight from the freezer. Just don't serve these to the kids — unless you want them taking an unexpected nap under the Christmas tree. They're perfect for adult holiday parties where you want something a little more sophisticated than another peppermint martini.
The Salty Sweet Obsession
Roll your finished truffles in crushed pretzels instead of candy canes. The salt enhances both the chocolate and mint flavors while adding a crunchy texture that contrasts beautifully with the smooth centers. These disappear faster than the original version, if you can believe it.
Storing and Bringing It Back to Life
Fridge Storage
While I generally avoid refrigeration, if you must store these in the fridge, wrap them in wax paper first, then place in an airtight container. The wax paper prevents condensation from forming on the chocolate surface, which causes that dreaded bloom. Let them come to room temperature for 30 minutes before serving — cold truffles taste dull and flat, but room temperature ones bloom into their full flavor potential. If they develop any condensation as they warm, gently blot with a paper towel.
Freezer Friendly
These freeze beautifully for up to three months, making them perfect for holiday prep. Flash freeze them first on a baking sheet for an hour, then transfer to a freezer bag with parchment paper between layers. This prevents them from sticking together into one giant truffle blob. When you're ready to serve, let them thaw in the refrigerator overnight, then bring to room temperature. The texture stays perfect, and you have instant holiday treats ready for unexpected guests or last-minute parties.
Best Serving Method
These are best served at room temperature with coffee or hot cocoa. The slight warmth of the drink brings out the peppermint notes while keeping the chocolate coating firm. For parties, arrange them in mini cupcake liners on a tiered stand — they look like tiny jewels and guests can grab them without touching the others. Add a tiny sprinkle of edible glitter for holiday sparkle that makes them Instagram-worthy. If you've ever struggled with desserts that look better than they taste, you're not alone — and I've got the fix right here.