Picture this: I’m standing in my cramped kitchen, the clock ticking toward dinner, and the last batch of chicken I’ve been saving for a week suddenly goes cold on the counter. My friend, ever the culinary daredevil, throws down a challenge: “Make the most unforgettable one‑pan chicken in under 45 minutes.” I’m skeptical, but the temptation of a quick, mouth‑watering meal pulls me into a culinary experiment that turns out to be a revelation. I’ve stumbled across a version of a classic that turns the humble chicken breast into a glossy, caramelized masterpiece, and I’m about to spill every secret.
The first thing you notice is the aroma—a sweet, slightly acidic perfume that rises from the pan like a promise. The balsamic vinegar, honey, and a splash of Dijon mustard mingle, creating a sauce that’s as silky as velvet and as sharp as a freshly cut blade. The garlic and Italian seasoning stir together, their earthy tones grounding the bright acidity. As the chicken cooks, the edges crisp to a golden brown that crackles when you press them, a sound that almost feels like applause for the flavor that’s about to unfold.
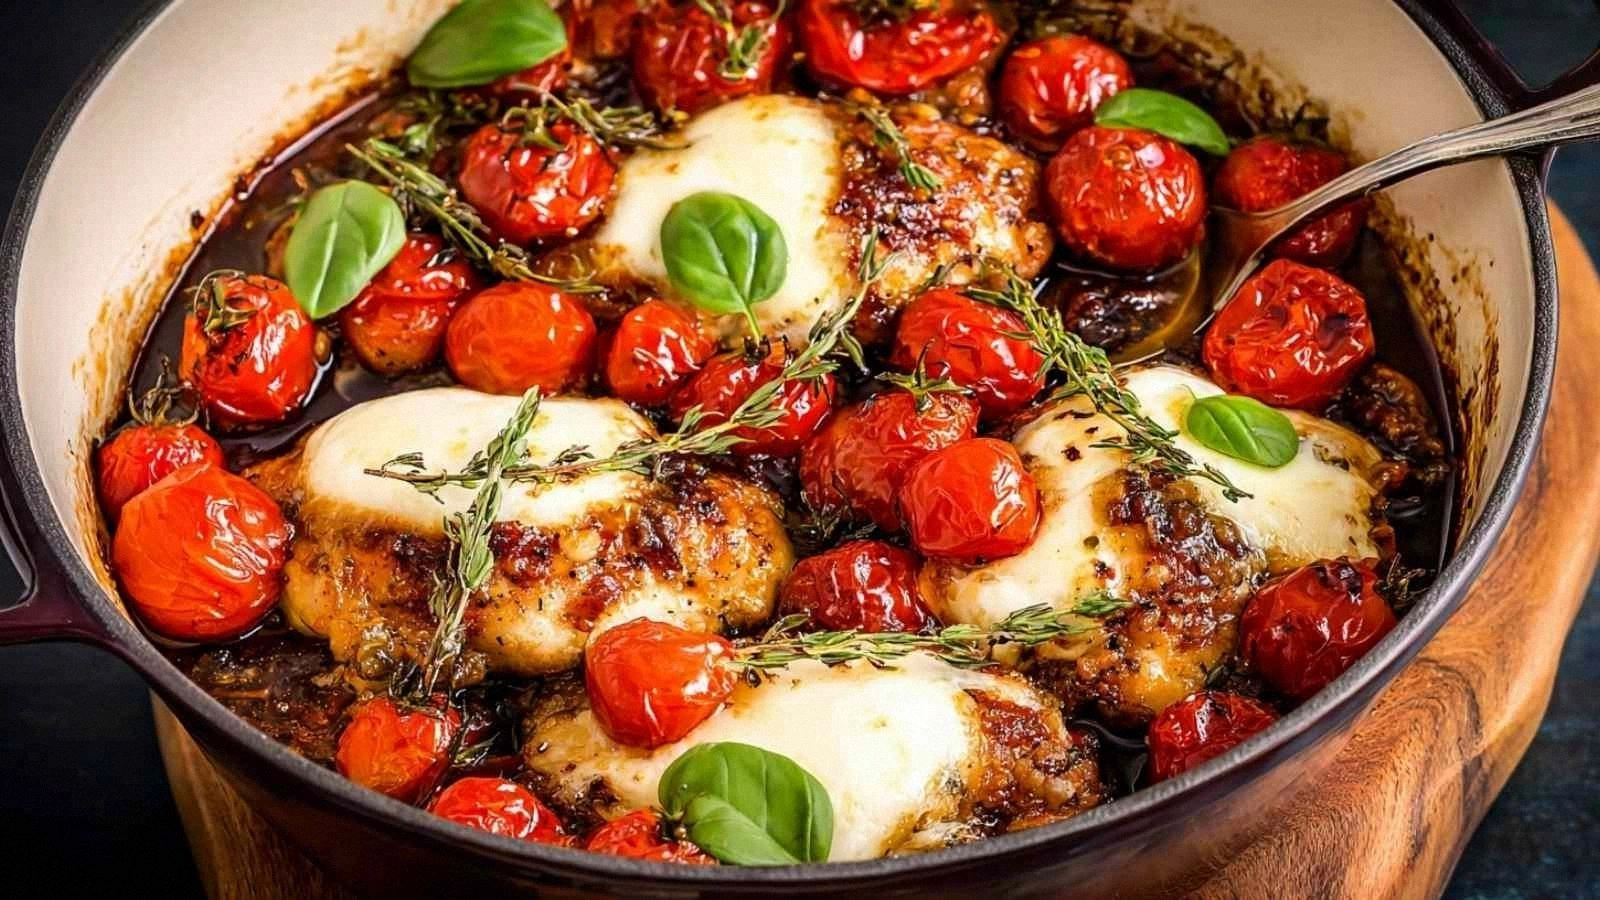
Why does this version stand out? It’s not just the ingredients; it’s the technique. I’ve discovered that searing the chicken first locks in juices, and then adding the glaze at the right moment turns the sauce into a glossy, caramelized coating that clings to every bite. The fresh mozzarella melts into pockets of gooey delight that contrast with the crisp tomatoes, creating a texture profile that feels like a well‑balanced conversation—each bite a different voice, yet all harmonizing. I dare you to taste this and not go back for seconds. Trust me, the first bite will have you craving the second before you even realize you’ve already had one.
Most recipes get this completely wrong. They either undercook the chicken, over‑season the sauce, or forget the crucial step of letting the glaze reduce to a perfect thickness. The result is a soggy mess or a bland plate that feels like a missed opportunity. Here, I’ve cracked the code: the balance of sweet, savory, and tang is achieved by layering flavors in a precise order, allowing each to bloom without drowning the others. And the best part? It’s so simple you can make it in a single pan, which means less cleanup and more time to enjoy the meal.
Picture yourself pulling this dish out of the oven, the whole kitchen smelling incredible, the steam rising like a gentle cloud of savory perfume. Your friends will be staring, mouths slightly open, as the golden crust shatters like thin ice, revealing a juicy interior that’s practically melting in your mouth. That moment—when the first forkful hits your tongue and the flavors explode—will have you saying, “This is hands down the best version you’ll ever make at home.” Let me walk you through every single step—by the end, you’ll wonder how you ever made it any other way.
What Makes This Version Stand Out
- Flavor: The marriage of balsamic vinegar and honey creates a glaze that’s both sweet and tangy, giving the chicken a glossy sheen that’s impossible to resist.
- Texture: The searing technique locks in juices, while the caramelized glaze crisps the edges into a delightful crunch that contrasts with the soft interior.
- Simplicity: One pan, one pot, one pot of sauce—no extra dishes to wash, no complicated steps, just pure, honest cooking.
- Uniqueness: The addition of fresh mozzarella and grape tomatoes adds layers of flavor and color, turning a plain chicken dish into a vibrant centerpiece.
- Crowd Reaction: Friends rave about the sauce’s depth, and the dish is a hit at gatherings because it’s both approachable and gourmet.
- Ingredient Quality: Using high‑quality balsamic vinegar and fresh mozzarella elevates the dish, making every bite feel like a luxury.
- Cooking Method: The two‑step sear and glaze method ensures that the chicken remains juicy while the sauce thickens into a silky coating.
- Make‑Ahead Potential: The dish can be prepared ahead of time, refrigerated, and reheated without losing its flavor or texture.
Alright, let’s break down exactly what goes into this masterpiece…
Inside the Ingredient List
The Flavor Base
Balsamic vinegar is the star that gives this dish its signature tang. The 1/3 cup of high‑quality vinegar should be a dark, aged variety; the deeper the color, the richer the flavor. If you can’t find balsamic, a mixture of red wine vinegar and a splash of honey can mimic the balance, but the authentic taste comes from a true aged balsamic. Don’t skip the honey—its natural sweetness cuts through the acidity and creates a glossy glaze. A tablespoon of Dijon mustard adds a subtle piquancy that prevents the sauce from feeling flat. If you’re allergic to mustard, a teaspoon of yellow mustard works fine, though it will be slightly milder.
The Texture Crew
Olive oil and vegetable oil are both used to create a layered oil base that helps the chicken sear evenly. The 2 tablespoons of olive oil are used for the initial sear, while the 2 tablespoons of vegetable oil are reserved for the final glaze. The olive oil’s fruity undertones add depth, whereas the neutral vegetable oil allows the glaze’s flavors to shine without interference. Fresh mozzarella is the unexpected star that melts into pockets of creamy, gooey delight. If you prefer a sharper cheese, try a small amount of provolone, but the mozzarella’s mildness balances the tangy glaze beautifully. The 2 cups of grape tomatoes provide bursts of sweet acidity that contrast with the savory chicken; if you’re out of tomatoes, cherry tomatoes work just as well.
The Unexpected Star
Fresh basil is the final flourish that lifts the dish. A tablespoon of finely chopped basil added at the end of cooking brings a bright, herbal note that cuts through the richness of the glaze. If you can’t find fresh basil, dried basil can be used, but use only half the amount, as the flavor is more concentrated. The 4 cloves of garlic are minced finely to release their aroma without overwhelming the dish; you can substitute garlic powder if you prefer a smoother texture, but the fresh cloves give a subtle bite that enhances the overall profile.
The Final Flourish
Seasoning is the quiet hero that ties everything together. Italian seasoning, onion powder, and garlic powder are combined to create a balanced, savory backdrop. Sea salt and black pepper are added to taste at the end, ensuring that each bite has the right level of seasoning. If you’re watching sodium, use a low‑sodium Italian seasoning blend. The 2 lb chicken breasts should be pounded to an even thickness to ensure uniform cooking; if you don’t have a meat mallet, a rolling pin works just fine. Remember, the chicken is the canvas—don’t rush the seasoning; let it soak for at least 10 minutes before searing.
Everything’s prepped? Good. Let’s get into the real action…
The Method — Step by Step
- Preheat the oven to 400°F (200°C). While the oven warms, pat the chicken breasts dry with paper towels to ensure a crisp sear. Season both sides generously with sea salt, black pepper, and a pinch of Italian seasoning. This step is crucial because it forms the first flavor layer that will carry the glaze.
- Heat a large oven‑proof skillet over medium‑high heat. Add the 2 tablespoons of olive oil and swirl to coat. When the oil shimmers but isn’t smoking, place the chicken breasts skin‑side down (if they have skin). Let them sear undisturbed for 3–4 minutes until a golden crust forms. Flip and sear the other side for an additional 3 minutes. The goal is a caramelized surface; the chicken should not be fully cooked at this point.
- Remove the chicken from the skillet and set aside. In the same pan, add the minced garlic and sauté for 30 seconds until fragrant. This quick sauté releases the garlic’s oils without burning it, giving the sauce a smooth base. Add the 2 tablespoons of vegetable oil and let it heat for another 10 seconds.
- Introduce the glaze. Stir in the balsamic vinegar, honey, Dijon mustard, onion powder, and garlic powder. The mixture should bubble gently—this is the moment of truth. Reduce the heat to medium and let it simmer for 4–5 minutes, stirring occasionally, until the liquid thickens and coats the back of a spoon. The glaze should be glossy, not syrupy.
- Return the chicken to the pan. Nestle the seared breasts back into the glaze, spooning some sauce over each piece. Add the grape tomatoes around the chicken; their skins should blister slightly as the sauce cooks. Sprinkle the fresh mozzarella over the top so it starts to melt into the sauce.
- Transfer the skillet to the preheated oven. Bake for 15 minutes, or until the chicken reaches an internal temperature of 165°F (74°C) and the mozzarella is melted and bubbly. The tomatoes should be soft, and the glaze should have a glossy sheen that coats the chicken.
- Finish with basil. Remove the skillet from the oven and sprinkle the fresh basil over the top. Let the dish rest for 3 minutes; this allows the flavors to meld and the sauce to thicken slightly.
- Serve immediately. Plate the chicken with a generous spoonful of the caramelized glaze and a few whole tomatoes. Garnish with an extra basil leaf for color. The dish is now ready to impress.
That’s it— you did it. But hold on, I’ve got a few more tricks that’ll take this to another level…
Insider Tricks for Flawless Results
The Temperature Rule Nobody Follows
Many cooks set the oven to 375°F, but 400°F gives the chicken a better sear and a crispier crust. The higher temperature also helps the glaze caramelize faster, creating that glossy coating that’s a hallmark of this dish. I once baked at 375°F and the sauce stayed too runny; the chicken ended up a bit soggy. The 400°F temperature ensures that every bite is a perfect bite of crisp and juicy.
Why Your Nose Knows Best
The first hint that the glaze is ready comes from your nose—once the balsamic and honey begin to caramelize, a sweet, smoky aroma will fill the kitchen. Don’t rely solely on the visual cue of bubbling; the scent is a more reliable indicator of depth. I’ve found that when the aroma is strong, the sauce is at its peak flavor, and the chicken will finish with a perfect balance of sweetness and acidity.
The 5‑Minute Rest That Changes Everything
After removing the skillet from the oven, let the dish rest for exactly five minutes. This brief pause allows the juices to redistribute, ensuring that every bite of chicken is juicy. It also lets the glaze thicken slightly, making it easier to spoon over the chicken when you serve. I once skipped the rest and the sauce was too thin, which made the chicken feel a bit dry.
Use Fresh Garlic Over Powder
Fresh garlic adds a bright, sharp bite that powder can’t replicate. Mince the garlic finely so it releases its oils without creating large clumps. If you’re short on time, a teaspoon of garlic powder works, but the flavor will be milder and less complex. The fresh garlic is what gives the dish that authentic, home‑cooked feel.
Keep the Chicken Flat
Pounding the chicken to an even thickness ensures that it cooks uniformly. If one side is thicker, it will overcook while the other side remains underdone. Use a meat mallet or a rolling pin to flatten the breasts to about 1 inch thick. This step may seem minor, but it’s the difference between a perfectly cooked chicken and a patchwork of textures.
Serve With a Simple Side
Pair this dish with a light, crisp salad or a handful of roasted asparagus. The acidity of the tomatoes and the sweetness of the glaze complement a fresh green salad, while the roasted asparagus adds a subtle crunch. The key is to keep the side simple so that the chicken remains the star.
Creative Twists and Variations
This recipe is a playground. Here are some of my favorite ways to switch things up:
Smoky Chipotle Variation
Add a teaspoon of chipotle powder to the glaze for a smoky kick that pairs beautifully with the sweet balsamic. The heat will contrast the creamy mozzarella, creating a flavor profile that’s both comforting and adventurous.
Herb‑Infused Chicken
Swap the basil for a handful of fresh thyme or rosemary. The earthy herbs give the dish a Mediterranean vibe, while the fresh thyme’s subtle minty notes complement the balsamic’s acidity.
Cheese‑Stormed Version
Instead of mozzarella, try a mix of provolone and fontina. The combination of sharp and mild cheeses adds depth and a gooey texture that’s irresistible.
Vegan Take‑Away
Replace the chicken with thick slices of tofu, marinated in the same glaze. The tofu will absorb the flavors and become a hearty, plant‑based main that still delivers that glossy, caramelized coating.
Spicy Tomato Explosion
Add a handful of diced jalapeños to the tomatoes for a spicy burst. The heat will cut through the richness of the mozzarella and the sweetness of the glaze, creating a balanced, flavorful dish.
Glazed Chicken with Pesto
Finish the dish with a spoonful of basil pesto on top. The pesto’s nutty flavor adds a new dimension, while the basil’s freshness ties back to the original recipe’s theme.
Storing and Bringing It Back to Life
Fridge Storage
Cool the dish completely before transferring it to an airtight container. Store in the refrigerator for up to 3 days. When ready to eat, reheat in a preheated oven at 350°F for 10 minutes, or until warmed through. The glaze will remain glossy, and the mozzarella will still be melty.
Freezer Friendly
Wrap the dish tightly in foil or plastic wrap and place it in a freezer‑safe bag. It will stay good for up to 2 months. Thaw overnight in the refrigerator before reheating. For best results, add a splash of water before reheating to keep the chicken from drying out.
Best Reheating Method
The oven is the gold standard for reheating. Preheat to 350°F, place the dish in a shallow baking dish, and cover loosely with foil to retain moisture. Warm for 10–12 minutes, then remove the foil to allow the glaze to thicken slightly. This method preserves the texture and flavor better than microwaving.