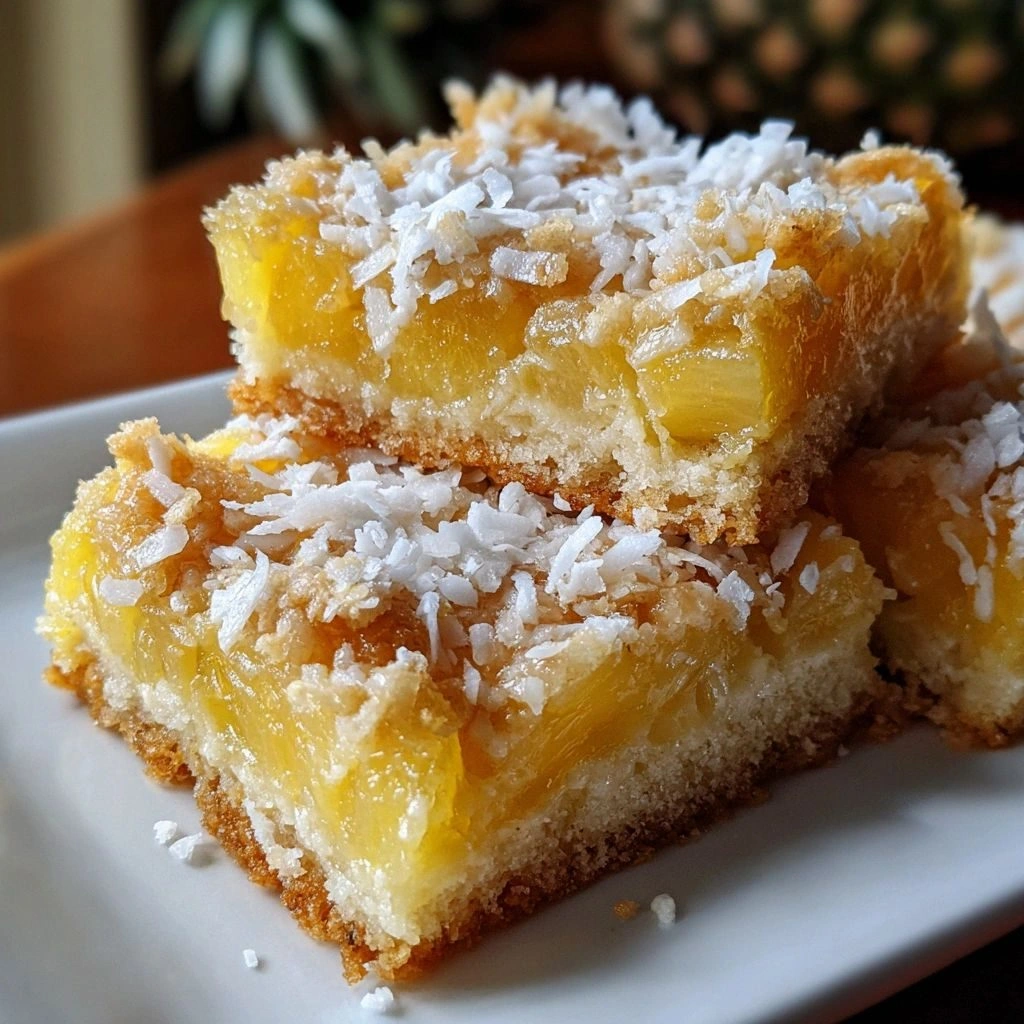
I’m still buzzing from the last time I tried to recreate that tropical, chewy bar that my grandma used to make on her island getaway. Picture this: a sunny afternoon, a handful of leftover pineapple chunks, a jar of shredded coconut, and a kitchen that smelled like a tropical storm. I was determined to turn that memory into a recipe that would make your taste buds do the salsa. The result? A batch of bars that are as dreamy as a lazy beach day and as addictive as a second slice of cake.
The first time I tasted them, I was hit with a wave of sweet, salty, and buttery flavors that danced on my tongue like a salsa dancer. The pineapple was bright and juicy, the coconut added that subtle nutty crunch, and the buttery base gave it a comforting, almost velvety texture. The aroma alone was enough to make anyone’s mouth water: a sweet, caramelized scent that promised indulgence with every bite. I knew then that I had stumbled onto something special.
But what sets these Pineapple Coconut Dream Bars apart from the countless other “tropical” bars out there? The secret is in the balance of sweet and savory, the way the coconut is incorporated both in the batter and on top, and that unexpected splash of vanilla that ties everything together. Most recipes get the ratio wrong, ending up either too dry or overly sweet. Here, every ingredient has a purpose and every step is designed to elevate flavor and texture.
And there’s a twist you won’t expect— a subtle hint of sea salt that cuts through the sweetness, giving the bars a depth of flavor that feels like a secret handshake between the ingredients. Picture yourself pulling the bars out of the oven, the whole kitchen smelling incredible, and the first bite delivering a burst of tropical sunshine that feels both comforting and adventurous. Let me walk you through every single step — by the end, you’ll wonder how you ever made it any other way.
What Makes This Version Stand Out
- Flavor: A harmonious blend of sweet pineapple, nutty coconut, and subtle vanilla that creates a multi-dimensional taste profile.
- Texture: Chewy core with a slightly crisp exterior, thanks to the coconut flakes and the right baking temperature.
- Ease: Minimal prep time with a single mixing bowl; the recipe is perfect for beginners and seasoned cooks alike.
- Versatility: Works as a snack, dessert, or even a quick breakfast on the go.
- Ingredient Quality: Uses only the freshest pineapple and coconut, ensuring a bright, natural flavor that outshines processed alternatives.
- Make‑ahead Potential: Can be refrigerated or frozen, making it ideal for parties or meal prepping.
- Presentation: The toasted coconut topping gives an elegant finish that looks as good as it tastes.
- Health‑Friendly: While indulgent, the recipe balances natural sugars with healthy fats from coconut oil and butter.
Alright, let's break down exactly what goes into this masterpiece…
Inside the Ingredient List
The Flavor Base
The foundation of these bars starts with the dry mix: all‑purpose flour, baking powder, and a pinch of salt. The flour gives structure, the baking powder ensures lift, and the salt balances the sweetness. Skipping the salt might make the bars taste flat, so keep it in. If you prefer a gluten‑free version, swap the flour for a blend of rice flour, tapioca, and potato starch.
The Texture Crew
The butter and coconut oil are the dynamic duo that delivers moisture and richness. The butter adds a classic buttery flavor, while the coconut oil introduces a subtle tropical note and helps the bars stay soft. A small amount of coconut milk is added to keep the batter moist and to marry the coconut pieces together. If you’re looking for a vegan version, replace the butter with extra coconut oil and use a plant‑based milk.
The Unexpected Star
Crushed pineapple is the star that brings sunshine to the mix. Use canned pineapple, drained well to avoid excess liquid that can make the bars soggy. If you’re feeling adventurous, add a splash of fresh lime juice to brighten the flavor profile. Pineapple also contains natural sugars that caramelize during baking, giving the bars a golden crust.
The Final Flourish
Shredded coconut and optional dark chocolate chips are folded into the batter for texture and bursts of flavor. The coconut adds chewiness and a nutty undertone, while chocolate chips give a touch of indulgence. A pinch of sea salt on top before baking creates a subtle contrast that enhances the sweetness. After baking, sprinkle toasted coconut flakes to finish with a crunchy, aromatic layer.
Everything's prepped? Good. Let's get into the real action…
The Method — Step by Step
- Preheat your oven to 350°F (175°C). Line a 9×13 inch baking pan with parchment paper, leaving an overhang on the sides for easy removal. This step is crucial for even baking and prevents sticking.
- In a medium bowl, whisk together flour, baking powder, and salt. The dry mix should be smooth; this ensures a consistent crumb throughout the bars.
- In a separate bowl, cream the butter, coconut oil, and brown sugar until light and fluffy. This should take about 2 minutes with a hand mixer. The creaming process incorporates air, giving the bars a lighter texture.
- Add the eggs one at a time, beating well after each addition. Then stir in the vanilla extract and coconut milk. The wet mixture should be glossy and smooth.
- Gradually fold the dry ingredients into the wet mixture, mixing just until combined. Overmixing can make the bars tough; a gentle fold preserves tenderness.
- Fold in the shredded coconut, crushed pineapple, and chocolate chips (if using). The batter should look a little lumpy— that’s the sign of a perfect mix.
- Transfer the batter to the prepared pan, smoothing the top with a spatula. Sprinkle a pinch of sea salt and the toasted coconut flakes evenly over the surface. The salt will create a subtle contrast that brightens each bite.
- Bake for 30 minutes, or until the edges pull away from the pan and the center is set. The bars should emit a sweet, caramelized aroma— that’s your cue that they’re done.
- Remove from the oven and let cool in the pan for 10 minutes before lifting out with the parchment overhang. This rest period allows the bars to set, making slicing easier and preventing breakage.
- Once cooled, cut into bars or squares using a sharp knife. Serve immediately or store in an airtight container.
That's it — you did it. But hold on, I've got a few more tricks that'll take this to another level…
Insider Tricks for Flawless Results
The Temperature Rule Nobody Follows
Many bakers bake at 375°F, but that can cause the edges to burn while the center remains undercooked. Stick to 350°F for even baking, and always preheat the oven for at least 10 minutes before putting the pan in. This ensures a consistent rise and a golden crust.
Why Your Nose Knows Best
During the final 5 minutes, keep a close ear on the aroma. A sweet, caramelized smell indicates that the sugars are caramelizing properly. If you notice a sour note, it could mean the pineapple was too ripe or the batter was too wet.
The 5-Minute Rest That Changes Everything
Letting the bars rest in the pan for 10 minutes before cutting is not just a suggestion—it’s essential. The rest allows the structure to set, ensuring that the bars hold together when sliced. Skipping this step often results in mushy, crumbly pieces.
The Secret to a Crisp Edge
If you prefer a crispier edge, brush the top with a thin layer of melted coconut oil before baking. This creates a golden, slightly crunchy crust that contrasts beautifully with the chewy interior.
The Power of Toasted Coconut
Toast the coconut flakes in a dry skillet until they turn golden. This step releases oils and intensifies flavor, giving the bars an unmistakable coconut aroma that lingers long after you take a bite.
Creative Twists and Variations
This recipe is a playground. Here are some of my favorite ways to switch things up:
Tropical Twist
Swap the pineapple for mango chunks and add a splash of coconut water to the wet mix. The mango’s sweetness pairs beautifully with coconut, creating a new tropical flavor profile.
Nutty Delight
Add chopped toasted almonds or pecans into the batter. The nuts bring a crunchy texture and a nutty aroma that complements the coconut.
Chocolate Lover’s Edition
Increase the dark chocolate chips to ¾ cup and drizzle melted chocolate over the top after baking. The chocolate adds richness and a glossy finish.
Vegan Version
Replace the butter with melted coconut oil and use flax eggs (1 tbsp ground flaxseed mixed with 3 tbsp water) instead of chicken eggs. Use plant‑based milk in place of coconut milk. The texture remains similar, and the flavor stays tropical.
Low‑Sugar Option
Use a sugar substitute like monk fruit sweetener or stevia in place of brown sugar. Keep the baking time the same, but watch closely for the bars to set.
Spiced Coconut
Add a teaspoon of ground ginger and a pinch of cinnamon to the dry mix. The spices give the bars a warm, comforting undertone that’s perfect for cooler evenings.
Storing and Bringing It Back to Life
Fridge Storage
Store the bars in an airtight container at room temperature for up to 5 days. The bars will stay moist and flavorful because the coconut oil helps preserve moisture. If you notice the bars drying out, add a slice of fresh fruit to the container for a few hours.
Freezer Friendly
Wrap each bar tightly in plastic wrap, then place them in a freezer bag. They stay fresh for up to 3 months. When you’re ready to eat, let them thaw at room temperature for 30 minutes.
Best Reheating Method
To revive frozen bars, microwave on medium power for 15–20 seconds. Alternatively, place them on a parchment‑lined baking sheet and heat at 300°F for 5 minutes. A tiny splash of water before reheating steams the bars back to perfection, restoring that chewy texture.