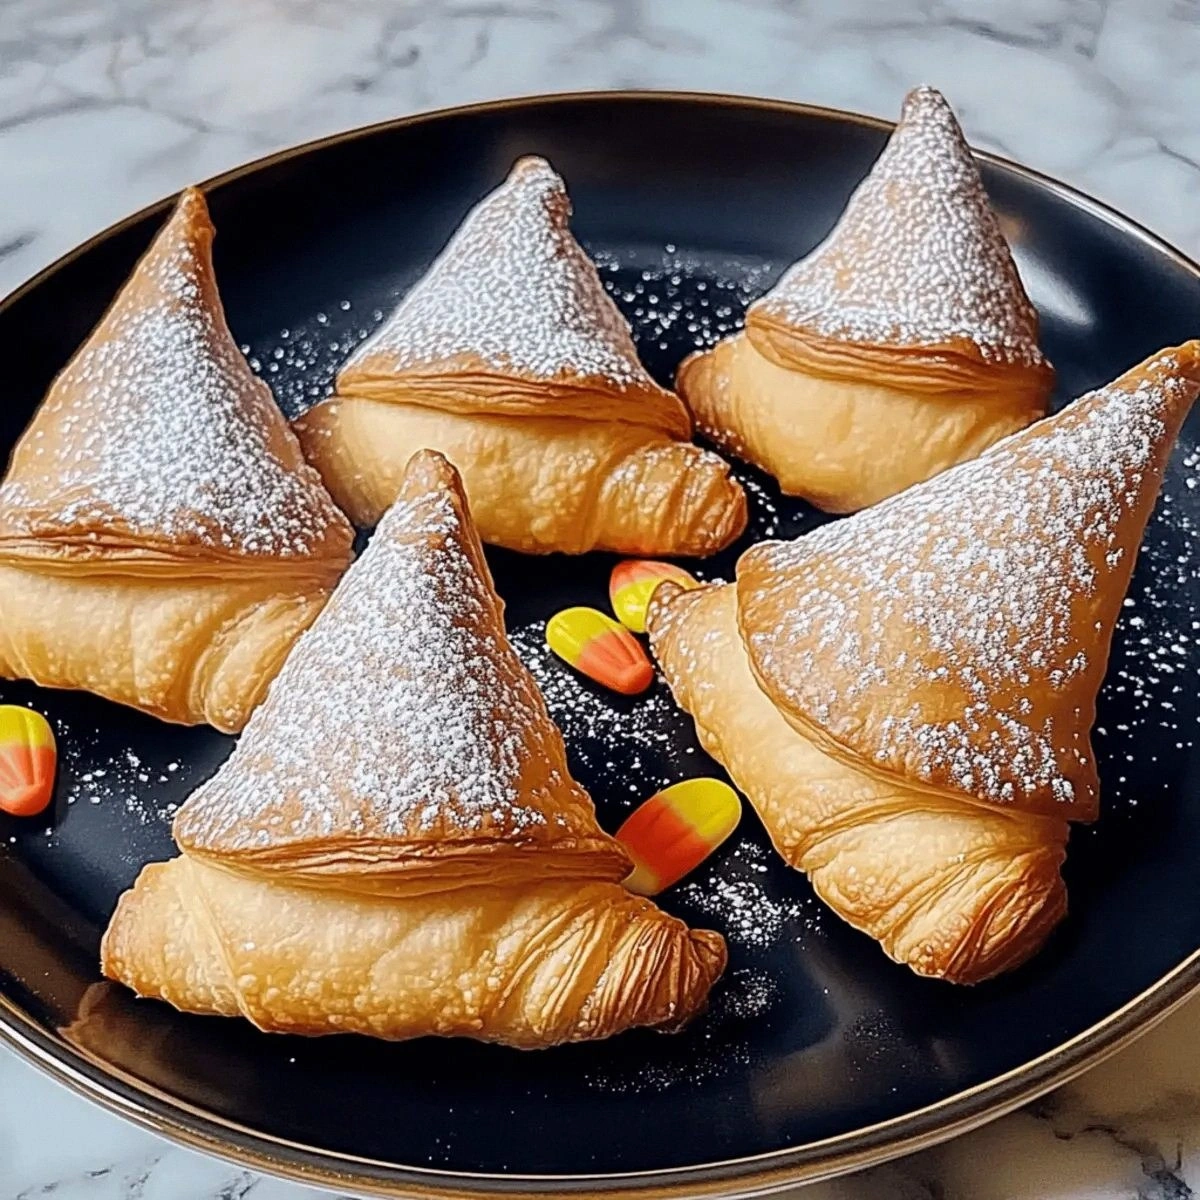
I still remember the Halloween when my kitchen looked like a crime scene from a chocolate factory explosion. I was attempting some overly ambitious witch-themed dessert that required tempering chocolate, piping intricate details, and about seventeen different specialty ingredients. Three hours later, I had a counter full of misshapen blobs that looked more like sad melting snowmen than spooky witches. My guests were arriving in thirty minutes, and I had nothing but a stressed-out expression and a sink full of dirty dishes. That's when I grabbed a can of crescent roll dough from the fridge and decided to wing it. Thirty minutes after that, I was pulling golden witch hats from the oven that had everyone convinced I'd secretly enrolled in pastry school. The best part? They tasted even better than they looked, and I've been perfecting this ridiculously easy recipe ever since.
These Spooky Crescent Roll Witch Hats are about to become your secret weapon for every Halloween gathering from now until the end of time. They capture everything you love about Halloween treats — they're playful, they're chocolatey, they've got that perfect candy crunch from the candy corn — but they come together faster than you can say "trick or treat." I'm talking fifteen minutes of active work time, max. The crescent roll dough puffs up into these perfect little witch hat shapes that are somehow both elegant and adorably spooky. When you bite into one, you get that satisfying crackle of the golden pastry giving way to melted chocolate that oozes just enough to make you close your eyes and sigh. The candy corn adds this unexpected pop of sweetness and color that makes every bite feel like you just won Halloween.
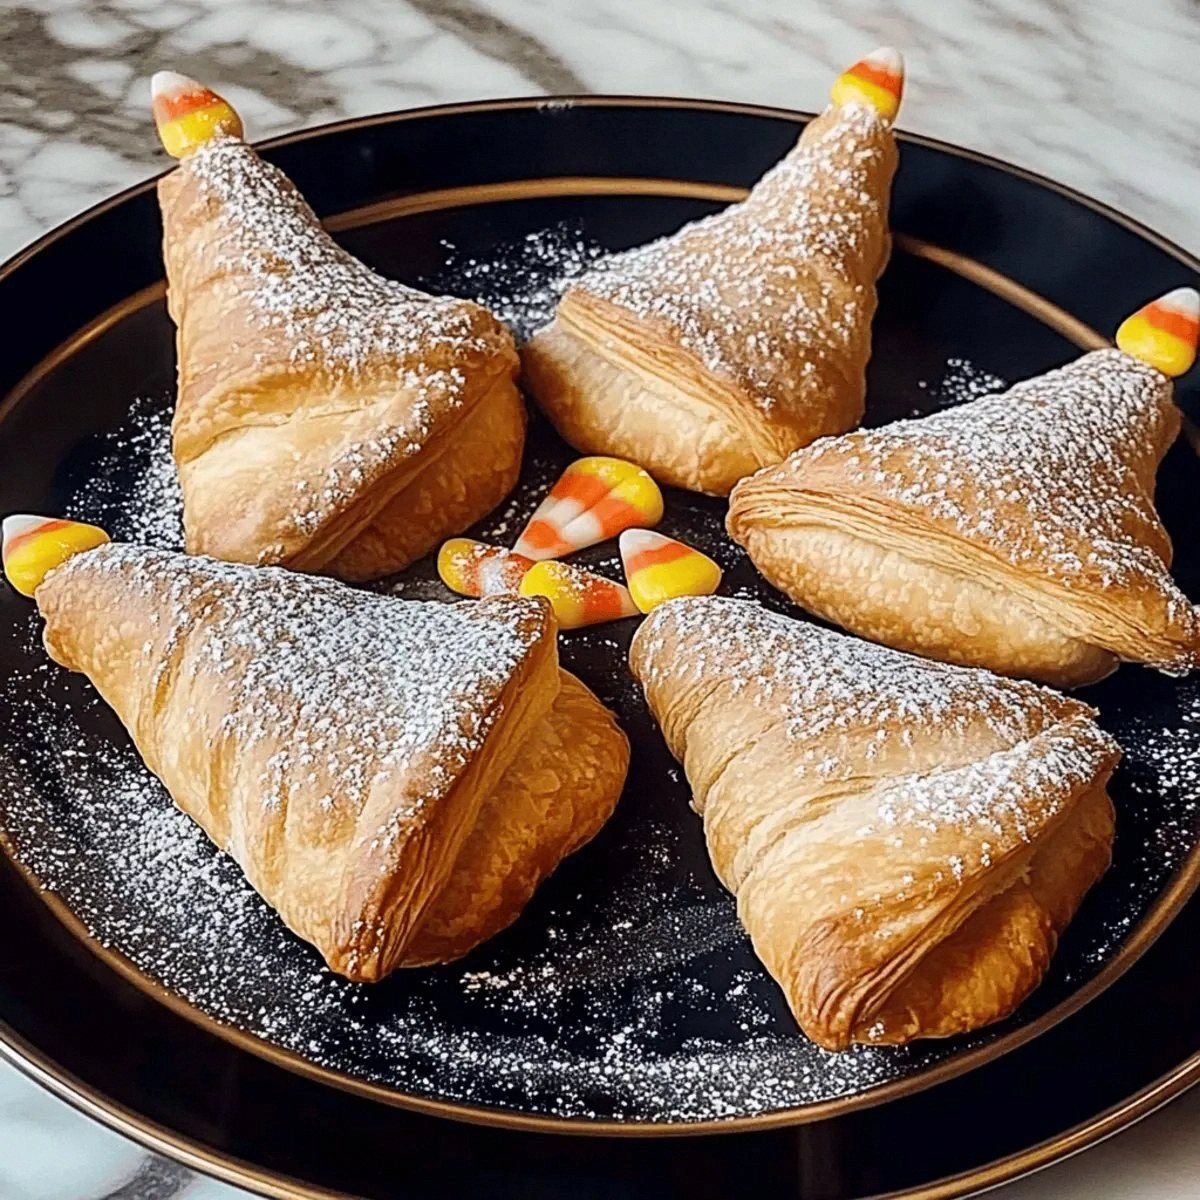
What really sets these apart from every other Halloween treat out there is the contrast between the warm, buttery pastry and the cool, melty chocolate. It's like a chocolate croissant met a candy bar at a costume party and decided to become best friends forever. The witch hat shape isn't just cute — it's actually functional. The pointed top gets extra crispy while the base stays tender, giving you two textures in every bite. And here's the kicker: they're actually better when made ahead, which means you can spend Halloween actually enjoying yourself instead of being stuck in the kitchen while everyone else is out having fun.
Okay, ready for the game-changer? These witch hats are completely foolproof. I'm talking can't-mess-them-up-even-if-you-try levels of easy. No candy thermometers, no piping bags, no artistic skills required whatsoever. If you can roll dough and press chocolate chips into warm pastry, you can make these. Let me walk you through every single step — by the end, you'll wonder how you ever made it any other way.
What Makes This Version Stand Out
Lightning Fast: From zero to witch hats in under thirty minutes flat. While other Halloween treats require hours of chilling, setting, or decorating, these bad boys are in and out of the oven faster than you can decide on a costume. The crescent roll dough does all the heavy lifting, puffing up into perfect hat shapes without any shaping or fussing on your part.
Kid-Friendly Construction: This is the recipe that turns little goblins into kitchen helpers. Kids can unroll the dough, place the chocolate chips, and press in the candy corn without any sharp tools or hot surfaces. The best part? Even their "imperfect" versions look charmingly spooky, so there's no pressure for Pinterest-worthy results.
Pantry Perfect: Four ingredients. That's it. No specialty flours, no obscure extracts, no equipment you use once and then forget about in the back of your cabinet. These witch hats prove that sometimes the simplest ingredients create the most magical results when combined just right.
Make-Ahead Magic: Here's what nobody tells you about Halloween entertaining — you want everything done before the doorbell starts ringing with trick-or-treaters. These actually improve in texture as they cool, so you can make them in the morning and they'll be perfect by party time. Try getting that kind of flexibility from frosted cookies or caramel apples.
Texture Paradise: Most Halloween treats are one-note — all soft or all crunchy. These give you the best of both worlds with their shatteringly crisp edges and tender, almost croissant-like centers. When you hit a pocket of melted chocolate, it's like finding treasure in your pastry.
Crowd-Pleasing Power: I dare you to bring these to a party and watch what happens. Adults love them because they scratch that nostalgic itch for Halloween candy while feeling just sophisticated enough. Kids love them because, well, chocolate and candy corn wrapped in buttery dough. They're the great equalizer of Halloween treats.
Instagram Gold: Let's be real — we all want our Halloween creations to look as good as they taste. These witch hats photograph like absolute stunners with their dramatic shapes and festive colors. That moment when you pull them from the oven and the chocolate is still glossy? Pure food photography magic.
Alright, let's break down exactly what goes into this masterpiece...
Inside the Ingredient List
The Flavor Foundation
The crescent roll dough is where all the magic begins, and here's why it works so brilliantly: it's already laminated, meaning it's been folded with butter to create those distinct layers that puff up into flaky perfection. When you unroll those triangles, you're essentially working with pre-made puff pastry that someone else has done all the hard work on. The dough contains just the right amount of sugar to caramelize slightly at the edges, giving you those gorgeous golden-brown witch hats that look like they've been kissed by Halloween itself. If you try to substitute with pizza dough or biscuit dough, you'll get something edible but you'll lose that ethereal lightness that makes these feel special rather than just convenient.
The Chocolate Core
Chocolate chips are the heart and soul of these witch hats, but not all chips are created equal. You want the regular semisweet morsels here — not mini chips, not chunks, not fancy artisanal pieces. The standard size melts into perfect puddles that stay contained within the pastry walls, creating little chocolate lakes in each hat. Milk chocolate gets too sweet with the candy corn, while dark chocolate can taste bitter against the buttery dough. Semisweet hits that perfect middle ground that makes everyone happy. Pro tip: give your chips a rough chop if you want more chocolate distribution, but honestly, the whole chips create those dramatic molten centers that make people close their eyes when they bite in.
The Candy Crown
Candy corn is the make-or-break ingredient that transforms these from "chocolate croissant thingies" into actual witch hats. Those tri-colored tips aren't just decorative — they provide a honey-sweet crunch that contrasts beautifully with the soft pastry. When you press them into the dough, they adhere just enough to stay put during baking but don't melt completely, maintaining that classic candy corn texture. If you're one of those people who claim to hate candy corn, I challenge you to try this recipe anyway. Something magical happens when they warm up in the oven — the waxy texture disappears and you're left with pure honey-vanilla sweetness that even candy corn skeptics find themselves reaching for.
The Invisible Helper
Cooking spray might seem like an afterthought, but it's the difference between witch hats that slide gracefully onto your serving platter and ones that leave their bottoms behind in the pan. You want just the lightest coating — enough to prevent sticking but not so much that the bottoms fry instead of bake. If you don't have spray, a tiny bit of butter works too, but spray gives you the most even coverage without adding extra fat that could make the bases greasy.
Everything's prepped? Good. Let's get into the real action...
The Method — Step by Step
- Preheat your oven to 375°F (190°C) and position the rack in the center. This temperature is crucial — too hot and the bottoms burn before the tops brown, too cool and you lose that dramatic puff. While it's heating, line a baking sheet with parchment paper and give it the lightest kiss of cooking spray. You want just enough to make the surface slightly shiny but not greasy. If you can see pools of spray, you've gone too far — blot it with a paper towel. The parchment is non-negotiable here; it prevents sticking and helps the bottoms brown evenly.
- Open your crescent roll dough by peeling back the paper label (that satisfying pop is your official start to Halloween baking season). Unroll the dough on your cutting board and separate it into the pre-scored triangles. Here's where most people mess up — they try to separate the triangles while the dough is still cold from the fridge. Let it sit for 2-3 minutes first. Cold dough tears, but slightly room-temperature dough separates like a dream. If you do get a tear, just pinch it back together; the dough is forgiving and will still puff up beautifully.
- Place a chocolate chip at the wide end of each triangle — this is going to be the base of your witch hat where the brim would be. Press it in gently but firmly, just enough to anchor it in place. Don't push it all the way through; you want it embedded like a chocolate stud that will become your delicious surprise. The chips should be about half-submerged. If you're feeling extra chocolatey (and honestly, who isn't?), add a second chip slightly overlapping the first.
- Starting from the chocolate-chip end, roll the dough toward the point to create your witch hat cone. Keep the roll tight at first, then let it relax slightly as you go — think firm but not strangled. The pointed end will become the top of your hat, so aim it slightly upward as you roll. This isn't the time for perfection; slightly wonky hats look more charming and homemade. If the tip doesn't stay tucked, just give it a gentle press to seal it. The dough will puff and fill any small gaps during baking.
- Curve the finished roll into a slight crescent shape and place it on your prepared baking sheet, leaving about 2 inches between each hat. They need room to expand without touching — if they bake together, you'll end up with witch hat Siamese twins that are impossible to separate cleanly. The curve helps them look more like hats and less like regular crescent rolls. If your kitchen is warm, pop the whole tray in the fridge for 5 minutes before baking; cold dough puffs higher and keeps its shape better.
- Press three pieces of candy corn into the wide base of each hat — one in the center and one on each side, slightly angled outward like a crown. Push them in until they're about halfway submerged. They should look like they're wearing colorful witch hat bands. The candy corn will warm and soften but not completely melt, giving you that perfect chewy texture contrast. If any fall off during baking, just press them back in while the pastry is still warm — they'll stick like glue.
- Bake for 11-13 minutes, but start checking at 9 minutes. You're looking for golden-brown tops that have puffed dramatically and bottoms that are deep amber. The chocolate chips will look glossy and slightly melted but shouldn't be burnt. Your kitchen will start smelling like a French bakery had a baby with a candy store — that's when you know they're close. If the tops are browning too quickly, tent loosely with foil for the last 2-3 minutes.
- Cool on the baking sheet for exactly 5 minutes — no more, no less. Too short and they'll fall apart when you move them; too long and they'll stick to the parchment. During this time, the chocolate will finish melting and the candy corn will set into its final chewy state. Transfer to a wire rack to cool completely, or serve warm if you want that molten chocolate experience that makes grown adults make involuntary happy noises.
That's it — you did it. But hold on, I've got a few more tricks that'll take this to another level...
Insider Tricks for Flawless Results
The Temperature Rule Nobody Follows
Here's the thing that separates good witch hats from legendary ones — dough temperature matters more than you'd think. When the dough is too cold, it doesn't puff properly and you get dense, hockey-puck hats. Too warm, and it becomes stretchy and hard to work with, plus the butter melts before it bakes, giving you greasy bottoms. The sweet spot is taking it out of the fridge 5-7 minutes before you plan to use it. It should feel pliable but not sticky, like play-doh that's been left out for a bit. If you press it with your finger, it should leave a slight imprint but not feel mushy. Trust me on this — I once made these in a hurry with cold dough and they came out looking like sad little witch berets instead of proper hats.
Why Your Nose Knows Best
Forget timers — your nose is the most reliable indicator of when these are done. When they're perfectly baked, your kitchen will smell like buttery pastry with hints of caramelized sugar and warm chocolate. If you start smelling anything sharp or toasty, they're probably 30 seconds away from overdone. The visual cue you're looking for is golden-brown tops with slightly darker edges, like they've been kissed by the oven gods. The bottoms should be a deep amber color, not pale blonde (underdone) or dark brown (bitter). This is hands down the best version you'll ever make at home once you learn to trust your senses instead of blindly following a timer.
The 5-Minute Rest That Changes Everything
I know it's tempting to dig in immediately — that chocolate is calling your name, I get it — but the 5-minute rest on the baking sheet is non-negotiable. During this time, the chocolate finishes its melt cycle and the candy corn adheres permanently to the pastry. If you try to move them too soon, the chocolate will run everywhere and you'll have witch hat casualties. Too long, and they'll stick to the parchment like they've been super-glued. I set a timer for exactly 5 minutes, then use a thin spatula to lift one and check — it should come up cleanly with just a slight tug. If it resists, give it another minute. This next part? Pure magic.
Creative Twists and Variations
This recipe is a playground. Here are some of my favorite ways to switch things up:
The Peanut Butter Witch
Swap out half the chocolate chips for peanut butter chips and prepare for your life to change. The peanut butter melts into this creamy, nutty layer that pairs insanely well with the buttery pastry. Use Reese's Pieces instead of candy corn for the full peanut butter experience. This version is particularly dangerous because peanut butter and chocolate is already a perfect combination, but wrap it in flaky pastry and you might find yourself making a second batch "just to be safe."
The Midnight Witch
Use dark chocolate chips and black food coloring in the dough (or find chocolate crescent roll dough if you're lucky enough to spot it). Replace the candy corn with black and orange sprinkles or black licorice bits. These look incredibly sophisticated and are perfect for adult Halloween parties where you want something festive but not cutesy. The bitter chocolate against the sweet pastry creates this grown-up flavor profile that'll have people asking for your secret.
The Caramel Apple Witch
Add a teaspoon of apple butter or caramel sauce with the chocolate chips before rolling. The apple version tastes like fall exploded in your mouth — warm spices, buttery pastry, melty chocolate, and that hint of autumn fruit. The caramel version is pure indulgence, creating these sticky, gooey centers that stretch when you pull the hats apart. Both are guaranteed to make you the most popular person at any fall gathering.
The S'mores Witch
Replace the chocolate chips with mini marshmallows and chocolate chips mixed together. Add a sprinkle of graham cracker crumbs before rolling. The marshmallows puff and toast while the chocolate melts, creating that classic s'mores experience but in witch hat form. The graham crackers add texture and that unmistakable campfire flavor. If you've ever struggled with traditional s'mores that fall apart or get too messy, this is your new go-to method.
The White Chocolate Raspberry Witch
Use white chocolate chips and press a fresh raspberry into the base along with them. The tart berry cuts through the sweetness of the white chocolate and creates these beautiful ruby jewels in your witch hats. This version is stunning for photos — the white chocolate against the golden pastry with pops of red looks incredibly elegant. Plus, you can pretend it's healthier because fruit.
The Mexican Hot Chocolate Witch
Add a pinch of cinnamon and cayenne to the dough before rolling, and use Mexican chocolate or chocolate chips with a hint of spice. The warmth from the spices builds slowly and pairs beautifully with the sweetness of the candy corn. These have a subtle kick that makes people pause and go "wait, what is that?" in the best possible way. Perfect for those who like their treats with a little attitude.
Storing and Bringing It Back to Life
Fridge Storage
Here's where most people go wrong — they think these need to be refrigerated. They don't. The fridge actually makes the pastry soggy and the chocolate waxy. Store them in an airtight container at room temperature for up to 3 days. Layer them between sheets of parchment paper to prevent sticking, and keep them away from direct sunlight or heat sources. They'll stay crisp on the outside and tender inside, though the candy corn will firm up slightly. If you live somewhere humid, add a packet of food-safe silica gel to the container to absorb excess moisture.
Freezer Friendly
These freeze beautifully, which makes them perfect for getting ahead on Halloween prep. Let them cool completely, then arrange them in a single layer on a baking sheet and freeze until solid (about 2 hours). Transfer to a freezer bag with parchment between layers. They'll keep for up to 2 months frozen. To serve, thaw at room temperature for 30 minutes, then warm in a 300°F oven for 5-7 minutes. They won't be quite as crisp as fresh-baked, but they'll be close enough that no one will complain. Picture yourself pulling these out of the freezer on Halloween morning — you're basically a kitchen wizard at that point.
Best Reheating Method
If they've gone a bit soft (which happens in humid environments), the oven is your friend. 300°F for 5-7 minutes brings back that crisp texture without over-browning. The microwave is a last resort — it works in a pinch but makes the pastry chewy rather than crisp. If you must microwave, do it in 10-second bursts and eat immediately. Pro tip: add a tiny splash of water to the container before reheating — it steams back to perfection and prevents the chocolate from seizing up. These are best served slightly warm or at room temperature, never cold.