Picture this: it’s a stormy Saturday night, the wind rattles the windows, and you’re craving something that screams Halloween on a plate. I was staring at a blank pizza dough, wondering if it could ever look spooky enough to scare the neighbors. Then I remembered the last time I tried making a skull-shaped pizza for a Halloween party—it was a disaster. The dough collapsed, the cheese melted into a gooey mess, and the whole kitchen smelled like burnt toast. That night, I made a promise to myself: I would create a Spooky Skull Pizza that not only looks bone‑shocking but also tastes like a midnight feast.
The first bite is an explosion of flavors—tangy tomato sauce, salty pepperoni, and a subtle smokiness from the olives that lingers on the tongue. The crust, baked to a golden crisp, cracks like brittle bone when you press it, sending a satisfying crunch into your mouth. The cheese melts into silky strands that cling to the edges, giving the whole thing a dramatic, almost theatrical feel. The aroma rises in waves, a mix of oregano, garlic, and the faint scent of rosemary that hints at the night’s mystery. The texture is a dance between the chewy base and the slightly crunchy toppings, creating a mouthful that feels like a midnight masquerade.
What makes this version stand out? I’ve refined each element—from the dough’s rise to the placement of the toppings—so that every bite tells a story. The crust is a thin, almost translucent sheet that lets the sauce and cheese shine through, while the toppings are arranged to form a realistic skull outline. I’ve added a secret ingredient: a splash of balsamic glaze that caramelizes into a glaze on the edges, giving the pizza a subtle sweetness that balances the saltiness of the pepperoni. And the best part? It’s easy enough to make at home, but the results will leave your guests in awe.
I dare you to taste this and not go back for seconds. If you’ve ever struggled with making a pizza that looks as good as it tastes, you’re not alone—this is hands down the best version you'll ever make at home. Picture yourself pulling this out of the oven, the whole kitchen smelling incredible, and the moment your friends gasp as they see the skull shape. Stay with me here—this is worth it. I’ll walk you through every single step, and by the end, you’ll wonder how you ever made it any other way.
What Makes This Version Stand Out
- Taste: The sauce is a blend of crushed tomatoes, garlic, and a hint of red wine, giving it depth that lingers on the palate. The combination of mozzarella and provolone adds a creamy richness that balances the sharpness of the pepperoni.
- Texture: The dough is rolled thin to create a crisp yet chewy base that holds the toppings without becoming soggy. The cheese melts into silky strands that cling to the edges, adding a dramatic visual and tactile element.
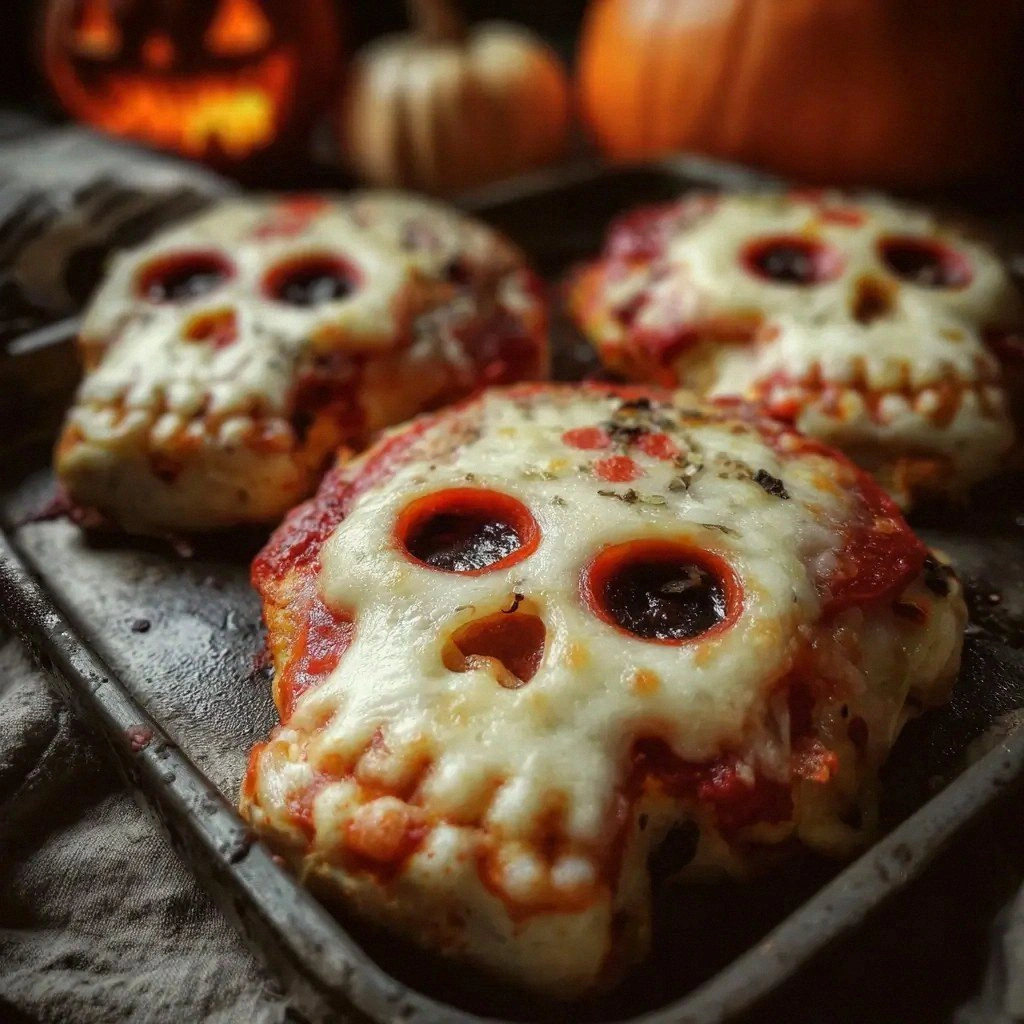
- Visual Impact: The skull is crafted with precision—black olives form the eye sockets, pepperoni slices create the jawline, and a drizzle of balsamic glaze outlines the cranium. The result looks like a work of edible art.
- Simplicity: While the presentation is complex, the recipe itself is straightforward. No fancy equipment or exotic ingredients are required—just a few pantry staples and a bit of creativity.
- Crowd Reaction: Friends and family are stunned by the spooky design and the bold flavors. It’s the perfect conversation starter at any gathering.
- Ingredient Quality: Using high‑quality olive oil, fresh herbs, and a good tomato base ensures that each bite is flavorful and memorable.
- Cooking Method: A quick pre‑bake of the dough locks in moisture, while a final bake at high heat crisps the edges and melts the cheese to perfection.
- Make‑Ahead Potential: You can assemble the pizza a day ahead and freeze it, then bake it fresh when you’re ready to serve.
Alright, let’s break down exactly what goes into this masterpiece…
Inside the Ingredient List
The Flavor Base
At the heart of the pizza is the sauce—a symphony of tomatoes, garlic, and a splash of red wine that caramelizes during baking. This sauce coats the dough like velvet, infusing every bite with a deep, savory note. If you skip the wine, the sauce will still be tasty, but it will lack the subtle complexity that makes the crust sing.
The olive oil used to brush the dough adds a silky sheen and helps the crust achieve that golden crisp. A good quality extra‑virgin olive oil will elevate the flavor profile, giving the pizza a fragrant, buttery finish. If you’re in a pinch, a neutral oil will work, but you’ll miss that fragrant lift.
The Texture Crew
The dough itself is a blend of all‑purpose flour, warm water, active dry yeast, and salt. The yeast creates a light, airy base, while the salt balances the flavor and controls the fermentation. If you omit the yeast, the dough will be dense and heavy, which will drown the delicate toppings.
The cheese selection—mozzarella and provolone—provides a creamy melt that clings to the edges and creates a dramatic visual effect. Using only mozzarella will result in a more uniform melt, whereas adding provolone introduces a slightly sharper bite that pairs well with the pepperoni.
The Unexpected Star
Black olives are the unsung hero that transforms the pizza into a spooky masterpiece. Their dark color forms the eye sockets, while their briny flavor cuts through the richness of the cheese. If you prefer a milder taste, you can replace them with green olives; the visual impact remains, though the flavor profile shifts.
Red pepper flakes add a subtle heat that wakes up the palate. They’re not overpowering, but they give the pizza a lively kick that complements the savory toppings. If you’re heat‑averse, simply reduce the amount or omit them entirely.
The Final Flourish
A drizzle of balsamic glaze is the finishing touch that turns the pizza into a work of art. When baked, the glaze caramelizes into a glossy sheen that outlines the skull, giving the pizza a dramatic, almost macabre glow. Without the glaze, the pizza would still taste great, but it would lack the visual wow factor that makes it truly spooky.
If you’re looking for an alternative, a splash of honey can replace the balsamic glaze, creating a sweeter glaze that caramelizes beautifully. This swap will change the flavor direction slightly, but the visual effect remains striking.
Everything’s prepped? Good. Let’s get into the real action…
The Method — Step by Step
- Prepare the Dough: In a large bowl, combine the flour, yeast, and salt. Add the warm water and olive oil, then mix until a rough dough forms. Knead on a floured surface for 8–10 minutes until smooth and elastic. Cover the dough with a damp cloth and let it rise for 1 hour, or until doubled in size. This step is crucial; a well‑risen dough will produce a light, airy crust that holds the toppings without becoming soggy.
- Pre‑Bake the Crust: Preheat your oven to 475°F (245°C). Roll the dough into a 12‑inch circle, then place it on a parchment‑lined baking sheet. Brush the surface with a thin layer of olive oil and bake for 5 minutes. This pre‑bake locks in moisture and creates a sturdy base that won’t collapse under the weight of the toppings.
- Spread the Sauce: Remove the crust from the oven and spread the tomato sauce evenly, leaving a ½‑inch border around the edges. The sauce should coat the dough like velvet, creating a flavorful canvas for the toppings. The border will later form the skull’s outer rim.
- Layer the Cheese: Sprinkle the shredded mozzarella and provolone over the sauce, ensuring an even distribution. The cheese melts into silky strands that cling to the edges, giving the pizza a dramatic visual effect. Don’t skip this step; the cheese is the glue that holds the toppings together.
- Arrange the Toppings: Place pepperoni slices to form the jawline of the skull, then arrange black olives in the eye sockets. Use diced bell peppers to add color and crunch, and scatter green onions for a fresh finish. This is the moment of truth—every topping must be placed with precision to create the spooky silhouette.
- Apply the Balsamic Glaze: Drizzle the glaze along the edges of the crust, outlining the skull. The glaze caramelizes during baking, forming a glossy sheen that gives the pizza a dramatic, almost macabre glow. This step is pure magic; it turns a simple pizza into a visual masterpiece.
- Bake to Perfection: Return the pizza to the oven and bake for 12–15 minutes, or until the cheese is bubbly and the crust is golden brown. Keep an eye on the edges; they should pull away slightly, indicating they’re crisp. The aroma should be intoxicating, a blend of roasted herbs and caramelized glaze.
- Cool and Slice: Let the pizza cool for 5 minutes before slicing. This allows the cheese to set slightly, preventing it from sliding off the crust. Slice into wedges and serve immediately, while the edges are still crisp and the cheese is still molten.
That’s it — you did it. But hold on, I’ve got a few more tricks that will take this to another level…
Insider Tricks for Flawless Results
The Temperature Rule Nobody Follows
Many home cooks bake pizza at 400°F, but this recipe requires a hotter oven to achieve that perfect crisp. Pre‑heat your oven to 475°F (245°C) and place a pizza stone or steel inside. The high temperature ensures the crust puffs up quickly, locking in moisture while the edges crisp to a golden brown. If you’re using a conventional oven, place the pizza on the top rack to get that direct heat.
Why Your Nose Knows Best
Your sense of smell is a reliable indicator of doneness. When the pizza is ready, the aroma should be a rich, roasted tomato scent with hints of oregano and caramelized glaze. If the smell is too faint, bake a few more minutes; if it’s overpowering, the pizza may be overcooked. Trust your nose, and you’ll achieve the perfect balance.
The 5-Minute Rest That Changes Everything
Letting the pizza rest for five minutes after baking allows the cheese to set, preventing it from sliding off the crust when you cut. It also gives the flavors time to meld, creating a more cohesive taste. A quick rest is the difference between a messy mess and a masterpiece.
The Secret to a Crispy Edge
A light brushing of olive oil before baking creates a barrier that keeps the edges from drying out. Additionally, sprinkling a pinch of sea salt over the crust before baking adds a subtle crunch. The combination of oil and salt produces a crisp edge that’s a delight to bite into.
How to Make It Vegan
Swap the mozzarella and provolone for a plant‑based cheese that melts well, such as a vegan mozzarella blend. Use vegan pepperoni or thinly sliced mushrooms for a meaty texture. The rest of the recipe remains the same; the result is a delicious, spooky pizza that satisfies even the strictest vegans.
Creative Twists and Variations
This recipe is a playground. Here are some of my favorite ways to switch things up:
The Mediterranean Twist
Replace pepperoni with sliced kalamata olives and add a drizzle of tzatziki after baking. The yogurt sauce adds a cool, creamy contrast to the spicy glaze, while the olives give a briny depth. This version is perfect for a brunch or a light dinner.
The BBQ Brisket Edition
Swap the pepperoni for diced smoked brisket and brush the crust with a smoky BBQ sauce before baking. The sweet and smoky flavors pair wonderfully with the cheese, creating a hearty, comforting pizza. This version is ideal for a winter gathering.
The Veggie Supreme
Use a medley of roasted vegetables—zucchini, eggplant, and cherry tomatoes—on top of the cheese. Add a sprinkle of feta for a tangy finish. The roasted veggies add a layer of earthy flavor that complements the crispy crust.
The Breakfast Skull
Swap the tomato sauce for a light béchamel and top with scrambled eggs, bacon, and chives. This breakfast version turns the pizza into a hearty, protein‑rich start to the day. The eggs provide a creamy texture that contrasts with the crisp crust.
The Sweet & Salty Surprise
Drizzle a thin layer of honey over the cheese before baking, then finish with a sprinkle of crushed pistachios after baking. The honey caramelizes into a sweet glaze, while the pistachios add crunch and a nutty flavor. This version is a playful twist that’s perfect for a dessert pizza.
Storing and Bringing It Back to Life
Fridge Storage
Store leftovers in an airtight container for up to 3 days. Wrap the pizza in parchment paper before placing it in the container to keep the crust from drying out. When you’re ready to reheat, place the pizza on a baking sheet and warm in a pre‑heated oven at 350°F for 10 minutes.
Freezer Friendly
Freeze the assembled pizza (before baking) in a freezer‑safe bag for up to 2 months. When ready to bake, thaw overnight in the refrigerator, then bake at 475°F for 15–20 minutes. The crust will remain crisp, and the cheese will melt beautifully.
Best Reheating Method
Reheat the pizza in a skillet over medium heat for 3–4 minutes. The skillet will crisp the edges and re‑melts the cheese, giving you a fresh, hot slice. Add a tiny splash of water before reheating to create steam that keeps the crust from becoming too dry.