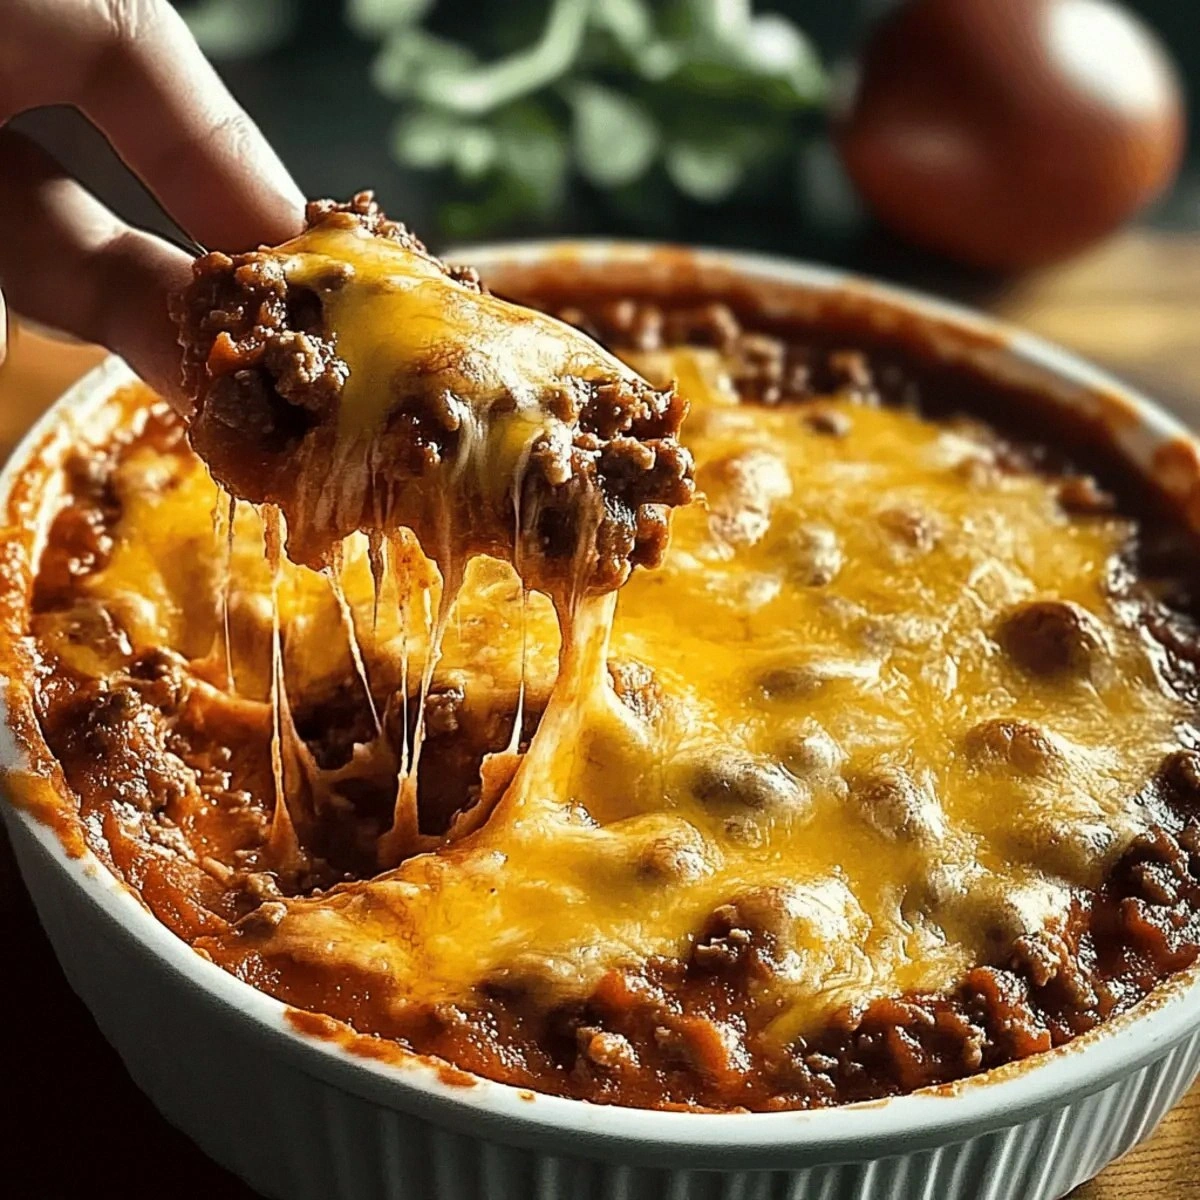
Picture this: it’s a rainy Sunday, the couch is calling your name, and you’ve promised your friends a snack that will make the whole living room roar louder than any TV broadcast. I was in that exact spot, juggling a half‑cooked lasagna and a sudden craving for something that could melt hearts and cheese alike. The kitchen was a mess of stray noodles, a busted blender, and a lingering scent of burnt garlic that made me swear off cooking for a week. Then, out of sheer desperation, I grabbed the only things that didn’t require a fancy technique—ground beef, cream cheese, salsa, taco seasoning, and shredded cheddar. I tossed them together, slid the pan into the oven, and what emerged was a golden, bubbling masterpiece that made even the most skeptical friend gasp, “Is that really a dip?”
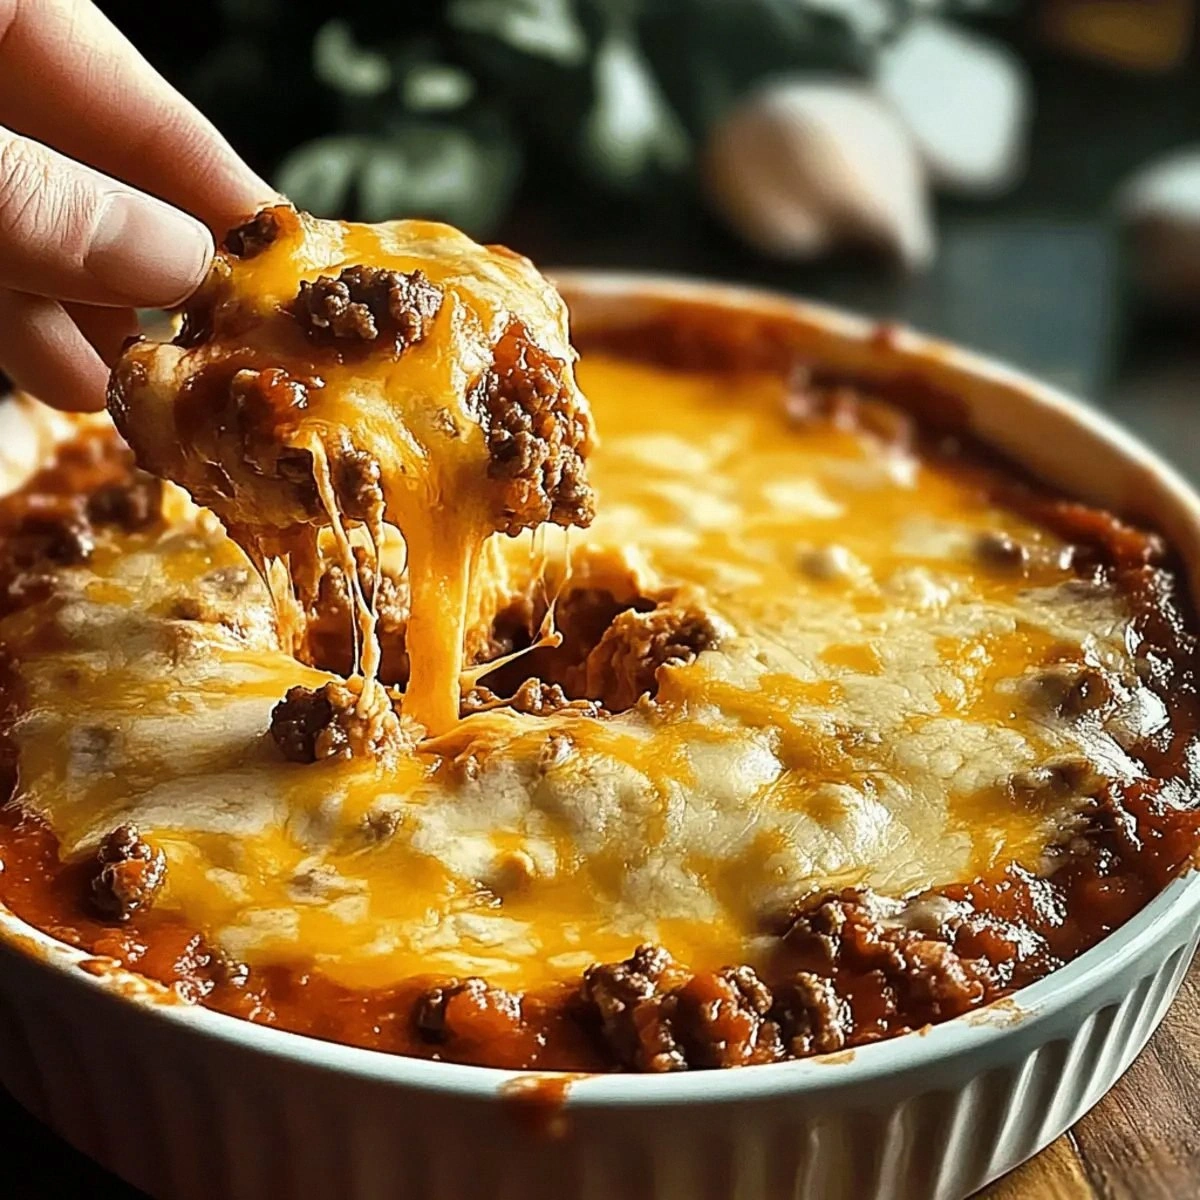
That first bite was an explosion of flavors that hit my palate like a perfectly timed touchdown. The beef was seasoned just right, the salsa added a bright, tangy kick, and the cream cheese turned everything into a silky, melt‑in‑your‑mouth blanket. The shredded cheddar on top formed a crust that crackled and pulled away in glorious strings, reminiscent of the best‑cheese‑pull you get from a pizza slice fresh out of the oven. The aroma that filled the kitchen was a heady mix of sizzling meat, smoky cheese, and a hint of cumin that made my stomach do a little victory dance. I could already hear the crunch of tortilla chips diving into that warm, gooey goodness, each dip a little celebration of texture and taste.
Most recipes for “cheesy dip” either drown you in a sea of dairy or leave the flavor flat, like a bland halftime show. This version flips the script by using just five ingredients, yet delivering a complexity that rivals a three‑course meal. The secret? A strategic order of addition that lets each component shine, plus a few tricks that keep the dip from turning into a greasy puddle. I’ll be honest — I ate half the batch before anyone else got a chance to try it, and that’s a confession that proves how addictive this dip truly is. I dare you to taste this and not go back for seconds; the combination is that compelling.
Let me walk you through every single step — by the end, you’ll wonder how you ever made it any other way. Okay, ready for the game‑changer? This next part? Pure magic. Stay with me here — this is worth it.
What Makes This Version Stand Out
- Flavor Explosion: The taco seasoning and salsa create a bold, zesty base that cuts through the richness of the cheese, delivering a balanced bite every time.
- Texture Symphony: Cream cheese gives a velvety smoothness while shredded cheddar forms a crispy, golden crust that shatters like thin ice under your fork.
- Simplicity at Its Best: Only five ingredients, no fancy gadgets, and a single pan make this dip accessible to even the most kitchen‑phobic.
- Uniqueness Factor: Most dips rely on canned beans or processed cheese; this one uses ground beef for heartiness and real cheese for authenticity.
- Crowd‑Pleaser: Whether it’s game day, a backyard BBQ, or a simple movie night, this dip earns applause and empty plates in equal measure.
- Ingredient Quality: Fresh ground beef and real shredded cheddar elevate the dish from “just okay” to “hands down the best version you’ll ever make at home.”
- Cooking Method: Baking the dip locks in moisture and creates that coveted cheese‑crackling top that no stovetop method can replicate.
- Make‑Ahead Potential: Assemble it ahead of time, refrigerate, and pop it in the oven when guests arrive; the flavor actually deepens overnight.
Inside the Ingredient List
The Flavor Base
The star of the flavor base is the 1 packet Taco Seasoning. This blend of chili powder, cumin, garlic, and a hint of paprika brings the classic Mexican street‑food vibe straight to your dip. If you skip it, you’ll lose that smoky depth and the dip can taste flat, like a plain cheese sauce with no personality. Want to dial up the heat? Add a pinch of cayenne or a splash of hot sauce, but remember, the goal is balance, not fire.
Next up, 1 cup Salsa acts as the bright, tangy counterpoint to the meat and cheese. It introduces fresh tomato, onion, and cilantro notes that lift the entire dish. Using a chunky salsa adds texture, while a smooth variety keeps the dip silky. If you’re out of salsa, a can of diced tomatoes with a dash of lime juice works in a pinch, though you’ll miss the layered spice profile.
The Texture Crew
8 ounces Cream Cheese is the secret weapon that binds everything together. Its mild flavor lets the taco seasoning shine, while its creamy body ensures the dip stays luxuriously smooth even after baking. If you substitute with a low‑fat version, you’ll notice a grainy texture and a loss of that melt‑in‑your‑mouth feel. For a tangier twist, try mixing in a spoonful of Greek yogurt, but keep the total dairy volume in check.
The final texture element is 2 cups Shredded Cheddar Cheese. This cheese provides the golden crust that crackles and pulls apart in those satisfying strings. Opt for sharp cheddar for a more pronounced bite; mild cheddar will still work but may feel a bit one‑dimensional. If you’re dairy‑intolerant, a blend of vegan cheddar shreds can mimic the melt, though the flavor will shift slightly.
The Unexpected Star
The 1 pound Ground Beef is the unexpected hero that turns a simple dip into a hearty, protein‑packed indulgence. It adds a meaty umami depth that plain cheese dips lack, making it perfect for game nights when you need something that satisfies both cravings and hunger. Choosing lean ground beef (90% lean) reduces excess grease, but if you love richness, a 80% lean blend will give you an even more decadent result. Always break the meat into small crumbles while cooking to ensure even seasoning distribution.
When selecting ground beef, look for a bright red color and a clean smell; any grayish hue or sour odor indicates it’s past its prime. Pat the meat dry with paper towels before browning; this step prevents steaming and ensures you get that coveted caramelized crust that locks in flavor.
The Final Flourish
While the five core ingredients carry the dish, a few optional touches can elevate it further. A splash of lime juice added at the end brightens the overall profile, while a sprinkle of fresh cilantro adds a burst of herbaceous freshness. If you’re feeling adventurous, fold in a handful of corn kernels for a pop of sweetness and texture. These additions are not mandatory, but they can turn a great dip into an unforgettable one.
Everything's prepped? Good. Let's get into the real action...
The Method — Step by Step
-
Preheat your oven to 375°F (190°C) while you gather all the ingredients on the counter. This temperature is the sweet spot that allows the cheese to melt perfectly without scorching, and it gives the beef enough time to finish cooking through. I like to set a timer for the preheat so I don’t waste any precious minutes. That sizzle when it hits the pan? Absolute perfection.
-
Heat a large skillet over medium‑high heat and add the ground beef, breaking it up with a wooden spoon. Let it sit undisturbed for about a minute so it develops a nice brown crust—this is where the flavor lives. As the meat browns, sprinkle the taco seasoning evenly, and watch the spices release an intoxicating aroma that fills the kitchen like a stadium chant. That moment when the beef is fully browned and fragrant? That’s your cue to move on.
Kitchen Hack: Use a splatter guard while browning the beef; it keeps your stovetop clean and lets you focus on getting that perfect caramelization. -
Once the beef is nicely browned, drain any excess fat—this prevents the dip from becoming greasy. Return the skillet to the heat, stir in the salsa, and let the mixture simmer for 3‑4 minutes. The salsa should thicken slightly, coating each crumb of beef like a glossy glaze. Taste at this point; you’ll notice a subtle tang that will later balance the richness of the cheese.
-
Turn off the heat and add the 8 ounces of cream cheese in chunks, letting it melt into the beef‑salsa mixture. Stir continuously until the cream cheese is fully incorporated, creating a silky, uniform sauce. This step is crucial—if the cream cheese isn’t fully melted, you’ll end up with pockets of firmness that ruin the dip’s smooth texture.
-
Transfer the beef‑cream cheese blend into a 9‑inch baking dish, spreading it out evenly with a spatula. Sprinkle the shredded cheddar cheese over the top, ensuring an even layer that will turn golden and bubbly. Pro tip: Use a mixture of sharp and mild cheddar for a complex flavor profile that’s both sharp and buttery.
Kitchen Hack: If you’re short on time, pre‑shred the cheddar and store it in the freezer; it will grate itself when you need it. -
Slide the dish into the preheated oven and bake for 20‑25 minutes, or until the cheese is bubbling and the edges are pulling away from the sides of the dish. The top should be a deep, golden‑brown that crackles when you tap it lightly with a spoon. Watch out: Overbaking can cause the cheese to become rubbery, so keep a close eye on the color.
Watch Out: If the cheese starts to brown too quickly, loosely cover the dish with foil to prevent burning while the interior finishes cooking. -
Remove the dip from the oven and let it rest for 5 minutes. This short rest allows the cheese to set slightly, making it easier to scoop and preventing it from sliding off the chips like a slippery football. The aroma at this stage is intoxicating—a blend of toasted cheddar, savory beef, and a hint of salsa that makes your mouth water before you even take a bite.
-
Serve the dip hot, surrounded by sturdy tortilla chips, crunchy pretzel sticks, or even sliced baguette. Encourage your guests to dive in, and watch as they scramble for the last spoonful. I dare you to taste this and not go back for seconds; the combination of textures and flavors is that compelling. And now the fun part—watch everyone fight over the last bite.
That's it — you did it. But hold on, I've got a few more tricks that'll take this to another level...
Insider Tricks for Flawless Results
The Temperature Rule Nobody Follows
Never bake a cheese dip at a temperature higher than 400°F. Higher heat can cause the cheese proteins to seize, resulting in a rubbery texture. Keep it at 375°F for a gentle melt that retains that creamy pull you love. I once cranked the oven to 425°F in a hurry; the result was a burnt top and a gritty interior—lesson learned.
Why Your Nose Knows Best
Trust the scent cues more than the clock. When the dip starts to emit a toasted, buttery aroma, you’re within five minutes of perfection. If the smell turns sharp or burnt, pull it out immediately. Your nose is a more reliable timer than any kitchen gadget.
The 5‑Minute Rest That Changes Everything
Allowing the dip to rest for exactly five minutes after baking lets the cheese fibers re‑align, creating that coveted stringy pull. Skipping this step makes the dip too runny, and you’ll lose the dramatic cheese stretch that impresses guests. Set a timer—five minutes is all it takes.
Cheese Blend Magic
Mixing sharp cheddar with a small amount of mozzarella gives you both flavor depth and meltability. The mozzarella ensures a smooth, glossy surface, while the sharp cheddar adds bite. I’ve tried pure cheddar and found the top a bit gritty; the blend solves that problem instantly.
Layering for Crunch
For an added crunch, sprinkle a thin layer of crushed tortilla chips or fried onions on top during the last five minutes of baking. The chips toast lightly, providing a contrasting texture that makes each bite more exciting. A friend tried this once and called it “the ultimate crunch factor.”
Creative Twists and Variations
This recipe is a playground. Here are some of my favorite ways to switch things up:
Southwest Spin
Swap the taco seasoning for a packet of Southwest blend, add black beans and corn, and finish with a drizzle of chipotle mayo. The result is a smoky, slightly sweet dip that pairs perfectly with corn chips.
Spicy Inferno
Increase the heat by using a habanero salsa and adding a teaspoon of crushed red pepper flakes. Top with pepper jack cheese instead of cheddar for an extra kick that will make even the bravest eaters sweat.
Tex‑Mex Bacon Blast
Stir in half a cup of crisped bacon bits after the beef is cooked. The salty crunch adds a new dimension, and a sprinkle of green onions on top brightens the presentation.
Veggie‑Loaded Delight
Fold in diced bell peppers, zucchini, and shredded carrots before adding the cream cheese. This not only adds color but also sneaks in extra nutrition without compromising the indulgent feel.
Cheesy Quesadilla Dip
Replace the shredded cheddar with a blend of Monterey Jack and mozzarella, and sprinkle a layer of crushed tortilla chips on top before baking. The dip becomes a cheesy quesadilla in disguise—perfect for a game‑day twist.
Herbaceous Garden
Mix in a tablespoon of fresh chopped cilantro and a squeeze of lime juice right before serving. The fresh herbs cut through the richness and give the dip a bright, garden‑fresh finish.
Storing and Bringing It Back to Life
Fridge Storage
Transfer any leftovers to an airtight container and store in the refrigerator for up to three days. When reheating, cover the dish with foil to keep moisture in and prevent the cheese from drying out.
Freezer Friendly
This dip freezes beautifully. Portion it into freezer‑safe containers, label with the date, and store for up to two months. To reheat, thaw overnight in the fridge, then bake at 350°F for 15‑20 minutes, adding a splash of water before baking to restore its creamy texture.
Best Reheating Method
For the ultimate comeback, reheat in a preheated oven at 350°F, uncovered, until the cheese bubbles and the edges turn golden again. Adding a tablespoon of milk or water to the top before reheating creates a gentle steam that revives the dip’s silky interior.