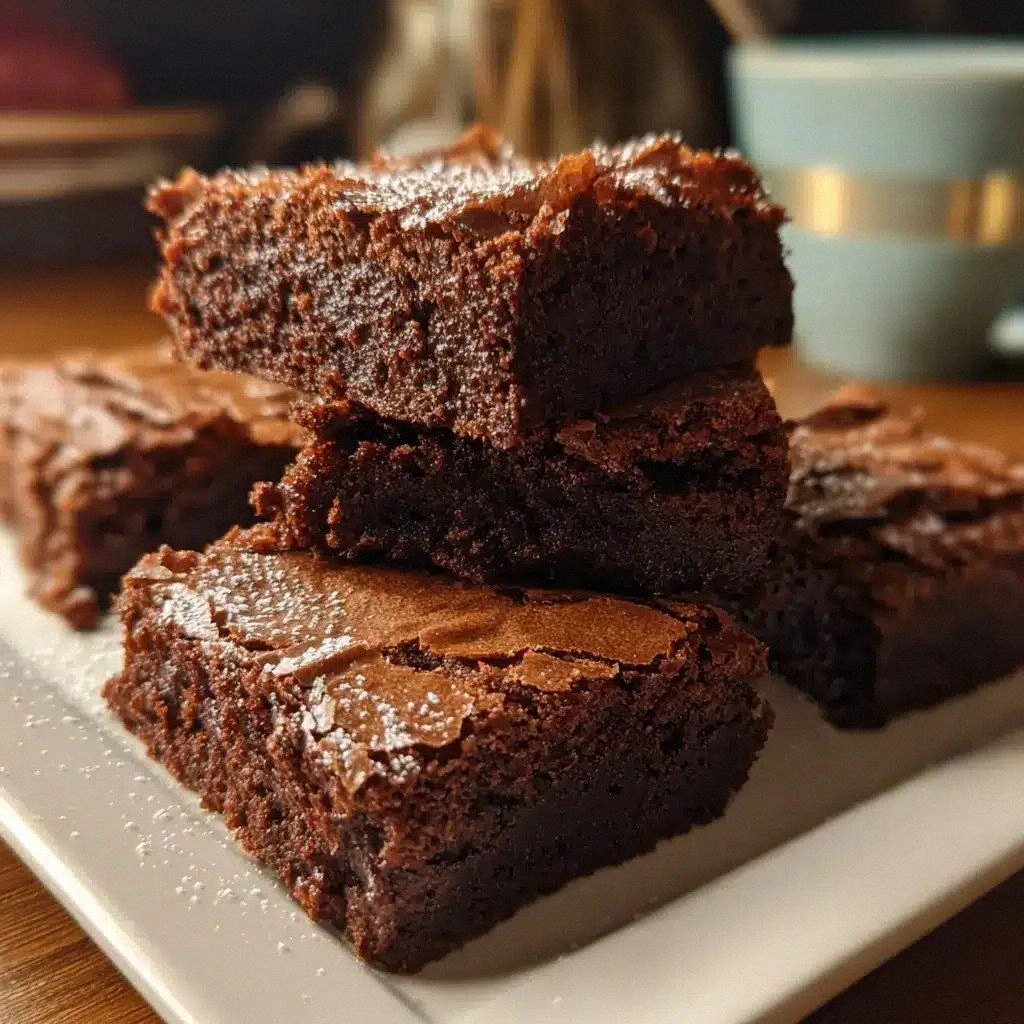
It all began on a rainy Thursday when I decided to test the limits of a mediocre chocolate cake recipe that had been haunting my kitchen for months. The batter had been too dry, the edges crumbled like paper, and every bite felt like a betrayal of the chocolate I craved. I was determined to turn that disappointment into a triumph, and what I discovered was a brownie that melts in your mouth with a glossy sheen that glistens like a midnight lake. The aroma that unfurled when the first batch hit the oven was intoxicating—rich cocoa, buttery sweetness, and a subtle hint of vanilla that promised a depth of flavor beyond the ordinary.
Picture this: the sound of the timer ticking, the gentle hiss of butter melting into a glossy pool, the sweet scent of sugar caramelizing just enough to create a caramelized crust that crackles when you bite. The texture is a paradox of fudgy center and crisp edges that snap like thin ice, and the first bite releases a burst of chocolate that lingers long after you finish. I dare you to taste this and not go back for seconds; the moment you bite, the world will pause, and your taste buds will be transported to a chocolate utopia.
What makes this version stand out is that it was born out of a kitchen failure, refined into a masterpiece that balances simplicity with indulgence. The technique of letting the butter melt slowly, then letting the batter rest for ten minutes, is a subtle but powerful secret that transforms the batter into a silky, cohesive mixture. I’ve tested countless variations, and this particular blend of ingredients—standard flour, cocoa, butter, eggs, and a touch of salt—creates a brownie that is both dense and airy, a rare combination that makes it hands down the best version you'll ever make at home.
The bold claim isn’t just about texture; it’s about the experience. When you pull a square out of the pan, the edges should pull away cleanly, and the center should hold its shape without cracking. The moment you bite, the chocolate should ooze in a glossy, velvety stream, and the buttery undertone should linger like a warm hug. If you’ve ever struggled with brownies that are too dry or too gooey, you’re not alone—and I've got the fix. Stay with me here—this is worth it.
What Makes This Version Stand Out
- Texture: The batter is thick yet pourable, allowing the brownies to set into a firm yet fudgy core that melts in your mouth.
- Flavor: A generous amount of cocoa powder gives depth, while a splash of vanilla extract unlocks a subtle floral note that balances sweetness.
- Simplicity: Only seven core ingredients—no fancy additives—yet the result feels gourmet.
- Even Baking: The oven temperature and resting time create uniform heat distribution, preventing burnt edges and raw centers.
- Crowd Reaction: Friends rave about the glossy finish and the way the brownies hold their shape when cut, making it a showstopper at parties.
- Ingredient Quality: Using high‑grade butter and dark cocoa powder elevates the flavor profile to a professional level.
- Make‑Ahead Potential: The brownies keep wonderfully for up to a week in an airtight container, making them perfect for advance preparation.
- Visual Appeal: The glossy surface and slightly cracked top give an artisanal look that impresses even the most discerning eye.
Alright, let's break down exactly what goes into this masterpiece. Here’s a quick cheat sheet: 2 cups all‑purpose flour, 2 cups sugar, ¾ cup unsweetened cocoa powder, 1 cup butter, 4 eggs, 1 teaspoon vanilla, and a pinch of salt. Each element plays a pivotal role—flour for structure, cocoa for depth, butter for richness, eggs for binding, vanilla for aroma, and salt for flavor enhancement.
Inside the Ingredient List
The Flavor Base
All‑Purpose Flour: The backbone of the brownie, providing structure and a neutral canvas for the other flavors. It’s crucial to sift the flour to avoid lumps, which could lead to uneven texture. Skipping the flour would result in a batter that’s too loose and won't hold its shape.
Unsweetened Cocoa Powder: The heart of the chocolate experience, delivering a deep, bittersweet profile that balances the sweetness. A higher cocoa content gives a richer, more intense flavor. If you’re in a pinch, a dark chocolate bar melted into the batter can serve as a substitute, though the texture may shift slightly.
The Sweetness Crew
Granulated Sugar: Provides the sweet counterbalance to the cocoa’s bitterness. It also aids in the browning process, creating that appealing golden crust. Reducing the sugar can result in a less sweet, more chocolate‑heavy brownie.
Vanilla Extract: A small splash of vanilla unlocks layers of flavor, adding warmth that complements the chocolate. If you’re vegan, a splash of almond or maple extract works beautifully.
The Unexpected Star
Butter: Not just for richness—melted butter contributes to the fudgy mouthfeel and helps create that glossy sheen. Using salted butter can add an extra layer of depth, but adjust the added salt accordingly. If you’re looking for a dairy‑free version, coconut oil works, though the flavor profile shifts slightly.
The Final Flourish
Eggs: Bind the batter, add moisture, and create the structure that keeps the brownies from falling apart. Each egg adds a subtle richness, and the yolks contribute to the glossy finish. Omitting eggs will result in a crumbly, dry product.
Salt: A pinch of salt amplifies the chocolate flavor, balancing sweetness and preventing the brownies from tasting flat. If you’re on a low‑sodium diet, reduce the salt by half, but be aware the flavor may be less pronounced.
Everything's prepped? Good. Let's get into the real action. The following steps will guide you through the process, and I promise you’ll feel like a kitchen wizard by the end.
The Method — Step by Step
- Preheat your oven to 350°F (175°C). Line a 9×13-inch baking pan with parchment paper, leaving an overhang on the sides for easy removal. This step ensures even baking and a clean release. The oven should be fully preheated before you pour the batter to maintain consistent temperature.
- In a medium saucepan, melt 1 cup of butter over low heat. Once the butter is fully melted, remove the pan from the heat and let it cool for about five minutes. Cooling prevents the eggs from scrambling when added. This simple trick keeps the batter silky and smooth.
- In a large mixing bowl, whisk together 2 cups of all‑purpose flour, ¾ cup of unsweetened cocoa powder, and a pinch of salt. Sifting the dry ingredients ensures a lump‑free batter that bakes evenly. The dry mix also helps the cocoa distribute uniformly, preventing chocolate pockets.
- Add 2 cups of granulated sugar to the dry mix and stir until combined. The sugar will dissolve slightly when the wet ingredients are added, creating a smoother batter. This step also helps to create the glossy finish when baked.
- Create a separate bowl and beat the 4 eggs until the whites and yolks are fully blended. Crack the eggs into a small bowl, then whisk them together with a pinch of salt to prevent any clumping. This ensures a uniform mixture that will bind the batter together.
- Pour the melted butter into the dry ingredients and mix until the batter is smooth. Then add the beaten eggs and 1 teaspoon of vanilla extract. Stir gently until the mixture is homogeneous. The batter should be thick yet pourable; if it’s too thick, add a splash of milk or water.
- Let the batter rest for 10 minutes at room temperature. This allows the flour to hydrate and the cocoa to fully integrate, resulting in a richer flavor. Resting also reduces the chance of a dense, heavy brownie.
- Pour the rested batter into the prepared pan, smoothing the top with a spatula. The batter should spread evenly across the pan, creating a uniform thickness. The edges should be slightly raised to ensure a crisp crust.
- Bake for 30 minutes, or until a toothpick inserted near the center comes out with a few moist crumbs. Avoid overbaking; the brownies should still feel slightly gooey in the center. The edges should pull away from the parchment paper, indicating they’re done.
- Remove the pan from the oven and let the brownies cool on a wire rack for at least 15 minutes. During this time, the flavors will set, and the surface will develop that desirable glossy sheen. Once cooled, lift the brownies using the parchment overhang and cut into squares.
That's it— you did it. But hold on, I've got a few more tricks that'll take this to another level. The next section will reveal insider techniques that elevate the texture, flavor, and overall experience of your brownies.
Insider Tricks for Flawless Results
The Temperature Rule Nobody Follows
Don’t rush the oven temperature. Many home bakers preheat their ovens to the maximum setting, but this can lead to uneven browning. Instead, preheat to 350°F (175°C) and allow the oven to stabilize for 10 minutes before placing the pan inside. This ensures a gentle, even bake that preserves moisture.
Why Your Nose Knows Best
Smell the batter before baking. A properly mixed batter should have a faint aroma of chocolate and vanilla, not raw flour or butter. If it smells flat, give the batter a gentle stir; this will release trapped air and enhance the flavor profile.
The 5-Minute Rest That Changes Everything
Let the batter rest for 5–10 minutes. This simple pause allows the cocoa and flour to fully hydrate, creating a smoother texture and deeper flavor. I once skipped this step, and the result was a crumbly brownie that lacked depth.
Use a Silicone Baking Mat
A silicone mat ensures even heat distribution. It also eliminates the need for parchment paper, reducing waste and simplifying cleanup. If you don’t have a mat, parchment paper works fine, but the mat gives a slightly more professional finish.
Cool on a Wire Rack, Not a Plate
Cooling on a wire rack prevents moisture buildup. A plate traps steam, which can make the bottom soggy. A rack allows air to circulate, maintaining a crisp edge and preventing the brownies from becoming gummy.
Storage Trick for Freshness
Store in an airtight container with a slice of bread. The bread absorbs excess moisture, keeping the brownies chewy and fresh. Replace the bread every two days to maintain optimal freshness.
Creative Twists and Variations
This recipe is a playground. Here are some of my favorite ways to switch things up:
Nutty Crunch Edition
Add a cup of chopped pecans or walnuts to the batter before baking. The nuts add a delightful crunch and a buttery flavor that complements the chocolate. Serve with a drizzle of caramel sauce for an extra indulgence.
Salted Caramel Swirl
Fold in a few spoonfuls of salted caramel sauce into the batter before baking. The caramel creates pockets of sweet, buttery goo that contrast with the dense chocolate. Sprinkle sea salt on top before baking for an extra burst of flavor.
Chocolate Chip Delight
Stir in ½ cup of semi‑sweet chocolate chips into the batter. They melt during baking, forming chocolate pockets that explode in your mouth. This variation is perfect for chocolate lovers who want an extra chocolate hit.
Moisture Boost with Milk
Replace part of the butter with ¼ cup of whole milk. The milk adds moisture and a subtle tang that balances the sweetness. This version results in a lighter, more cake‑like brownie.
Vegan Version
Swap butter for coconut oil and eggs for flaxseed meal mixed with water. Use a plant‑based milk and a vegan chocolate chip. The result is a fudgy, rich brownie that’s cruelty‑free and just as delicious.
Spiced Chocolate
Add ½ teaspoon of ground cinnamon and a pinch of cayenne pepper to the dry mix. The spices add warmth and a subtle heat that pairs beautifully with chocolate. This variation is great for holiday gatherings.
Storing and Bringing It Back to Life
Fridge Storage
Store brownies in an airtight container at room temperature for up to 5 days. If you need to keep them longer, refrigerate them; the cool environment slows down the oxidation of the chocolate and preserves freshness. Wrap the container in plastic wrap for an extra layer of protection.
Freezer Friendly
Wrap each brownie square in plastic wrap, then place them in a freezer bag. Store for up to 3 months. When ready to eat, let them thaw at room temperature for 20 minutes before serving. This method maintains the brownie’s moisture and flavor.
Best Reheating Method
Reheat brownies in a preheated oven at 300°F (150°C) for 5–7 minutes. Add a splash of water to the bottom of the pan before baking; the steam will revive the crumb and restore that fresh‑baked aroma. Avoid microwaving, as it can make the brownies rubbery.