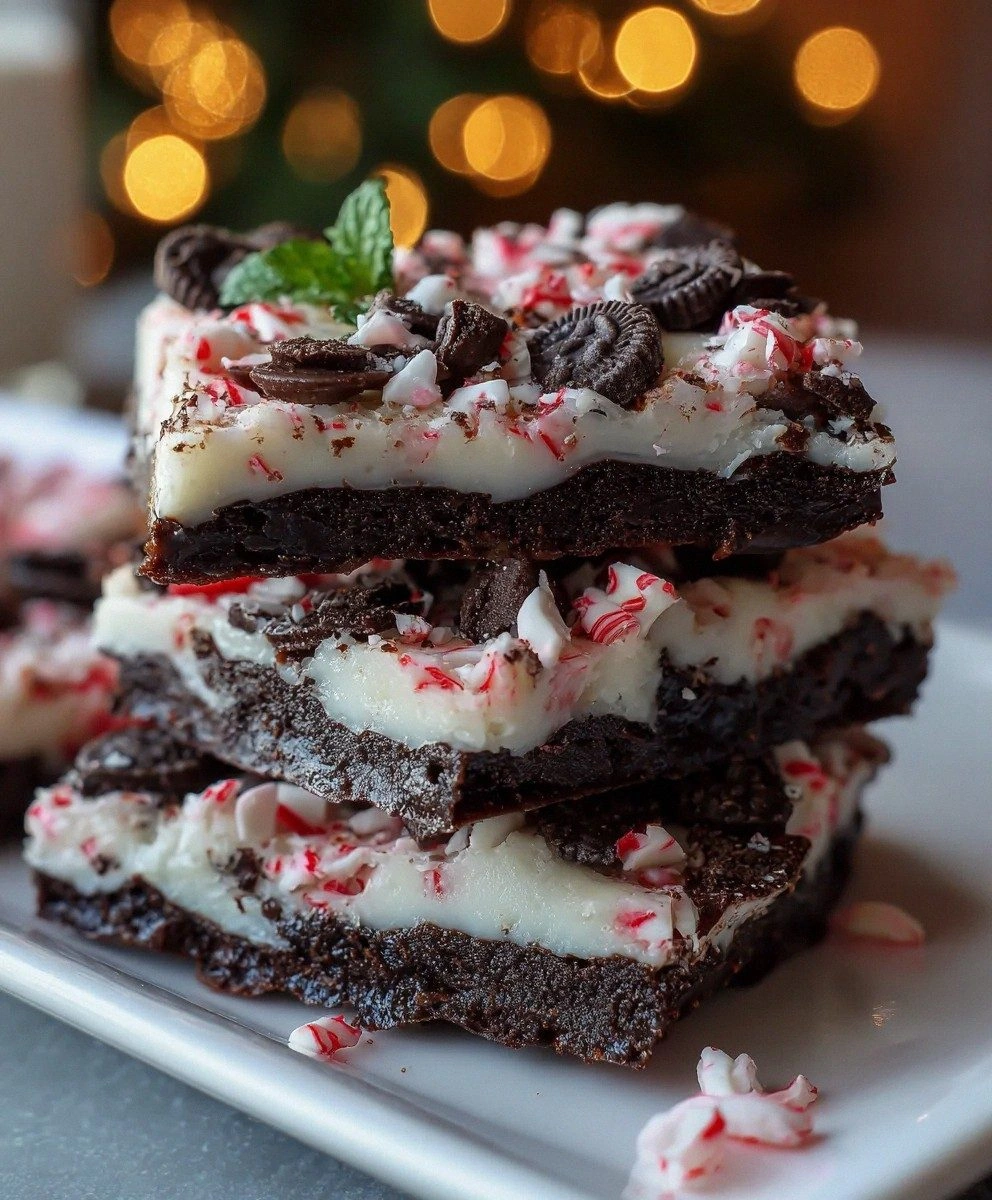
I still remember the night I accidentally invented Chaos Cake Peppermint Cookie Brittle. My kitchen looked like a sugar tornado had barreled through: flour clouds on the ceiling, candy cane shards crunching underfoot, and that intoxicating smell of caramelized sugar mingling with cool peppermint. I was supposed to be making a simple chocolate cake for my neighbor's holiday party, but somewhere between the third phone call interruption and the cat knocking over the vanilla extract, everything went gloriously sideways. Instead of a fluffy cake, I pulled out this crackling sheet of what looked like geological strata — layers of cookie crunch, cake crumbs, and candy glass that shattered like frozen lake ice when I tapped it with a spoon. One bite and I forgot all about the party. The texture was pure wizardry: crisp edges that dissolved into buttery crumbs, pockets of chewy cake bits, and that bright peppermint kick that made my whole mouth feel like I'd stepped outside into December air.
Picture this: you're standing at your counter, the oven light casting a warm glow as you break off a piece of this chaotic masterpiece. The first snap sounds like a tiny firecracker, followed by a cascade of crumbs that you'll definitely be finding in your pockets tomorrow. That initial crunch gives way to a gentle chew, and then — boom — peppermint swoops in like a superhero, cutting through the rich sweetness with surgical precision. The flavors dance around each other like they're at some wild winter masquerade ball, each bite revealing new combinations. Sometimes you get a shard of caramelized sugar that crackles between your teeth. Other times it's a soft pocket of cake that melts like snow on your tongue. And just when you think you've figured it out, you hit a vein of crushed candy cane that explodes into fresh, icy sweetness.
Here's what makes this recipe different from every other peppermint bark or cookie brittle you've tried: we're not just layering flavors, we're creating controlled chaos. Traditional recipes want everything neat and tidy, but this beauty thrives on beautiful disorder. We're going to let the cake batter marble with the cookie dough, we're going to encourage the candy to form random shards, and we're absolutely going to let those edges get darker than your grandmother would approve of. Those nearly-burnt bits? That's where the magic lives. They add a depth that makes people close their eyes and say "what IS that?" between bites. I've served this at three dinner parties now, and not one person guessed it started as a mistake. They just know it's the best thing they've ever tasted.
Stay with me here — this is worth it. We're about to embrace kitchen anarchy in the most delicious way possible. By the time we're done, you'll have a tray of something that defies categorization: part cookie, part cake, part candy, completely addictive. The best part? This recipe is forgiving in ways that would make a pastry chef weep with joy. Too much peppermint? It just tastes more festive. Overcooked edges? That's artisanal caramelization, my friend. Broken into weird shapes? Congratulations, you've got rustic artisan pieces. Let me walk you through every single step — by the end, you'll wonder how you ever made it any other way.
What Makes This Version Stand Out
Peppermint Power: Most recipes treat peppermint like an afterthought, but we're making it the star of the show. We're using three different forms — extract for depth, crushed candy for crunch, and a final dusting that hits your palate like winter morning air. The result is a cooling sensation that builds rather than overwhelms, creating that addictive quality that keeps you reaching for "just one more piece."
Texture Anarchy: Forget uniform texture. We're engineering a wild ride — shatteringly crisp edges that give way to chewy centers, punctuated by random cake pockets that melt on your tongue. It's like someone took the best parts of seven different desserts and threw them together in the most beautiful accident imaginable.
One-Bowl Wonder: Despite looking like it came from a Parisian patisserie, this whole thing comes together in one bowl and one pan. No fancy equipment, no piping bags, no patience-testing steps. If you can stir and spread, you can make this. I dare you to taste this and not go back for seconds.
Make-Ahead Champion: This stuff actually improves after a day, as the flavors meld and the textures settle into their final form. Make it Sunday, break it out Friday, and watch people think you're some kind of dessert wizard. I'll be honest — I ate half the batch before anyone else got to try it.
Holiday Flexibility: While it's perfect for December cookie swaps, swap the peppermint for citrus zest in summer, pumpkin spice in fall, or lavender in spring. The base recipe is your canvas, and seasonal flavors are your paint. Picture yourself pulling this out of the oven, the whole kitchen smelling incredible.
Crowd Psychology: There's something about the irregular shapes that makes people feel less guilty about indulging. Break it into rustic pieces and watch normally reserved guests become cookie vultures. Most recipes get this completely wrong. Here's what actually works.
Ingredient Integrity: We're using real butter, real vanilla, and real peppermint oil — no artificial flavors that taste like toothpaste. Quality ingredients shine through simple preparation, creating something that tastes like it should cost twenty dollars a pound in a boutique shop.
Inside the Ingredient List
The Flavor Foundation
Butter is the backbone here — we're using a full cup because this isn't the time for dietary restraint. Cold, cubed butter works best for that cookie layer, cutting into the flour like you're making pie dough. The result is pockets of buttery goodness that create those crave-worthy crispy edges. If you've ever struggled with bland cookie brittle, you're not alone — and I've got the fix. It's probably because you skimped on the butter or used that pale, flavorless stuff from a tub. Spring for the good European-style butter with higher fat content; it makes a difference you can taste.
Brown sugar isn't just for sweetness — it's our secret weapon for that deep, almost molasses-like flavor that makes people ask if there's bourbon in here. The molasses in brown sugar caramelizes at a lower temperature, creating those dark, complex edges that taste like they've been kissed by fire. Don't substitute white sugar here unless you want flat, one-dimensional sweetness. Picture this: brown sugar melting into butter, creating little rivers of caramel that snake through your cookie base.
The Texture Crew
All-purpose flour provides structure, but we're using less than you'd expect for cookies. This keeps things crisp and delicate rather than cakey and soft. Too much flour and you'll have a doughy brick; too little and you'll have greasy shards that fall apart. The magic happens when the flour hits the hot butter — creating layers that puff and crisp like the world's most addictive crackers.
Eggs are our binders, but they do double duty here. One whole egg plus an extra yolk gives us richness and helps create those chewy pockets amid the crispy terrain. The yolk adds fat for tenderness while the white provides structure. Don't skip the extra yolk — it's what separates good cookie brittle from the kind that makes people close their eyes in pleasure.
The Unexpected Star
Cake mix might seem like cheating, but here's where we get that "chaos" element. A quarter cup of yellow cake mix scattered through creates these surprise pockets of tender, fluffy texture that contrast beautifully with the crisp cookie base. It's like finding hidden treasure in each bite. Use the cheap stuff — expensive cake mix has too much leavening and creates weird bubbles.
The Final Flourish
Crushed candy canes aren't just garnish — they're texture bombs that provide sharp, bright pops against the rich base. Buy the organic ones if you can; they have better peppermint oil and fewer additives. We want some pieces that'll stay crunchy and some that'll melt into sticky rivers of peppermint candy. The contrast between the two is what keeps people coming back for more.
Pure peppermint extract is non-negotiable. Skip the imitation stuff that tastes like mouthwash. Good peppermint extract should smell like you're standing in a field of mint on a cold morning. It should make your sinuses tingle in the best way possible. Store it in the fridge — the cold helps preserve those volatile oils that give us that fresh, clean flavor we're after.
Everything's prepped? Good. Let's get into the real action...
The Method — Step by Step
- Start with your butter — and here's the game-changer: we're keeping it cold. Cube it into half-inch pieces and toss it with the flour, brown sugar, and salt like you're making the world's most decadent streusel. Work quickly with your fingertips, rubbing the butter into the dry ingredients until you have a mixture that looks like coarse breadcrumbs with some pea-sized butter pieces still visible. Those butter pockets are going to create steam and give us our signature flaky layers. Don't overwork it — stop when it holds together in clumps when you squeeze it. This next part? Pure magic.
- Now for the wet team: whisk your egg, extra yolk, vanilla, and peppermint extract until they're completely combined. The mixture should smell like a winter wonderland — if it doesn't make you want to drink it straight, add another drop of peppermint. Pour this over your flour-butter mixture and fold with a spatula just until it comes together. It should look shaggy and rough — like something that should be dough but hasn't decided yet. Those dry patches are fine; they'll hydrate as it bakes and create our varied texture. Okay, ready for the game-changer?
- Here's where we embrace the chaos: scatter tablespoons of dry cake mix randomly over your dough. Don't mix it in completely — we want pockets of cake that'll create soft, tender surprises amid the crisp cookie base. Use your fingers to lightly press some cake mix into the dough while leaving other areas untouched. Think of it like creating a topographical map with different elevations. Some areas should have concentrated cake mix, others barely any. This random distribution is what creates our signature texture variety. And now the fun part.
- Press the dough into your pan, but don't be neat about it. We're going for rustic, almost geological layers here. Press some areas thinner so they'll crisp up like candy, leave others thicker for chewy pockets. The edges should be uneven — some places flush with the pan edge, others pulling back to create those coveted crispy rim pieces. If you've ever struggled with cookie brittle that bakes unevenly, you're not alone — and I've got the fix. It's all in the distribution and those intentional thin spots.
- Slide your pan into a 350°F oven and don't you dare walk away for the first 15 minutes. This is when the magic happens: butter melting, sugar caramelizing, edges turning that perfect amber color. You want to pull it out when the edges are deep golden brown and the center is set but still slightly soft when pressed. It'll continue cooking from residual heat, so err on the side of underdone rather than over. That sizzle when you open the oven door? Absolute perfection.
- While it's still hot from the oven, sprinkle your crushed candy canes over the surface. Don't dump them all in one spot — create a snowfall effect with heavier concentrations in some areas and light dusting in others. The heat will partially melt the candy dust while leaving larger pieces intact, creating a glassy candy surface that crackles beautifully when broken. Some pieces will melt into shiny rivers of peppermint candy, others will stay crunchy for contrast.
- Here's the hardest part: let it cool completely. I know, I know — it smells incredible and you're dying to taste it. But cutting into hot cookie brittle is like slicing into a soufflé early. It needs to set up, those sugars need to harden, and the flavors need to meld. Give it at least two hours at room temperature, or speed things up in the fridge for 45 minutes if you're impatient. The cooling process transforms it from soft cookie to the crisp-chew hybrid we're after.
- Once completely cool, break it into irregular pieces. Don't use a knife — embrace the rustic look by snapping it with your hands. Some pieces will be mostly crispy edges, others will have tender cake centers, and a lucky few will have concentrated pockets of melted candy. The variety is what makes it special. Store pieces in an airtight container with parchment between layers, or freeze for up to two months. That's it — you did it. But hold on, I've got a few more tricks that'll take this to another level...
Insider Tricks for Flawless Results
The Temperature Rule Nobody Follows
Your butter temperature is everything here. Too soft and you'll have greasy, flat cookie brittle. Too cold and it won't incorporate properly, leaving you with dry pockets that taste like flour. The sweet spot is butter that's been out of the fridge for exactly 20 minutes in a 70°F kitchen. It should still feel cool to the touch but yield slightly when pressed. If you can leave fingerprints but it still holds its shape, you've nailed it. A friend tried skipping this step once — let's just say it didn't end well. She ended up with a greasy mess that we had to rename "butter soup brittle."
Why Your Nose Knows Best
Don't trust the timer alone — your nose is the best tool in your kitchen. When this stuff is ready, your house will smell like a winter bakery had a beautiful accident with a candy factory. The scent changes from sweet butter to deep caramel with hints of mint. When you catch yourself standing near the oven just to smell it, it's probably done. This olfactory cue is more reliable than any timer, especially since ovens can vary by 25 degrees or more.
The 5-Minute Rest That Changes Everything
After you pull it from the oven, let it rest for exactly five minutes before adding the candy cane topping. This brief pause allows the surface to set slightly so your candy doesn't sink in and disappear. But don't wait longer than five minutes or the residual heat won't be enough to partially melt the candy dust. It's like the difference between a gentle snowfall and dumping a bucket of ice on a warm cake. Timing here is everything — set a timer and don't get distracted by texts or pets or that show you're binging.
Creative Twists and Variations
This recipe is a playground. Here are some of my favorite ways to switch things up:
Orange Dark Chocolate Chaos
Replace the peppermint extract with orange zest and Grand Marnier, swap candy canes for candied orange peel, and add dark chocolate chunks that melt into bittersweet pockets. The result tastes like those chocolate oranges but with way more interesting texture. It's sophisticated enough for dinner parties but addictive enough that you'll find yourself making it for solo Netflix binges.
Salted Caramel Pretzel Madness
Trade the peppermint for vanilla bean paste, fold in crushed pretzels for salt-and-crunch, and drizzle with homemade caramel after baking. The sweet-salty combo hits every craving button, and the pretzels stay crispy for days. This version disappears faster than the original at potlucks — people lose their minds over the salty-sweet thing.
Lavender Honey Dream
For spring, infuse your butter with culinary lavender, swap brown sugar for honey, and top with crushed honeycomb candy. It tastes like you're eating in a Provencal garden, but with that same addictive crunch. The floral notes are subtle — not like eating perfume — and the honey creates these gorgeous amber pockets that look like stained glass.
Spicy Mexican Chocolate Adventure
Add cinnamon, cayenne, and a touch of chili powder to your dry ingredients, use Mexican chocolate chunks instead of candy canes, and finish with a sprinkle of sea salt. The heat builds slowly, hitting at the end of each bite, making this dangerously easy to eat. It's like your favorite spicy hot chocolate got transmuted into crunchy, snackable form.
PB&J Throwback
Swirl peanut butter into the dough, use strawberry jam in random dollops, and top with crushed honey roasted peanuts. It tastes exactly like that sandwich you lived on in third grade but with grown-up texture complexity. The jam creates these sticky pockets that contrast beautifully with the crisp cookie base.
Storing and Bringing It Back to Life
Fridge Storage
Store your cooled brittle in an airtight container with parchment between layers. It'll stay crisp for up to a week in the fridge, though it's never lasted more than three days in my house. The cold actually intensifies the peppermint flavor, so it's even better straight from the refrigerator. Just let it sit out for five minutes before serving — enough to take the chill off but not enough to lose that refreshing coolness.
Freezer Friendly
This stuff freezes like a dream. Break it into pieces, layer between parchment in a freezer bag, and it'll keep for two months. Thaw at room temperature for 20 minutes — no microwave unless you want peppermint-scented puddles. The texture actually improves after freezing; the cold seems to set the candy pieces even more, giving you that perfect snap. Pro tip: hide some in the back of your freezer for emergency chocolate cravings.
Best Reheating Method
If your brittle has absorbed humidity and lost its snap, spread pieces on a baking sheet and warm in a 300°F oven for 5-7 minutes. Add a tiny splash of water before reheating — it steams back to perfection. Let cool completely and it'll be as crisp as day one. This revival trick works even on pieces that have gone slightly soft, bringing back that satisfying crunch that makes this stuff so addictive.