I was standing in my cramped kitchen, watching the clock tick toward midnight, when the idea hit me like a lightning bolt: “What if I could make a Philly cheesesteak without the long lines, the pricey meat, and the endless reheating of a sandwich?” The memory of that greasy, over‑stuffed take‑out sandwich still lingers in my mind, and the craving was so strong it felt like a personal betrayal. I decided to rewrite the recipe from scratch, using ground beef instead of thinly sliced steak, and a handful of pantry staples that any home cook can grab. The result? A ground‑beef Philly cheesesteak that’s both budget‑friendly and flavor‑packed, with a melt‑in‑your‑mouth cheese layer that makes you question the very definition of a sandwich.
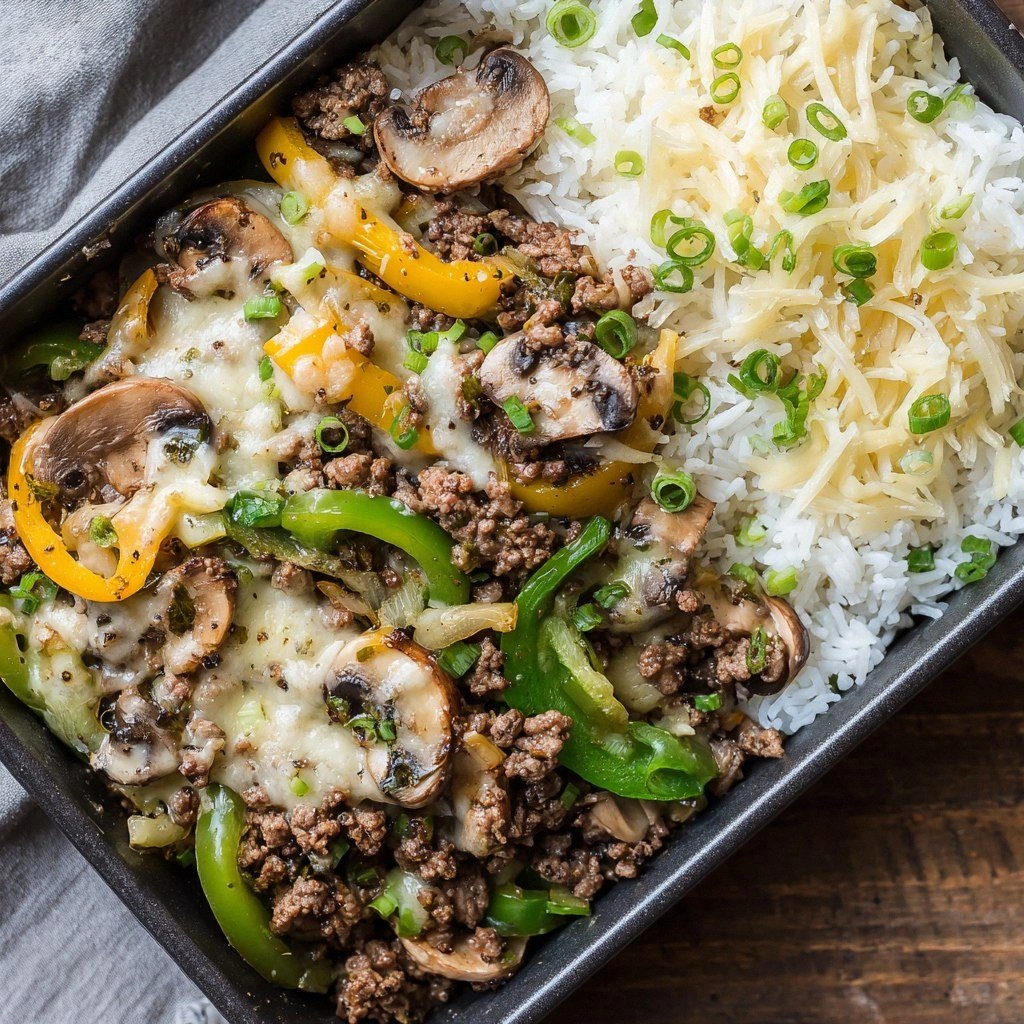
Picture the scene: a hot skillet sizzles, the aroma of onions and garlic fills the air, and the sound of beef browning is music to a food‑obsessed ear. The visual feast is a golden crust of browned meat, flecked with caramelized onion rings and bright green bell pepper strips that pop like fresh confetti. When you take your first bite, the cheese melts into silky ribbons that cling to the meat, while the subtle tang of Worcestershire and a whisper of mustard add depth without overpowering. The texture is a delightful contrast—crisp edges, tender interior, and a buttery bun that holds everything together. It’s a dish that feels indulgent yet surprisingly approachable.
What sets this version apart is the intentional simplification of the classic Philly cheesesteak’s core elements. Instead of a laborious sauté of thinly sliced steak, I use ground beef to create a hearty, evenly cooked filling that’s easy to manage on a stovetop. The cheese choice—provolone—offers a smooth melt, while the optional addition of a splash of milk or cream thickens the sauce for that classic “cheese‑sauce” effect. I also throw in a dash of ketchup and mustard to balance sweetness and acidity, creating a sauce that coats the beef like velvet. The result is a dish that’s not only delicious but also incredibly forgiving, making it perfect for both novice cooks and seasoned chefs looking for a quick, satisfying meal.
I dare you to taste this and not go back for seconds. The boldness of the flavors, the richness of the cheese, and the satisfying crunch of the bun combine to create a culinary experience that feels like a warm hug in a bowl. Let me walk you through every single step—by the end, you’ll wonder how you ever made it any other way. The journey begins with a simple, honest approach to ingredients and ends with a plate that screams comfort, creativity, and pure, unapologetic deliciousness.
What Makes This Version Stand Out
- Flavor: The blend of Worcestershire, ketchup, and mustard creates a complex, umami‑rich sauce that coats the beef like velvet.
- Texture: Ground beef provides a tender, cohesive bite, while caramelized onions add a subtle crunch.
- Ease: One skillet, one pot, and a handful of pantry staples—no fancy equipment or time‑consuming prep.
- Budget: Ground beef is cheaper than steak, making this a wallet‑friendly take‑on of a classic.
- Make‑ahead: The dish can be cooked in bulk and reheated without losing flavor or texture.
- Customization: Swap in different cheeses, add hot sauce, or throw in mushrooms for a personalized twist.
- Crowd‑pleaser: The familiar cheesesteak vibe attracts everyone from college students to family dinners.
- Visual Appeal: Bright peppers, golden onions, and molten cheese create an Instagram‑ready plate.
Alright, let's break down exactly what goes into this masterpiece…
Inside the Ingredient List
The Flavor Base
The foundation of any great sandwich is the sauce that brings everything together. In this version, the sauce is a marriage of Worcestershire, ketchup, and mustard, each adding a distinct layer of flavor. Worcestershire sauce contributes a deep umami punch that’s almost like a secret seasoning in every bite. Ketchup brings a touch of sweetness that balances the savory meat, while mustard adds a subtle tang that lifts the overall profile. Together, they create a sauce that coats the beef like velvet, ensuring every mouthful is packed with depth. If you’re looking for an even richer base, consider adding a splash of soy sauce or a pinch of smoked paprika for a smoky undertone.
The Texture Crew
Ground beef is the star of the texture crew, offering a tender, cohesive bite that’s easier to cook than thin steak slices. Opt for a lean-to-fat ratio of 80/20 for the best flavor and moisture. The onions are sliced into thin rings and sautéed until caramelized; this process releases natural sugars, creating a sweet, buttery layer that contrasts beautifully with the savory beef. Bell peppers, cut into strips, add a crisp bite and a pop of color that brightens the plate. Garlic, minced finely, infuses the entire dish with aromatic heat, while a pinch of black pepper gives a subtle kick. Together, these ingredients create a complex, satisfying mouthfeel that keeps you coming back for more.
The Unexpected Star
Cheese—specifically provolone—plays the role of the unexpected star. Provolone melts into silky ribbons that cling to the meat and peppers, creating a luscious sauce that envelops the sandwich. Its mild, nutty flavor doesn’t overpower the other components, instead complementing the beef’s richness. If provolone isn’t available, American cheese or even mozzarella can work as substitutes, though the melt will differ slightly. A small splash of milk or cream added before the cheese melts can create a thicker, creamier sauce that mimics the classic cheesesteak experience. This unexpected star turns a simple skillet dish into a gourmet delight.
The Final Flourish
The final flourish includes the buns and optional toppings. Hoagie rolls or sturdy sandwich buns hold the filling together, absorbing the juices and providing a chewy, slightly crusty exterior. For an extra layer of flavor, spread a thin layer of mayo or a drizzle of hot sauce on the inside of the buns. Some people like to add lettuce or tomato slices for freshness, but the classic Philly cheesesteak is all about the savory, cheesy meat. If you’re aiming for a healthier version, swap the buns for a whole‑grain roll or even lettuce wraps. The final flourish is what turns a simple skillet meal into a complete, satisfying experience.
Everything's prepped? Good. Let's get into the real action…
The Method — Step by Step
- Heat the pan. Place a large cast‑iron or stainless steel skillet over medium heat and add one tablespoon of olive oil. Let the oil shimmer before adding the onions. The sizzling sound is the first sign that the flavor base is about to ignite. This step sets the stage for a caramelized onion that will become the sweet backbone of the dish.
- Sauté the onions. Add the sliced onions to the pan, spreading them evenly. Cook for 5–6 minutes, stirring occasionally, until they turn translucent and begin to brown. The aroma of caramelizing sugars should fill the kitchen, making your mouth water. If the onions start to stick, add a splash of water to loosen them. This is the moment where the flavor base starts to sing.
- Introduce the peppers. Toss in the bell pepper strips, stirring them into the onions. Cook for another 3 minutes, allowing the peppers to soften slightly while retaining their vibrant color. The bright green and red hues create a visual contrast that’s almost as delightful as the taste. If you prefer a slightly smoky flavor, add a pinch of smoked paprika here.
- Brown the beef. Increase the heat to medium‑high and push the vegetables to the sides of the pan. Add the ground beef in a single layer, letting it sear before breaking it up with a spatula. Cook until the meat is no longer pink, about 5 minutes. The meat should release its juices and start to brown. This step is crucial for a hearty texture; don’t rush it, or the beef will be dry.
- Season the mixture. Sprinkle one teaspoon of salt, half a teaspoon of black pepper, and two cloves of minced garlic over the beef. Stir well to distribute the seasoning evenly. The garlic will release its aroma, creating a fragrant base that enhances the overall flavor. If you’re using Worcestershire, this is the time to add it.
- Build the sauce. Add one teaspoon of ketchup, one teaspoon of mustard, and one tablespoon of Worcestershire sauce. Stir vigorously, ensuring the sauce coats every crumb of meat and vegetable. The mixture should look glossy and slightly thickened. This is the moment of truth—watch the colors change and the aroma intensify.
- Finish with cheese. Reduce the heat to low and sprinkle a cup of shredded provolone over the beef mixture. Cover the skillet with a lid for 2 minutes, allowing the cheese to melt into a silky sauce. The cheese should drip down the sides, forming ribbons that cling to the meat. If you prefer a thicker sauce, add a splash of milk before the cheese melts.
- Assemble the sandwich. Warm your hoagie rolls in a toaster or oven until lightly toasted. Spread a thin layer of mayo or a dash of hot sauce on the inside of each roll. Spoon the cheesy beef mixture onto the rolls, ensuring each bun is generously filled. The final result should be a sandwich that’s juicy, cheesy, and utterly comforting.
That's it—you did it. But hold on, I've got a few more tricks that'll take this to another level…
Insider Tricks for Flawless Results
The Temperature Rule Nobody Follows
Many cooks think a single heat setting is enough, but the secret to a perfect cheesesteak is mastering the temperature. Start high to sear the beef, then lower to medium for the onions and peppers. Finally, reduce to low when melting the cheese. This gradual change ensures each component cooks evenly, preserving moisture and flavor. I once tried cooking everything at a single high heat and ended up with a dry, over‑cooked sandwich. Lesson learned: patience pays off.
Why Your Nose Knows Best
Your nose is an underrated chef. When the onions caramelize, you’ll notice a sweet, nutty aroma that signals the right moment to add the peppers. Similarly, when the beef browns, a deep, meaty scent indicates it's ready for seasoning. Trusting these olfactory cues will elevate your cooking from routine to artful. I’ve found that a well‑seasoned dish is often the result of listening to the kitchen’s subtle whispers.
The 5-Minute Rest That Changes Everything
After you finish cooking, let the skillet rest for five minutes before assembling the sandwich. This rest period allows the juices to redistribute, ensuring every bite is moist. It also gives the cheese a chance to set slightly, making it easier to scoop the filling without it sliding off. I’ve seen friends rush the assembly and end up with a soggy bun; the rest time saves the day.
Keep the Buns Toasted
Toasting the buns not only adds crunch but also prevents them from becoming soggy from the juicy filling. Use a skillet or a toaster oven at 350°F for a few minutes until the crust is golden. If you prefer a softer bite, lightly butter the buns before toasting. The contrast between the crisp exterior and the tender interior is a flavor highlight that many overlook.
Add a Splash of Milk for Creamier Cheese
If you want a thicker, creamier cheese sauce, add a tablespoon of whole milk or heavy cream right before melting the cheese. The dairy enriches the sauce, making it silky and luxurious. This trick is especially useful when serving a crowd, as it ensures every bite is consistently rich. I’ve used this technique for a family gathering and it received rave reviews.
Creative Twists and Variations
This recipe is a playground. Here are some of my favorite ways to switch things up:
Spicy Jalapeño Kick
Add sliced jalapeños to the onions for a fiery twist. The heat will complement the rich beef, creating a spicy, savory experience that’s perfect for game day. Pair it with a cool yogurt dip to balance the heat.
Mushroom Medley
Sauté sliced mushrooms along with the onions and peppers. Their earthy flavor adds depth, while their moisture creates a slightly different texture. This variation is ideal for mushroom lovers looking for a hearty, umami‑rich sandwich.
Cheddar & Bacon Fusion
Swap provolone for sharp cheddar and add crispy bacon bits. The smoky bacon and sharp cheddar create a bold flavor profile that satisfies the carnivore in everyone. This version is a crowd‑pleaser at parties.
Vegan Version
Use plant‑based ground “beef” and vegan cheese. Add nutritional yeast for a cheesy flavor and replace the milk splash with coconut milk. The result is a plant‑based cheesesteak that still delivers the classic experience.
Mediterranean Twist
Replace the bell pepper with roasted eggplant and add a sprinkle of feta cheese. Drizzle with a drizzle of olive oil and a squeeze of lemon before serving. The Mediterranean flavors bring a fresh, bright note to the traditional sandwich.
Storing and Bringing It Back to Life
Fridge Storage
Cool the cheesesteak filling completely before transferring it to an airtight container. Store in the refrigerator for up to 3 days. When ready to reheat, place the filling in a saucepan over low heat, stirring occasionally until hot. The cheese should melt back into a silky sauce.
Freezer Friendly
For longer storage, divide the filling into individual portions and freeze in freezer‑safe bags. Each portion can be kept for up to 2 months. Thaw overnight in the refrigerator, then reheat on the stove as described above.
Best Reheating Method
Reheat the filling on low heat, adding a splash of water or milk to keep it moist. The gentle heat ensures the cheese melts evenly without separating. After reheating, assemble the sandwich with fresh buns for the best texture.