Picture this: it’s a crisp October evening, the wind is whispering through the trees, and you’re standing in your kitchen, sleeves rolled up, daring your friends to a Halloween cookie showdown. I once tried to impress a crowd with a classic sugar cookie, only to end up with a flat, bland disaster that crumbled like stale paper. That flop sparked a midnight obsession, and after countless trial‑and‑error sessions, I finally nailed the ultimate Halloween crinkle cookie that not only looks spooky but also explodes with joy in every bite. This version is the result of a kitchen rebellion—mixing the right balance of cocoa, sugar, and a secret technique that turns ordinary dough into a melt‑in‑your‑mouth marvel.
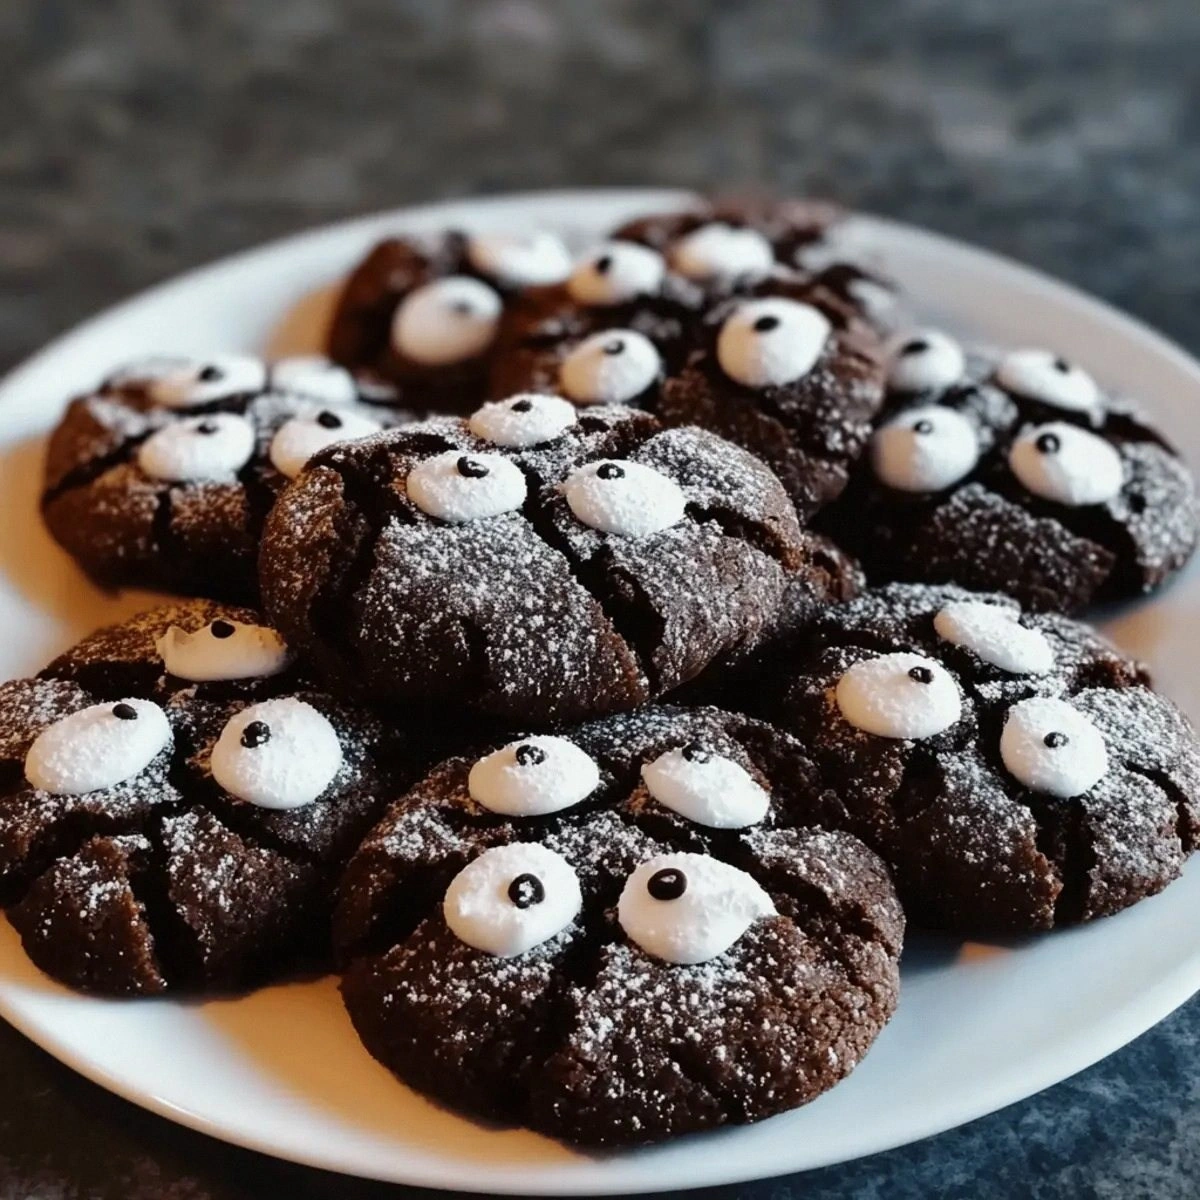
When you first open the oven, a wave of warm, chocolate‑rich aroma hits you like a cozy blanket, instantly making the whole house feel like a haunted bakery. The scent of vanilla and a hint of caramelized sugar swirl together, while the faint crackle of the crust forming is the soundtrack of anticipation. Your eyes are drawn to the glossy, powdered‑sugar coating that cracks open to reveal a fudgy interior, and your fingertips can’t resist the urge to press a cookie and watch it spring back like a rubber ball. The texture is a perfect paradox: a crisp, slightly crunchy exterior that gives way to a soft, almost gooey center, creating a sensory experience that feels like biting into a sweet, edible mystery.
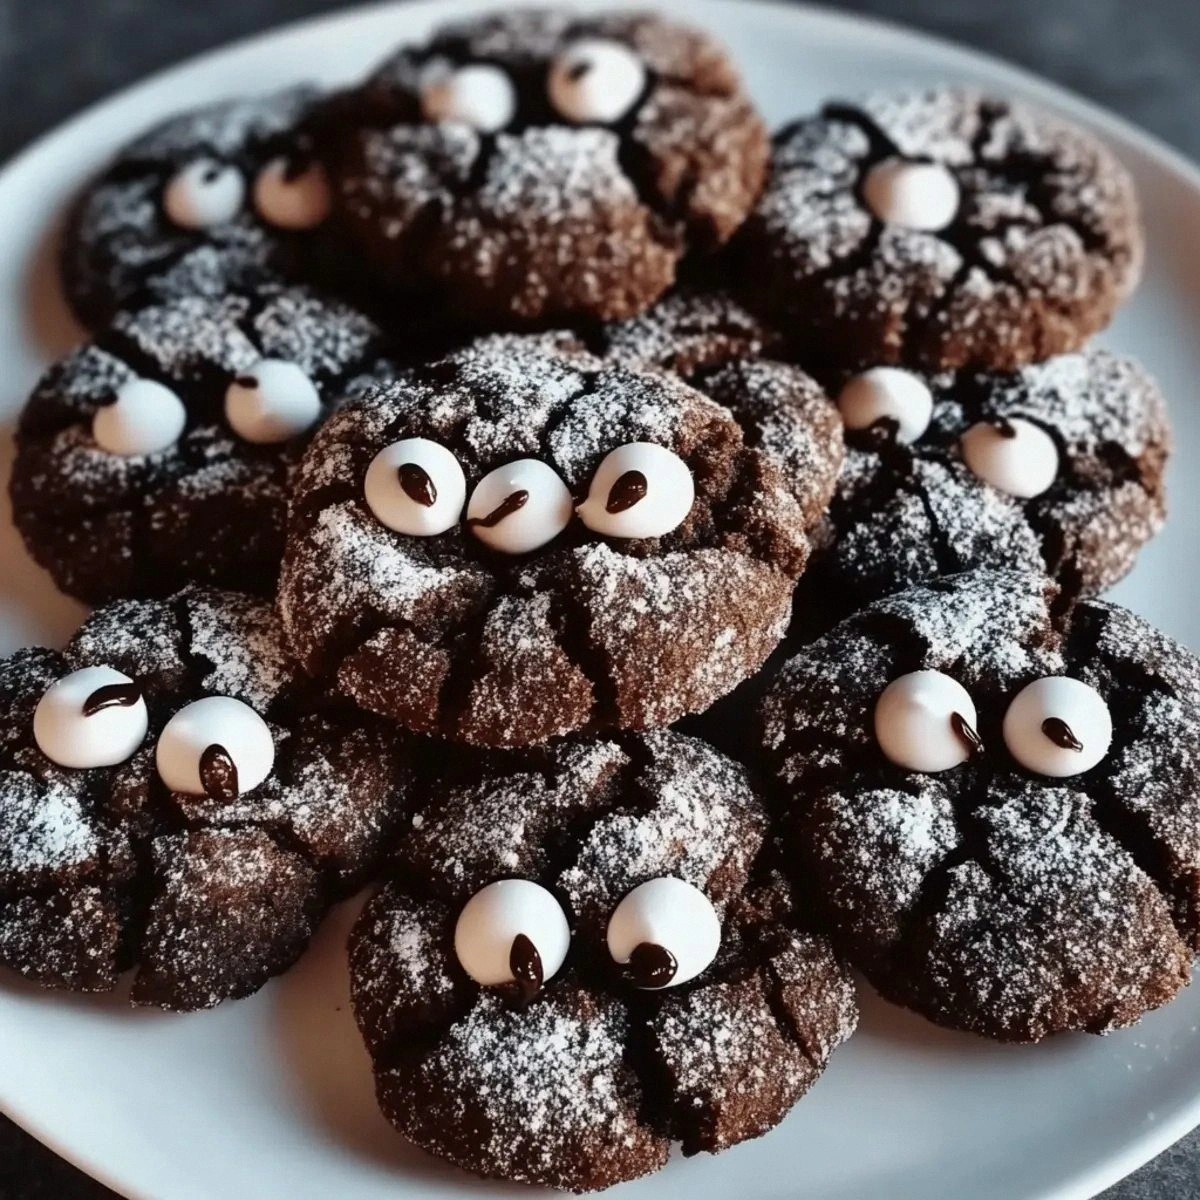
What sets this recipe apart from the sea of crinkle cookie copycats is a trio of game‑changing moves: a precise balance of natural cocoa and a splash of neutral oil for that melt‑in‑the‑mouth feel, a chilling rest that awakens the gluten, and a final dusting of confectioners’ sugar that not only adds sparkle but also forms that signature “crackle” crust. Most recipes get the sugar ratio wrong, leading to either overly sweet or oddly dry results. Here, the dual‑sugar system (granulated + brown) creates depth, while the optional candy eyes add a playful, spooky garnish that turns each cookie into a tiny Halloween character.
But the real secret? I’ll let you in on a technique that most bakers overlook: a quick 30‑minute freezer blast before baking. This tiny freeze locks in moisture, giving you that coveted crinkly exterior and a tender crumb that feels like a hug from a friendly ghost. I dare you to taste this and not go back for seconds—once you’ve tried the perfect crinkle, ordinary cookies will never satisfy you again. Let me walk you through every single step — by the end, you’ll wonder how you ever made it any other way.
What Makes This Version Stand Out
- Flavor Depth: The combination of natural cocoa and a touch of vanilla creates a chocolatey richness that feels both familiar and mysterious, like a classic horror tale with a fresh twist.
- Texture Harmony: A crisp outer shell that cracks open to a soft, fudgy interior delivers a satisfying contrast, reminiscent of stepping on crunchy autumn leaves that reveal hidden treasures.
- Simplicity: With just a handful of pantry staples and a few minutes of prep, you can achieve bakery‑level results without a PhD in pastry science.
- Unique Technique: The quick freeze before baking is the game‑changer that ensures each cookie crinkles perfectly while staying moist inside.
- Crowd Reaction: These cookies have a habit of disappearing faster than a magician’s rabbit, especially when you add candy eyes for that extra “boo” factor.
- Ingredient Quality: Using fine sea salt and high‑quality natural cocoa elevates the flavor profile, turning a simple treat into a gourmet experience.
- Cooking Method: Baking at a high temperature for a short burst creates that coveted crackle, while the chill‑time prevents spreading.
- Make‑Ahead Potential: The dough can be prepared up to two days in advance and frozen, giving you a ready‑to‑bake stash for any last‑minute Halloween party.
Inside the Ingredient List
The Flavor Base
All‑purpose flour is the structural backbone, providing the gluten network that holds the cookie together. Using a full cup ensures the dough isn’t too dense, while still giving enough body for that chewy center. If you substitute cake flour, expect a lighter, more crumbly texture that won’t deliver the same satisfying bite.
Natural cocoa brings a deep, earthy chocolate flavor without the bitterness that Dutch‑processed cocoa sometimes introduces. It also adds a dark, moody hue perfect for Halloween. For a slightly sweeter profile, you could swap half of it with cocoa powder that’s been lightly sweetened, but you’ll lose some of that authentic richness.
The Texture Crew
Granulated sugar and light brown sugar work together like a dynamic duo: the granulated sugar caramelizes, giving a subtle crunch, while the brown sugar adds moisture and a hint of molasses, contributing to the soft interior. Skipping the brown sugar will make the cookies dry, and using only brown sugar can cause them to spread too much.
Neutral oil (such as canola or grapeseed) replaces butter to keep the cookies moist without adding extra flavor that could compete with the cocoa. The oil’s liquid nature also helps the dough spread just enough to form that iconic crinkle. If you prefer butter, melt it first and use the same volume, but expect a richer taste and a slightly different texture.
The Unexpected Star
Eggs act as the binder, providing structure and lift. Two large eggs are just enough to hold the dough together without making it cakey. If you’re allergic, a flax‑egg (1 tbsp ground flaxseed + 3 tbsp water) can substitute, but the texture will be a tad denser.
Vanilla extract amplifies the chocolate notes, adding a warm, aromatic backdrop that feels like a comforting hug on a chilly night. A splash of almond extract could add an intriguing twist, but a little goes a long way.
The Final Flourish
Confectioners’ sugar is the magical snow that creates the crinkly coating. The range of ½‑¾ cup allows you to control how thick the dusting is; more sugar yields a thicker, snow‑like crust, while less keeps the cocoa flavor more pronounced. I recommend starting with ½ cup, then adding more if you love that powdery finish.
Optional candy eyes turn each cookie into a mini monster, perfect for a Halloween table. They’re purely decorative, so feel free to go wild with colors and shapes. If you’re avoiding sugar, you can skip them without compromising the taste.
Everything's prepped? Good. Let's get into the real action...
The Method — Step by Step
-
First, whisk together the all‑purpose flour, natural cocoa, baking powder, baking soda, and fine salt in a large bowl. This dry blend should look uniformly dark, with no streaks of cocoa. I always sift the mixture twice to guarantee a velvety texture that will later translate into a smooth dough. As you stir, notice the faint earthy aroma—this is the first hint of the flavor depth you’re building.
Kitchen Hack: Add a pinch of espresso powder to the dry mix; it intensifies the chocolate flavor without making the cookies taste coffee. -
In a separate medium bowl, combine the granulated sugar, light brown sugar, and neutral oil. Beat with a handheld mixer on medium speed until the mixture is glossy and the sugars begin to dissolve, about 2 minutes. This creaming step is crucial—it creates tiny air pockets that will expand during baking, giving the cookies a light lift.
Next, add the two large eggs one at a time, beating well after each addition. Finally, stir in the vanilla extract. The batter should be thick, slightly glossy, and smell sweetly of vanilla and caramel.
-
Gradually fold the dry ingredients into the wet mixture using a spatula. Scrape the sides of the bowl, and mix just until you see no more flour streaks. Over‑mixing will develop too much gluten, leading to a tough cookie, so stop as soon as the dough comes together in a cohesive ball.
At this point, the dough will feel sticky—perfectly normal. If you find it too tacky to handle, cover it with plastic wrap and let it rest for 5 minutes; the flour will absorb excess moisture.
-
Now for the crucial chill: scoop the dough into walnut‑sized balls (about 1.5 inches in diameter) and roll each ball generously in confectioners’ sugar, ensuring a full coating. Place the coated balls on a parchment‑lined tray, then pop the tray into the freezer for at least 30 minutes. This freeze‑time is the secret that locks in moisture and sets the sugar crust, guaranteeing that dramatic crackle when baked.
Watch Out: Skipping the freeze will cause the cookies to spread too much, resulting in a flat, non‑crinkly texture. -
Preheat your oven to 375°F (190°C). While the oven heats, line a second baking sheet with parchment paper. This second sheet will be your work surface for transferring cookies after the freeze.
When the timer dings, remove the dough balls from the freezer. Using a spatula, gently place them onto the prepared baking sheet, spacing them about 2 inches apart. If you’re feeling festive, press two candy eyes into the top of each ball now—don’t press too hard, or you’ll break the sugar crust.
-
Bake the cookies for 10‑12 minutes, or until the edges are set and the tops have a slightly cracked appearance. You’ll notice the sugar coating puffing and cracking, creating that iconic crinkle look. The centers will still look soft—that’s the sign they’re perfectly baked.
Resist the urge to open the oven door early; the sudden temperature drop can cause the cookies to collapse. Trust the timer and let the magic happen.
-
Remove the tray from the oven and let the cookies cool on the sheet for 5 minutes. This short rest allows them to firm up enough to transfer without breaking. Then, use a spatula to move them to a wire rack to cool completely.
As they cool, you’ll see the confectioners’ sugar settle into a delicate, snow‑like dusting that adds a sweet crunch to each bite. The aroma will fill your kitchen, making it impossible not to sneak a taste.
-
Finally, serve the cookies on a festive platter, perhaps with a drizzle of melted white chocolate for extra shine. Pair them with a warm mug of spiced cider, and you’ve got a Halloween spread that will wow even the most skeptical guests. And now the fun part—watch everyone dive in and disappear the batch in seconds.
Kitchen Hack: For an extra glossy finish, brush the warm cookies lightly with a mixture of melted butter and a pinch of salt right after they come out of the oven.
That's it — you did it. But hold on, I've got a few more tricks that'll take this to another level...
Insider Tricks for Flawless Results
The Temperature Rule Nobody Follows
Always bake at a high temperature (375°F) for a short burst. This creates steam inside the dough, which forces the outer layer to crack dramatically. I once tried a lower temperature to “slow‑cook” the cookies, and the result was a sad, flat disc with no crinkle. Trust the heat; it’s the secret behind that perfect crackle.
Why Your Nose Knows Best
During baking, the moment you smell a faint toasted cocoa scent is your cue that the cookies are almost done. If you wait for a golden brown color alone, you risk over‑baking. Your nose is a more reliable indicator—once you detect that warm, nutty aroma, pull them out.
The 5‑Minute Rest That Changes Everything
After mixing, let the dough rest for exactly five minutes before shaping. This short pause allows the flour to fully hydrate, resulting in a smoother dough that spreads evenly. Skipping this rest leads to uneven textures, as the flour particles haven’t had time to absorb the moisture.
Freezer Friendliness
Freeze the dough balls on a parchment sheet, then transfer them to a zip‑top bag. They’ll keep for up to two weeks. When you need a quick batch, just pop a few out, let them sit at room temperature for 5 minutes, and bake. This trick saved me countless last‑minute Halloween panics.
Eye‑Catching Decoration
If you love the candy‑eye look, lightly dust the eyes with a pinch of powdered sugar before baking. This prevents them from melting into a mess and keeps them crisp. A friend once tried to add the eyes after baking, and they turned into sugary blobs—don’t let that happen to you.
Creative Twists and Variations
This recipe is a playground. Here are some of my favorite ways to switch things up:
Spooky Espresso Crinkles
Swap half of the natural cocoa for finely ground espresso powder. The bitterness balances the sweetness, and the dark color deepens the Halloween vibe. Great for coffee lovers who want a dessert that still feels festive.
White Chocolate Pumpkin Swirl
Fold in ¼ cup of pumpkin puree and a pinch of pumpkin pie spice, then drizzle melted white chocolate over the baked cookies. The orange‑gold swirl looks like a haunted sunrise, and the pumpkin adds a subtle earthy note.
Nutty Crunch Variation
Stir in ¼ cup of finely chopped toasted pecans or walnuts into the dough before chilling. The nuts add a satisfying crunch that contrasts with the soft interior, and they bring a nutty aroma that pairs beautifully with cocoa.
Vegan Friendly
Replace the eggs with a flax‑egg (1 tbsp ground flaxseed + 3 tbsp water) and swap the neutral oil for coconut oil. Use a plant‑based vanilla extract. The texture remains tender, and the cookies stay just as crinkly.
Gluten‑Free Adaptation
Use a 1‑to‑1 gluten‑free flour blend in place of all‑purpose flour. Add a teaspoon of xanthan gum to mimic gluten’s binding power. The result is a slightly denser cookie but still wonderfully crinkly.
Double‑Sugar Glaze
After cooling, brush each cookie with a mixture of powdered sugar and a splash of orange food coloring. The glaze adds a glossy, candy‑apple finish that’s perfect for Halloween tables.
Storing and Bringing It Back to Life
Fridge Storage
Place cooled cookies in an airtight container with a parchment sheet between layers. They’ll stay fresh for up to five days. If you notice the sugar coating drying out, add a tiny piece of fresh apple slice to the container; it releases moisture without making the cookies soggy.
Freezer Friendly
Arrange cookies on a tray, freeze until solid, then transfer to a zip‑top freezer bag. They’ll keep for up to three months. When you’re ready to serve, let them thaw at room temperature for 10 minutes, then reheat for 5 minutes at 300°F to revive the crisp crust.
Best Reheating Method
Preheat your oven to 300°F, place the cookies on a parchment‑lined sheet, and bake for 5‑7 minutes. Add a tiny splash of water (just a teaspoon) to the bottom of the oven tray; the steam helps the interior become soft again while the exterior regains its crunch. Serve warm for maximum oozy delight.