I was standing in my kitchen, watching a batch of pancakes go flat and brown on the griddle, when my friend texted me, “You’ve gotta try this caramel cake, it’s a game‑changer.” I stared at the empty fridge, the idea of a buttery, sweet cloud rising from the oven dancing in my head. The smell of butter sizzling, sugar caramelizing, and the faint scent of vanilla drifting through the air felt like a promise of something extraordinary. I knew then that this wasn’t just another dessert; it was a moment of pure indulgence wrapped in a cloud‑like texture that would make my taste buds do a happy dance. I’m telling you, this is the kind of recipe that turns a regular Sunday into a festival.
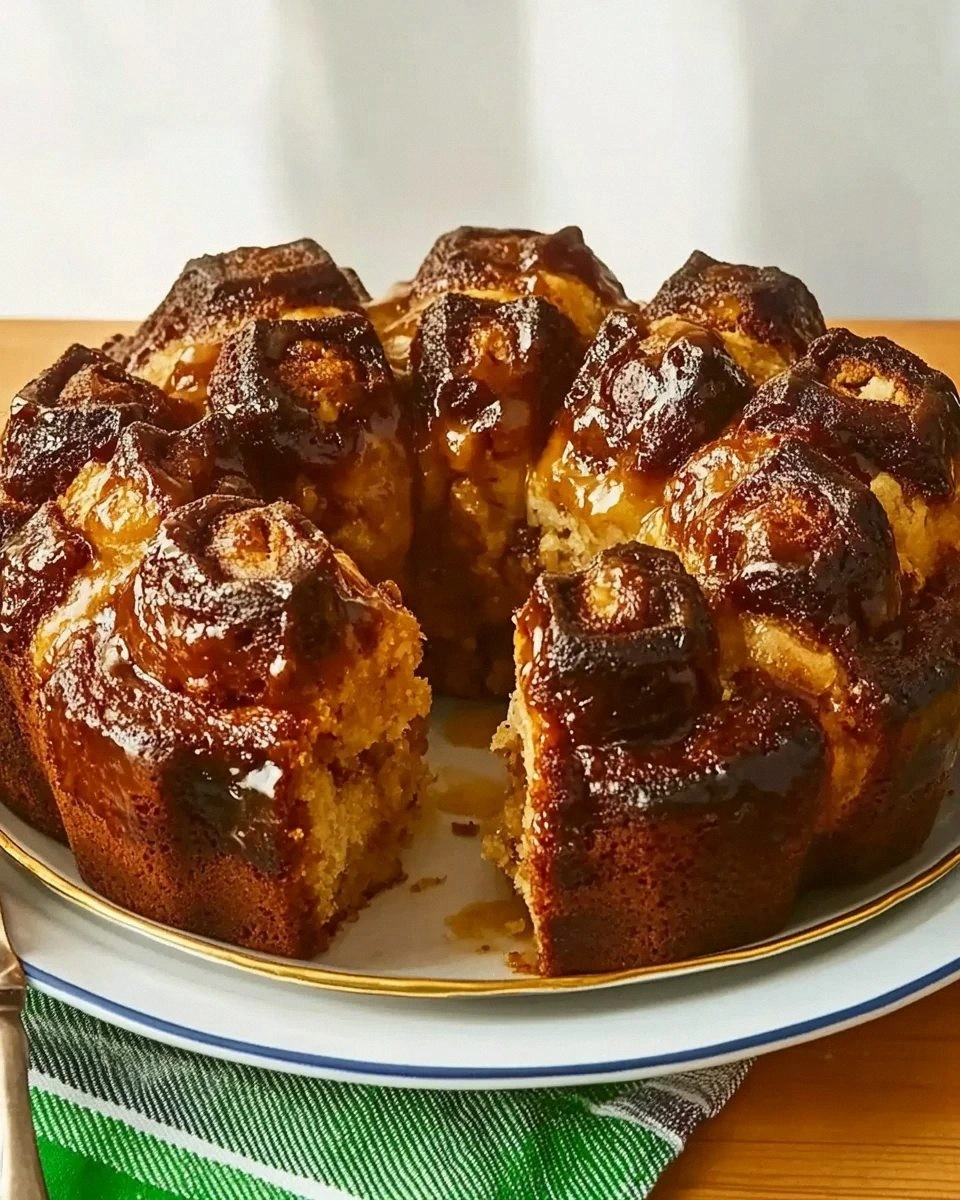
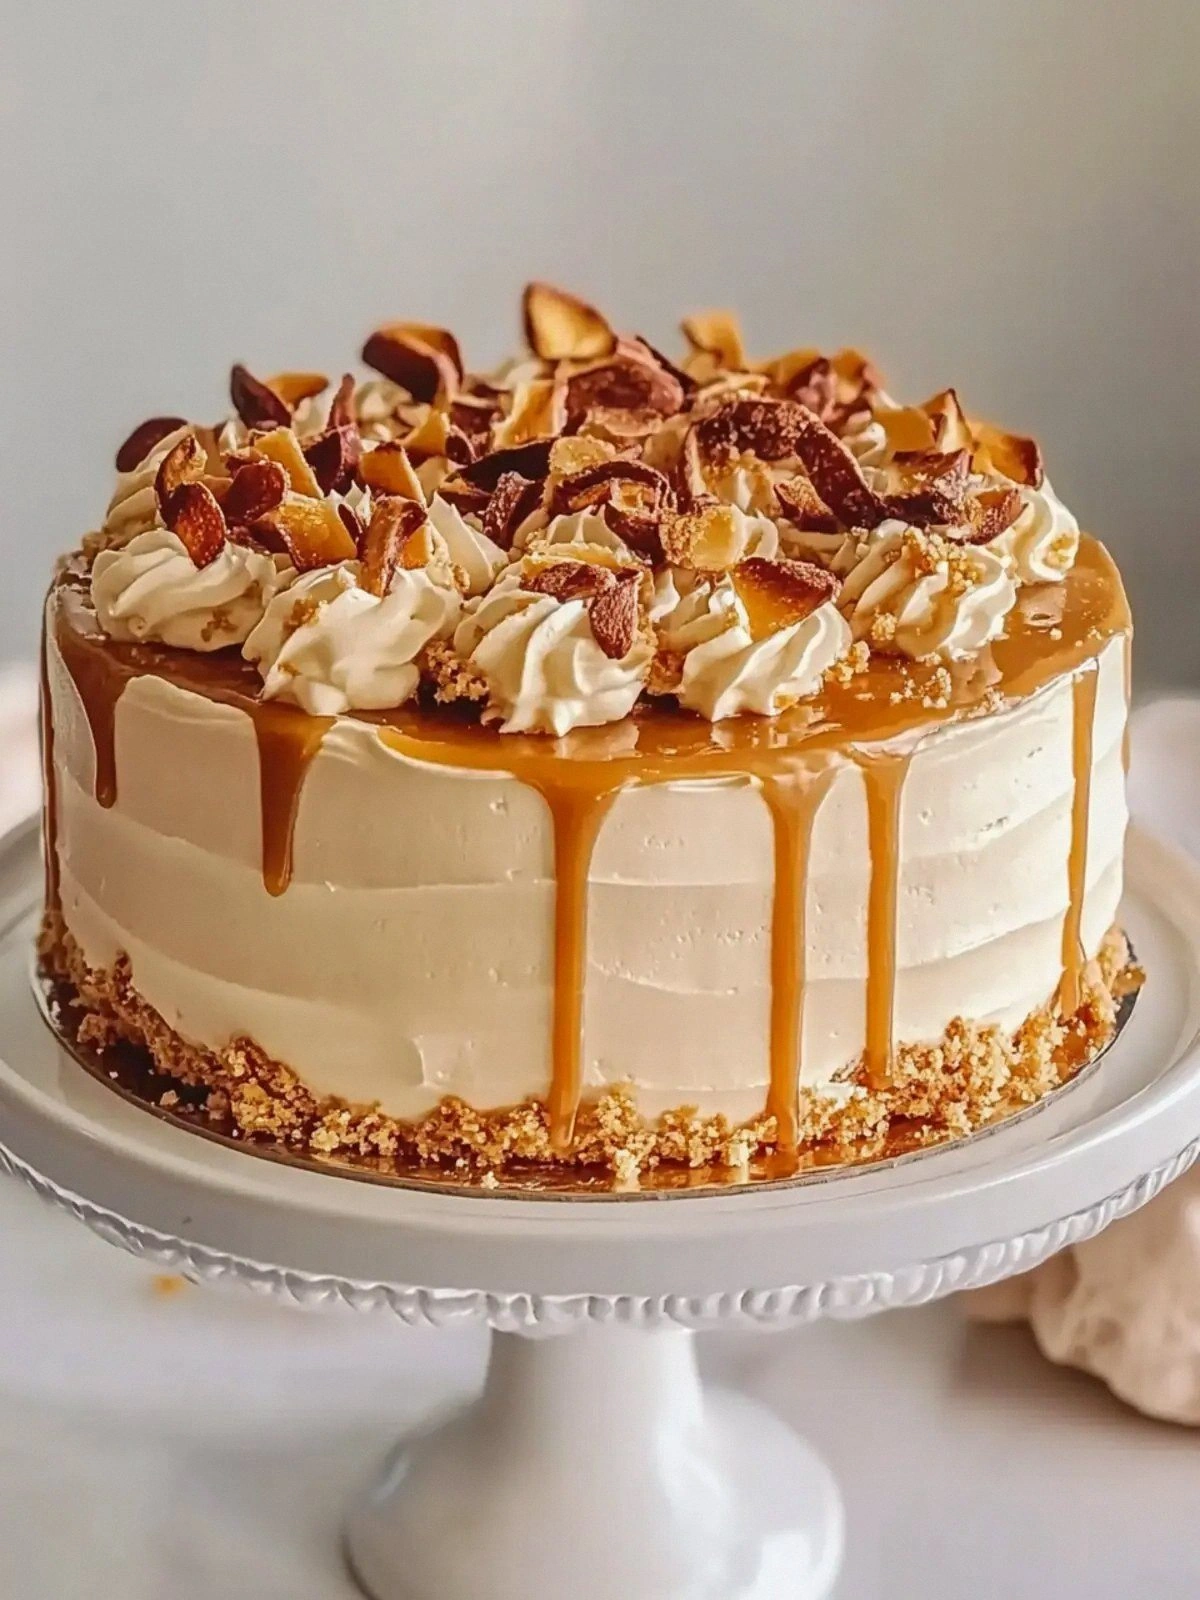
Picture the first bite: a light, airy crumb that melts in your mouth, leaving behind a rich, caramel drizzle that coats each crumb like velvet. The contrast between the airy batter and the glossy caramel is so striking that even the most seasoned bakers will pause in awe. I dare you to taste this and not go back for seconds—trust me, it will become your new guilty pleasure. The moment the cake comes out of the oven, the kitchen fills with a buttery aroma that feels like a warm hug from an old friend. And when you cut into it, the caramel sauce runs like liquid gold, turning every slice into a glossy masterpiece.
What makes this version stand out isn’t just the caramel; it’s the way the batter is balanced to create that ethereal cloud texture. The flour is lightly sifted, the eggs are beaten until they’re almost frothy, and the butter is melted just enough to keep the batter smooth. Baking powder is added in a precise ratio to lift the cake without giving it a heavy feel. The caramel sauce isn’t just poured; it’s folded in at the right moment to keep it from separating. The result is a cake that feels like a cloud—soft, sweet, and utterly unforgettable.
I’ve experimented with dozens of caramel cake recipes, and most of them either taste flat or are too dense. The trick here is the “cloud” technique, which involves whipping the eggs and sugar together until they’re light and airy before folding in the dry ingredients. This method traps tiny air pockets, giving the cake a delicate rise. The caramel isn’t just a topping; it’s an integral part of the batter, creating a harmonious blend of sweetness and richness. If you’ve ever struggled with caramel desserts, you’re not alone—this recipe is designed to make everything feel effortless.
Now, imagine pulling this masterpiece out of the oven, the whole kitchen smelling incredible, and watching friends gasp as they take their first bite. The anticipation builds as you watch the edges lift and the center soften. The moment you cut into it, the caramel sauce glistens, and the cloudy interior gives way to a buttery, sweet surprise. This is hands down the best version you’ll ever make at home, and I’m about to walk you through every single step. By the end, you’ll wonder how you ever made it any other way.
What Makes This Version Stand Out
- Taste: The caramel is infused throughout the batter, creating a consistent sweetness that lingers on the palate.
- Texture: The airy crumb is achieved through a meticulous whisking process that incorporates air without overmixing.
- Simplicity: Only six ingredients, no special equipment—just a whisk and a mixing bowl.
- Uniqueness: Caramel is folded in early, turning the cake into a single, unified flavor experience.
- Crowd Reaction: Guests often ask for the recipe after the first bite, and I’ve had people come back for seconds.
- Ingredient Quality: Using premium butter and a homemade caramel sauce elevates the flavor profile dramatically.
- Cooking Method: The batter is whisked until frothy, then folded, ensuring a light and fluffy result.
- Make‑ahead Potential: The cake can be prepared a day ahead; the caramel sauce keeps it moist and flavorful.
Inside the Ingredient List
The Flour Foundation
Flour is the skeleton that holds everything together, but in this recipe, it’s treated with care. I sift it once to eliminate clumps and introduce air, which helps the cake rise evenly. Using all‑purpose flour keeps the flavor neutral so the caramel can shine. If you’re looking for a lighter texture, you can replace half the flour with cake flour—just keep the ratio the same.
The Eggy Air Engine
Eggs are the heart of this cake, providing structure and a tender crumb. I beat them with sugar until they’re almost frothy, which incorporates air and gives the batter a lightness that feels like a cloud. Skipping this step will result in a denser cake that can’t hold the caramel as beautifully. If you’re vegan, you can substitute aquafaba; whisk it until it’s light and airy before folding into the batter.
The Sweet Backbone—Sugar
Sugar not only sweetens but also helps the eggs stay whipped. I use granulated sugar because it dissolves quickly, ensuring a smooth batter. If you prefer a caramelized flavor, you can swap in brown sugar, but the color of the batter will change slightly. For a lower‑calorie version, consider a sugar substitute that’s compatible with baking.
The Butter’s Velvet Touch
Butter adds richness and helps carry the caramel’s flavor throughout the cake. I melt it just enough that it’s liquid but not hot—this prevents the eggs from curdling. If you’re looking for a dairy‑free option, coconut oil works well, though it will alter the flavor profile slightly. A pinch of sea salt can balance the sweetness if you like a more complex taste.
The Unexpected Star—Caramel Sauce
Caramel sauce is the star that turns this cake into a dessert sensation. I use a homemade caramel made from sugar, butter, and a splash of cream, which gives it depth and a silky finish. The sauce is folded in after the batter is light, ensuring it stays distributed evenly. If you’re short on time, store‑bought caramel works, but homemade is far superior.
The Final Flourish—Baking Powder
Baking powder is the lift that keeps the cake from sinking. I use only two teaspoons to avoid an overly alkaline taste. If you’re using a different flour, adjust the amount accordingly; too much can make the cake bitter. A pinch of baking soda can be added if you prefer a slightly more pronounced rise.
Everything's prepped? Good. Let's get into the real action.
The Method — Step by Step
- Preheat the oven to 350°F (175°C). Line a 9‑inch round cake pan with parchment paper, then lightly grease the sides. The parchment ensures a clean release, while the greasing adds an extra layer of moisture. This step is crucial for a smooth finish and a cake that rises evenly.
- Whisk eggs and sugar. In a large bowl, combine the eggs and granulated sugar. Whisk vigorously for at least 5 minutes until the mixture becomes pale, thick, and triples in volume. This aeration is the secret to the cake’s airy crumb. The batter should look almost like meringue before you add the dry ingredients.
- Fold in the flour and baking powder. Sift the flour and baking powder together to avoid lumps. Gently fold the dry mixture into the egg mixture using a spatula, being careful not to deflate the batter. A few small streaks of flour are fine; the key is to keep the batter light.
- Incorporate the melted butter. Pour the melted butter over the batter in a slow, steady stream while folding. The butter should be warm but not hot to prevent the eggs from curdling. This step adds richness and helps bind the batter together.
- Fold in the caramel sauce. Gently fold the caramel sauce into the batter, ensuring even distribution. The sauce should be at room temperature to avoid separation. This is the moment the cake gets its signature sweet, buttery flavor.
- Pour batter into the pan. Transfer the batter to the prepared pan, smoothing the top with a spatula. Tap the pan lightly to release any air pockets that might have formed. This step ensures the cake will rise evenly.
- Bake until golden. Place the pan in the oven and bake for 25–30 minutes, or until a toothpick inserted into the center comes out clean. The cake should have a golden crust and a slightly glossy surface. Avoid opening the oven door too early, as the sudden temperature drop can cause the cake to sink.
- Cool and serve. Remove the cake from the oven and let it cool in the pan for 10 minutes, then transfer to a wire rack to cool completely. Once cooled, drizzle extra caramel sauce on top if desired. The cake will have a soft, cloud‑like interior that melts in your mouth.
That’s it—you did it. But hold on, I’ve got a few more tricks that will take this to another level. The next section will reveal insider tips that will make your cake rise to perfection every time.
Insider Tricks for Flawless Results
The Temperature Rule Nobody Follows
Many bakers keep the oven temperature too high, causing the cake to brown quickly on the outside while staying raw inside. Keep the oven at a steady 350°F (175°C) and use an oven thermometer to confirm the actual temperature. This consistency ensures even baking and a perfect rise.
Why Your Nose Knows Best
Before you pull the cake out, give it a sniff. A sweet, buttery aroma indicates the caramel is properly integrated. If the smell feels off, the batter may need a quick stir to redistribute the sauce. Trust your nose; it’s a reliable indicator of success.
The 5‑Minute Rest That Changes Everything
After baking, let the cake rest in the pan for exactly five minutes before transferring it. This brief pause allows the structure to set, preventing cracks on the surface. The cake will look flawless when you remove it from the pan.
Keep the Batter Moist
If you’re baking on a hot day, add a tablespoon of milk to the batter. The extra liquid helps keep the cake moist and prevents the caramel from drying out too quickly. This small tweak can make a noticeable difference.
Serve Immediately for Maximum Delight
Caramel is at its best when served warm. The sauce will be silky and the cake will feel light. If you need to keep it warm, cover the cake with foil and place it in a low‑heat oven for 5 minutes before serving.
Creative Twists and Variations
This recipe is a playground. Here are some of my favorite ways to switch things up:
Nutty Caramel Cloud
Add a handful of chopped pecans or walnuts to the batter before baking. The nuts provide a delightful crunch and a nutty undertone that complements the caramel. Serve with a dusting of powdered sugar for an extra touch of elegance.
Chocolate‑Infused Delight
Swirl in a tablespoon of melted dark chocolate into the caramel sauce before folding it into the batter. The chocolate adds depth and a bittersweet contrast that pairs wonderfully with the sweetness of the caramel.
Lemon‑Zest Surprise
Add a teaspoon of lemon zest to the batter. The citrus brightens the flavor profile, making the cake feel lighter and more refreshing, especially during warm weather.
Almond‑Laced Variation
Replace half the flour with almond flour for a gluten‑free version. The almond flour adds a subtle nutty flavor and a slightly denser crumb, which still holds the caramel beautifully.
Spiced Caramel Cloud
Introduce a pinch of cinnamon or nutmeg into the batter. These spices add warmth and complexity, turning the cake into a cozy, comforting dessert perfect for autumn gatherings.
Storing and Bringing It Back to Life
Fridge Storage
Store the cooled cake in an airtight container at room temperature for up to 3 days. If you want to keep it fresh longer, wrap it tightly in plastic wrap and refrigerate for up to a week. The caramel will remain glossy, and the cake will stay moist.
Freezer Friendly
Wrap the cake in parchment paper, then in aluminum foil, and freeze for up to 3 months. Thaw at room temperature for 2 hours before serving. The texture will remain airy, and the caramel will stay smooth.
Best Reheating Method
To revive a frozen or chilled cake, place it in a preheated oven at 300°F (150°C) for 10 minutes. Add a splash of water to the pan before baking; the steam will restore the cake’s moisture and keep the caramel from drying out.