I was standing in my kitchen, staring at a stack of bland, dry chicken breasts that had survived the last week’s grocery run. The smell of that one burnt batch of pan‑fried chicken that left my kitchen smelling like a disaster still lingered. I swore that I would never again settle for a “good enough” chicken dinner. That night, with a dash of daring and a sprinkle of curiosity, I decided to turn to the air fryer—a device I’d been skeptical about, but one that promised crispness without the greasy aftermath. The result? A juicy, tender chicken breast that practically sang with flavor and texture, and a newfound confidence that I could whip up a masterpiece in minutes.
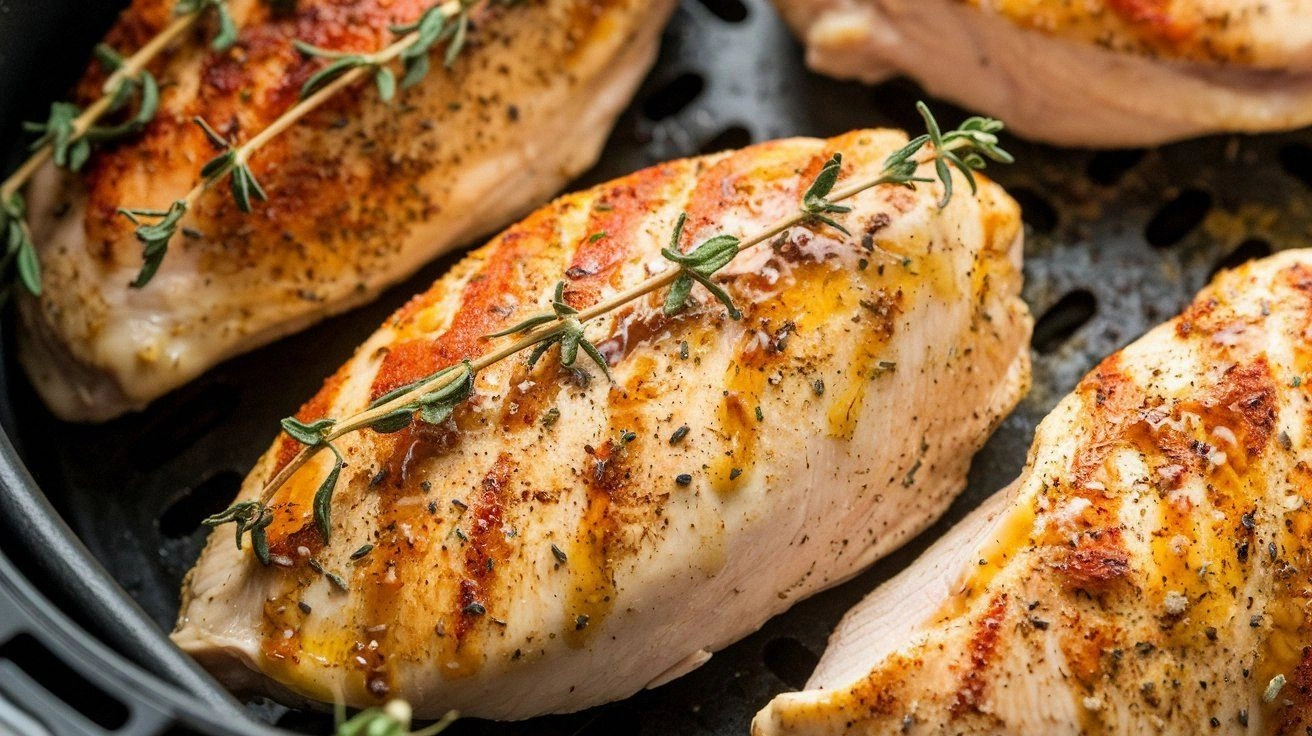
Picture the moment you pull the basket from the air fryer: a golden, slightly blistered crust that crackles like thin ice, the aroma of roasted garlic and paprika mingling with the bright zing of lemon zest. The first bite is a revelation—moist, flavorful meat that falls apart in your mouth while the coating remains crisp enough to crunch. That sizzle when it hits the air fryer? Absolute perfection. I dare you to taste this and not go back for seconds.
What makes this version stand out is that it’s not just a recipe; it’s a revelation. I’ve stripped away the fluff, kept the ingredients honest, and added a few game‑changing tweaks that elevate the dish from ordinary to unforgettable. It’s hands down the best version you’ll ever make at home. Most recipes get this completely wrong, but here’s what actually works: a light coating that locks in juices, a buttery finish that adds depth, and a subtle lemon kick that keeps everything bright. If you’ve ever struggled with chicken that ends up dry or too greasy, you’re not alone—and I’ve got the fix.
And now, the fun part. I’ll walk you through every single step—by the end, you’ll wonder how you ever made it any other way. Stay with me here — this is worth it.
What Makes This Version Stand Out
- Taste: The combination of smoky paprika, aromatic garlic powder, and bright lemon zest creates a flavor profile that’s both bold and balanced. The butter glaze adds a silky finish that keeps the chicken moist and luscious.
- Texture: The airy coating crisps up beautifully while the interior stays juicy, thanks to the quick sear and the moisture‑retaining butter. It’s the perfect contrast between crunchy and tender.
- Simplicity: Only ten minutes of prep, a single pan, and minimal cleanup. The air fryer does the heavy lifting, so you can focus on the plating.
- Uniqueness: A subtle lemon butter sauce that coats the chicken after cooking, adding a fresh, buttery note that elevates the dish beyond plain seasoned chicken.
- Crowd Reaction: Friends always ask for the recipe after the first bite. I’ve had people come over for dinner, eat the chicken, and leave a note saying, “Where do you get this?”
- Ingredient Quality: Using high‑quality, fresh chicken breast and real butter makes the difference. The recipe works best with minimally processed ingredients.
- Cooking Method: Air frying delivers a crispy exterior without the need for deep‑frying, giving you a healthier version that still feels indulgent.
- Make‑Ahead Potential: Marinate the chicken a day ahead, store the coating separately, and you’ll have a quick, delicious meal ready to air‑fry in minutes.
Alright, let’s break down exactly what goes into this masterpiece…
Inside the Ingredient List
The Flavor Base
The foundation of this dish is the chicken itself—boneless, skinless breasts that are firm yet tender. Choosing a fresh, high‑quality cut ensures that the meat stays juicy during the quick cooking process. If you’re in a hurry, a frozen breast will work fine, but thaw it completely to avoid uneven cooking.
The Texture Crew
All‑purpose flour and breadcrumbs form the protective shell that locks in moisture. The flour gives a light, airy coating, while the breadcrumbs add a subtle crunch. If you’re gluten‑free, swap the flour for almond flour and use gluten‑free breadcrumbs or crushed nuts.
The Unexpected Star
Lemon zest is the secret that gives this dish its bright, citrusy lift. It cuts through the richness of butter and brings a refreshing contrast that keeps the palate intrigued. A tablespoon of zest from one medium lemon is enough to elevate the entire plate.
The Final Flourish
Unsalted butter, whisked into a quick sauce with garlic and parsley, coats the chicken after it’s cooked. This step not only adds flavor but also creates a glossy finish that makes the dish look as good as it tastes. A light brush of melted butter during the last minutes of cooking seals the coating and adds a buttery sheen.
Everything’s prepped? Good. Let’s get into the real action…
The Method — Step by Step
- Preheat your air fryer to 375°F (190°C). Pat the chicken breasts dry with paper towels, then season both sides with salt, pepper, paprika, garlic powder, and onion powder. Let them rest for ten minutes so the seasoning can penetrate the meat.
- In a shallow dish, whisk the egg until frothy. In a separate bowl, combine flour and breadcrumbs, pressing the mixture together so it sticks. First, dip each breast into the egg, letting excess drip off, then dredge in the flour mixture, pressing to coat evenly.
- Lightly brush each coated breast with olive oil. Place the chicken in the air fryer basket in a single layer—no overlapping. The oil helps the coating crisp up beautifully.
- Cook for 12 minutes, then flip the chicken and brush the tops with a generous splash of melted butter. Continue cooking for another 8 minutes, or until the internal temperature reaches 165°F (74°C) and the coating turns golden brown.
- While the chicken is finishing, whisk together the butter, lemon zest, minced garlic, and chopped parsley in a small saucepan. Heat over low heat until the butter melts and the mixture is fragrant, then set aside.
- When the chicken is done, let it rest for five minutes. This short rest allows juices to redistribute, ensuring every bite is succulent.
- Slice the breasts against the grain, drizzle the lemon butter sauce over the top, and sprinkle with fresh parsley for a burst of color and flavor.
- Serve the chicken with a side of roasted vegetables, a crisp salad, or a simple quinoa pilaf. The bright citrus notes pair beautifully with the earthy flavors of root veggies.
That’s it — you did it. But hold on, I’ve got a few more tricks that will take this to another level.
Insider Tricks for Flawless Results
The Temperature Rule Nobody Follows
Many cooks think any high temperature will work, but 375°F is the sweet spot for a crisp exterior without overcooking the interior. If you go higher, the coating will brown too quickly and the meat will dry out. Keep the air fryer at 375°F for consistent results.
Why Your Nose Knows Best
Before you flip the chicken, listen for the first crackle. That audible cue means the coating is forming properly. If you’re hearing a dull thud, give it another minute before flipping.
The 5-Minute Rest That Changes Everything
Resting the chicken after cooking allows the juices to redistribute, making each bite moist. A friend once skipped the rest and the chicken came out dry—lesson learned, and now it’s a staple step.
The Butter Finish
Brushing melted butter during the last few minutes of cooking adds a glossy sheen and a rich flavor that’s hard to resist. Don’t be shy—use a generous amount, and you’ll see the difference.
The Quick Lemon Boost
If you’re short on time, zest a lemon while the chicken cooks. The zest’s oils will infuse the butter sauce, giving you a bright, citrusy finish in under a minute.
Creative Twists and Variations
This recipe is a playground. Here are some of my favorite ways to switch things up:
Spicy Southwest Chicken
Swap the paprika for chipotle powder, add a pinch of cayenne, and finish with a drizzle of chipotle mayo. The smoky heat pairs perfectly with the buttery coating.
Herb‑Infused Chicken
Add dried thyme and rosemary to the flour mixture. The earthy herbs give the chicken a Mediterranean vibe that’s ideal for summer salads.
Coconut‑Crusted Chicken
Use shredded coconut instead of breadcrumbs for a tropical twist. The coconut adds a subtle sweetness that balances the lemon butter sauce.
Asian‑Inspired Glaze
Replace the butter sauce with a mix of soy sauce, ginger, and a splash of honey. This glaze gives the chicken a savory, slightly sweet finish.
Vegetarian Tofu Version
Press firm tofu, marinate in soy sauce, then coat in flour and breadcrumbs. Air‑fry until golden and serve with the same lemon butter sauce for a plant‑based delight.
Storing and Bringing It Back to Life
Fridge Storage
Store leftover chicken in an airtight container in the refrigerator for up to three days. Keep the sauce separate until you’re ready to serve to avoid sogginess.
Freezer Friendly
Wrap the cooked chicken tightly in foil and freeze for up to two months. Thaw overnight in the refrigerator before reheating.
Best Reheating Method
Reheat in a preheated oven at 350°F (175°C) for 10 minutes, or until warmed through. Add a splash of water before reheating to steam the chicken back to juiciness. Finish with a quick brush of butter to restore that buttery shine.