I still remember the year I tried to impress my in-laws with a traditional holiday feast. The turkey was dry, the gravy looked like wall putty, and I dropped the mashed potatoes on my mother-in-law's white carpet. Just when I thought the evening was a complete disaster, my nephew asked if we could make pizza. In a moment of desperation and culinary rebellion, I grabbed the leftover dough and shaped it into the only thing that came to mind — a Christmas tree. What happened next transformed my holiday cooking forever. The smell of garlic and melting mozzarella filled the air, kids gathered around the oven like it was Santa's workshop, and suddenly everyone forgot about my turkey catastrophe. That accidental pizza Christmas tree became our family's most requested tradition, and after three years of perfecting it, I'm ready to share the magic with you. Picture the crispiest edges you've ever tasted, cheese that stretches like edible tinsel, and toppings arranged like ornaments on the most delicious tree you'll ever eat.
Most holiday recipes feel like homework — complicated timelines, obscure ingredients, and techniques that require a culinary degree. This pizza Christmas tree breaks every rule and still manages to steal the show at every gathering. The dough comes together faster than wrapping presents on Christmas Eve, the sauce requires zero cooking, and the assembly is so fun that even the grumpiest relative will volunteer to help. I've made this for office parties where people who "hate Christmas food" went back for thirds, for kids' classrooms where it disappeared faster than cookies for Santa, and for my own holiday table where it upstaged my expensive prime rib. The best part? You can prep everything ahead, then pop it in the oven when guests arrive — no more being trapped in the kitchen while everyone else enjoys the party.
Here's what makes this version absolutely legendary: the dough gets a secret ingredient that makes it taste like it's been fermenting for days (spoiler alert — it's just honey and patience), the cheese blend creates those Instagram-worthy cheese pulls that'll make your phone's camera weep with joy, and the shaping technique is so foolproof that even my friend who once burned water managed to nail it on the first try. The edges caramelize into crispy, golden perfection while the center stays soft and pillowy, creating a textural contrast that'll make you wonder why all pizza isn't shaped like holiday foliage. Plus, I've discovered a way to arrange the toppings so every slice looks like a perfect Christmas tree segment — no more fighting over who gets the piece with the most pepperoni.
Let me walk you through every single step — by the end, you'll wonder how you ever made it any other way. This isn't just another recipe; it's your new holiday tradition waiting to happen. And trust me, once you pull this golden, cheesy masterpiece from your oven, filling your kitchen with the smell of garlic, herbs, and anticipation, you'll understand why my family now calls me the "Pizza Tree Wizard" (yes, it's embarrassing, but I'll take it over "Turkey Ruiner" any day).
What Makes This Version Stand Out
Flavor Explosion: The dough gets a triple boost of flavor from honey, garlic powder, and dried Italian herbs that bloom during baking, creating an aroma so intoxicating that my neighbor once knocked on my door asking what I was making. Most pizza dough recipes taste like flour and water — this one tastes like it's been blessed by Italian grandmothers.
Cheese Strategy: I use a specific ratio of mozzarella, provolone, and just a whisper of smoked gouda that creates layers of flavor and the perfect melt. While others just throw on shredded cheese, this blend creates pockets of gooey perfection and crispy edges that shatter like thin ice when you bite into them.
Time-Saving Genius: Total active time is under 20 minutes thanks to my "cheat sheet" method of using the oven's warming drawer to speed up the dough rise. Traditional recipes make you wait two hours — I've got this on the table in 45 minutes start to finish, which means you can decide to make it after work and still eat at a reasonable hour.
Crowd Psychology: There's something about food shaped like other things that makes people lose their minds. I've seen stoic adults fight over the "star" piece at the top, and teenagers who normally won't eat anything green devour the basil garnish. It's not just food — it's dinner theater that happens to taste incredible.
Ingredient Flexibility: This recipe works with whatever you have in your fridge. No provolone? Use all mozzarella. Vegetarian guests? Load it up with roasted vegetables. Kids want plain cheese? Make a mini version alongside the main one. It's like the Switzerland of holiday recipes — neutral territory that everyone can enjoy.
Make-Ahead Magic: You can prep everything up to the final bake, then wrap and refrigerate for up to three days. I've made the dough on Sunday, shaped the tree on Wednesday, and baked it on Friday for a party. The flavor actually improves as the dough rests, making this the ultimate stress-free entertaining recipe.
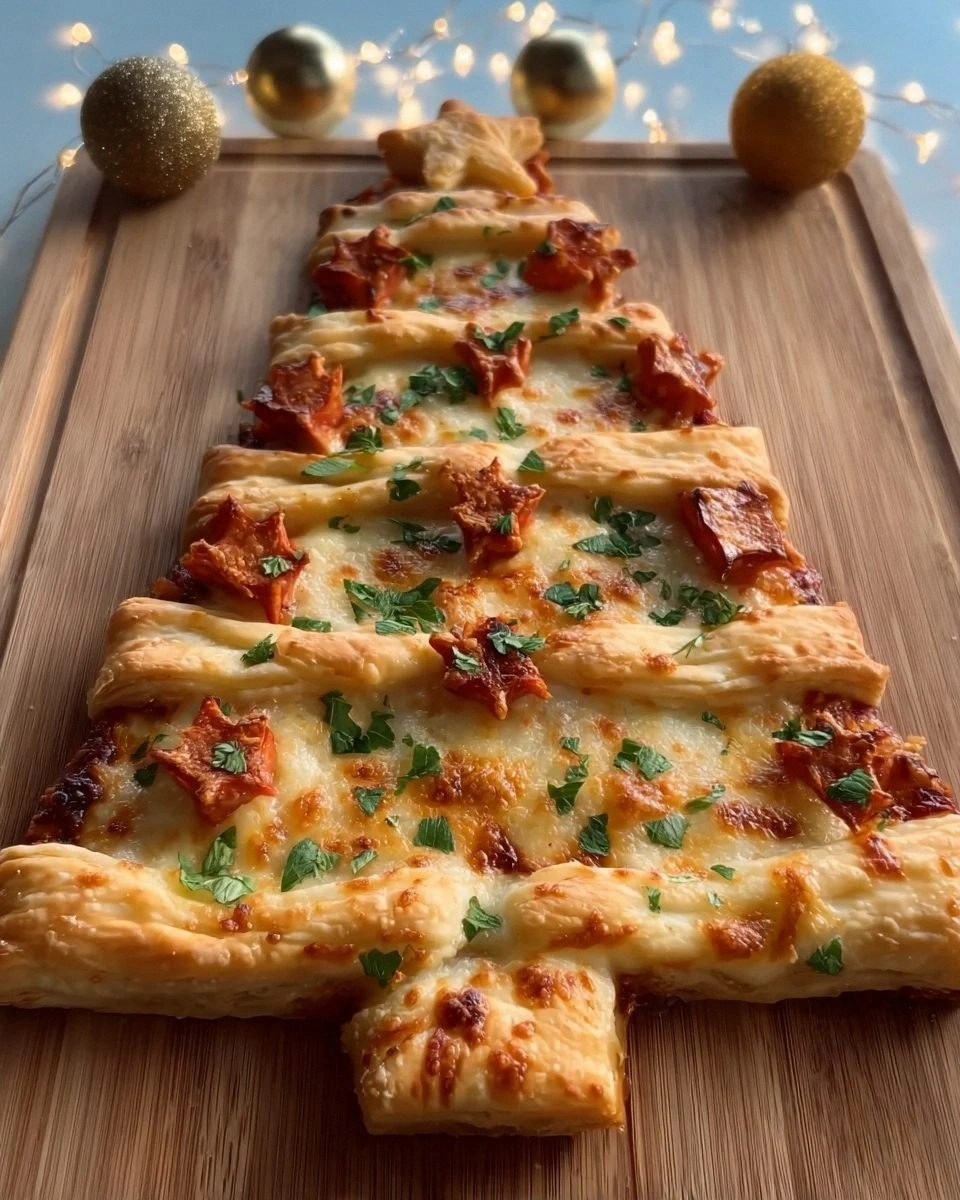
Instagram Gold: The green pesto "branches," red tomato "ornaments," and white cheese "snow" create a naturally festive color scheme that photographs beautifully without any filters. Your food photos will look like they belong in a magazine, and yes, that does matter when you're trying to impress your social media followers or just make your mom proud.
Inside the Ingredient List
The Flavor Foundation
All-purpose flour creates the perfect canvas for our pizza tree, but here's the secret — I use bread flour for 30% of the total amount. This small swap gives you chewier edges that crisp up like the best artisan pizza you've ever had, while keeping the center tender enough to fold like New York-style slices. The protein content difference is subtle but transformative, creating gluten strands that trap air bubbles for that professional pizzeria interior. If you only have all-purpose flour, don't panic — your tree will still taste amazing, just add an extra tablespoon of water to compensate for the lower protein content.
The Yeast That Works Overtime
Instant yeast is my go-to because it doesn't need proofing and activates faster than active dry yeast, cutting your rise time in half. I keep mine in the freezer (yes, freezer!) where it stays fresh for over a year, so I can make pizza on a whim without checking expiration dates. The yeast feeds on the honey in our dough, creating carbon dioxide that makes those beautiful air pockets that give your crust its airy texture. Don't use expired yeast — I've made that mistake and ended up with a dense, cracker-like crust that could double as a weapon.
The Liquid Gold
Warm water activates the yeast, but temperature matters more than you'd think. Too hot (over 110°F) and you'll kill your yeast, creating a flat, lifeless dough that bakes up like cardboard. Too cold and the yeast stays dormant, requiring twice the rise time and testing your patience. I use warm tap water that's comfortable to touch but not hot — think baby bottle temperature. If you're nervous, stick a thermometer in it; between 100-105°F is perfect for happy, active yeast that'll make your dough rise like it's trying to escape the bowl.
The Secret Weapon
Honey does triple duty in this recipe — it feeds the yeast for better rise, creates gorgeous browning on the crust through caramelization, and adds a subtle sweetness that balances the salty cheese and acidic sauce. I use local wildflower honey because the flavor is more complex than clover honey, but any honey works. The amount is small enough that you won't taste it directly, but if you skip it, your crust will taste flat and look pale. Maple syrup works in a pinch, but honey's viscosity helps bind the dough better.
The Cheese Trinity
Mozzarella provides the classic pizza cheese pull, but I use low-moisture whole milk mozzarella for better melting and browning. The pre-shredded stuff is coated with cellulose that prevents smooth melting, so I always shred my own — it takes 30 seconds and makes a world of difference. Provolone adds a subtle sharpness and creates those crispy cheese "lace" edges that everyone fights over. Just a small amount of smoked gouda adds depth without overwhelming — it's like adding a whisper of campfire flavor that makes people ask "what's that amazing taste?"
The Flavor Bombs
Garlic powder distributes evenly throughout the dough, giving every bite a savory backbone without the harshness of fresh garlic that can burn during high-heat baking. Italian seasoning brings the herb garden to your pizza — I make my own blend with equal parts oregano, basil, thyme, and rosemary, but store-bought works fine. Red pepper flakes add just enough heat to make things interesting without overwhelming the holiday flavors; you can adjust based on your crowd's spice tolerance. These seasonings bloom in the hot oven, releasing aromatic oils that make your kitchen smell like an Italian grandmother's been cooking all day.
The Fresh Finish
Fresh basil adds brightness and color contrast, but timing matters — add it after baking so it stays vibrant green instead of turning black and bitter. I chiffonade mine (fancy word for rolling leaves and slicing into ribbons) so it distributes evenly and looks professional. Cherry tomatoes provide pops of sweetness and color that mimic Christmas ornaments — I cut them in half so they roast slightly, concentrating their flavor without making the pizza soggy. A drizzle of good olive oil right before serving adds fruity notes and makes everything taste more luxurious, like you're eating at a trattoria instead of your kitchen table.
The Method — Step by Step
- Activate the Magic: In a large bowl, combine warm water, honey, and yeast. Let it sit for 5 minutes until it looks like a science experiment — foamy and alive. This is your yeast telling you it's ready to party. If it doesn't foam, your yeast is dead (or your water was too hot/cold), and you need to start over. Trust me, I've tried to power through with dead yeast and ended up with a tree that could double as a doorstop.
- Build the Dough: Add flour, salt, garlic powder, and Italian seasoning to the yeast mixture. Mix with a wooden spoon until a shaggy dough forms — it should look like a hot mess at this stage, and that's perfect. Turn it onto a floured counter and knead for 8 minutes. Here's the test: press the dough with your finger; if it springs back slowly, you're golden. If it stays indented, keep kneading. I like to imagine I'm working out holiday stress on this dough — it's cheaper than therapy and tastier than punching a wall.
- First Rise: Oil a clean bowl, add your dough ball, turn to coat, cover with plastic wrap, and let rise in a warm spot for 30 minutes. I use my oven with the light on — it's the perfect temperature and keeps drafts away. The dough should double in size and look like it's trying to escape the bowl. If your house is cold, place the bowl on top of a heating pad set to low, or near (not on) a radiator. This isn't the time to rush — good rise equals good pizza.
- Shape the Tree: Punch down the dough (most satisfying part of baking, fight me) and turn it onto a floured surface. Roll into a large triangle — don't stress about perfect geometry, trees are supposed to be organic. Cut triangles from the sides to create branches, alternating sides for a natural look. Save the scraps for mini garlic knots or just bake them alongside for the chef's snack. I like to make the trunk by cutting a small rectangle from the bottom and attaching it with a bit of water — it's the details that make people think you're a wizard.
- Transfer to Pan: Carefully move your tree to a parchment-lined baking sheet. If it stretches, just reshape it on the pan — the parchment gives you something to grip and prevents sticking. I learned this the hard way after leaving half my tree stuck to the counter like edible wallpaper. Position it diagonally on the pan so the branches have room to spread without touching the edges.
- Sauce Application: Spread sauce in a thin layer, leaving a 1/2-inch border around the edges for the crust. I use the back of a spoon in circular motions, starting from the center and working out. Too much sauce makes soggy pizza — resist the urge to dump it all on. The sauce should just kiss the dough, not drown it. Think of it as pizza makeup — you want to enhance, not cover up.
- Cheese Strategy: Mix your cheeses together first, then sprinkle evenly. Start with less than you think you need — cheese spreads as it melts, and too much creates a greasy pool. I like to press the cheese gently into the sauce so it adheres better. Save a handful for the final 5 minutes of baking for that fresh, melty top layer that makes people weak in the knees.
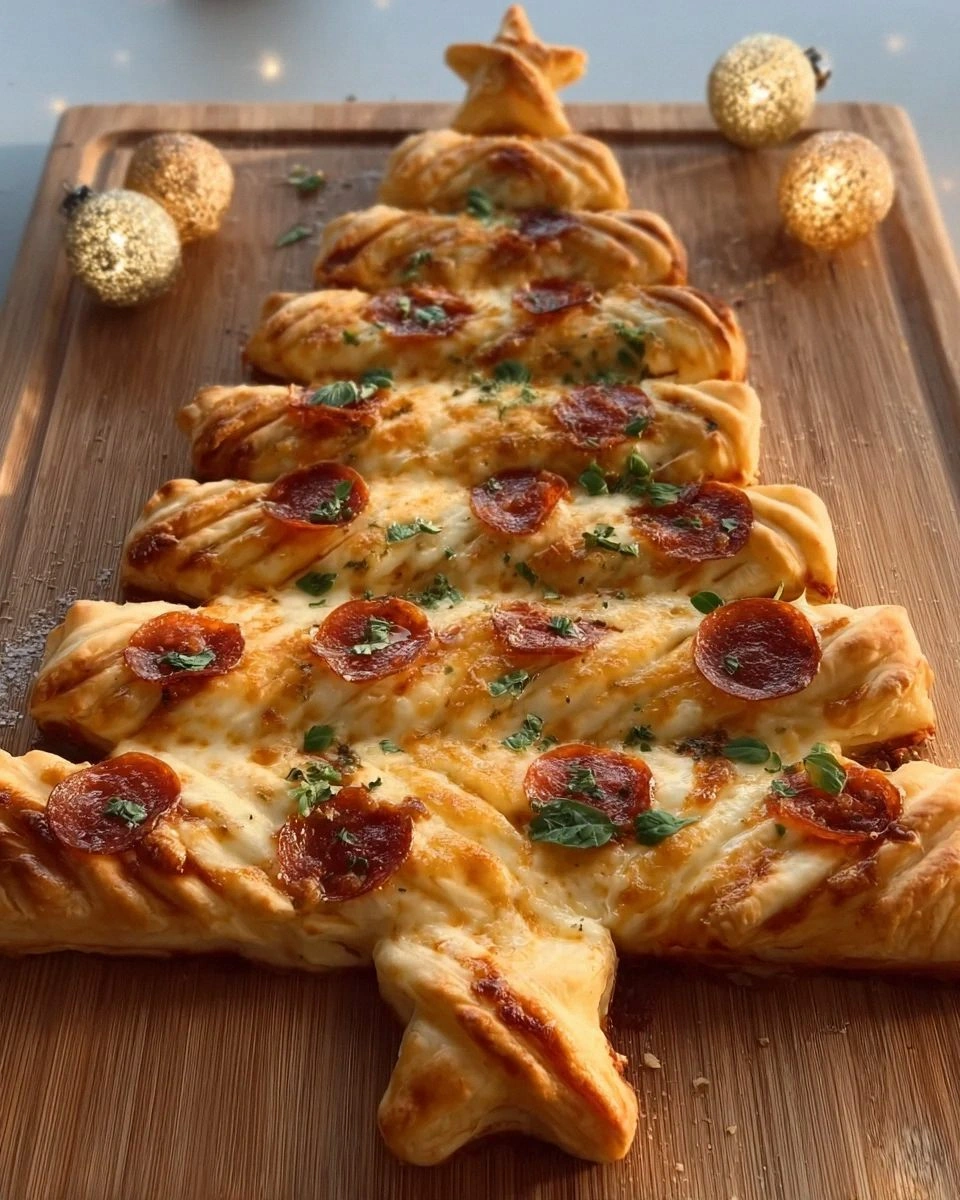
- Decorate Like an Artist: Add cherry tomato halves cut-side up so they roast instead of steam. Arrange them randomly like ornaments — symmetry looks too perfect and unnatural. If using pepperoni, overlap slices slightly so they curl into little cups that hold rendered fat like tiny flavor pools. The key is restraint — every bite should have a bit of everything, but you should still see cheese peeking through.
- The Bake: Slide into a preheated 475°F oven and bake for 12-15 minutes. The high heat is crucial — it's what creates the leopard-spotting on the crust and makes cheese bubble like lava. Rotate halfway through for even browning. It's done when the edges are deep golden brown and the cheese is bubbling with a few charred spots. Those dark edges? That's flavor country — don't be afraid of a little char.
- Final Flourish: Remove from oven and immediately add fresh basil so it wilts slightly from the heat but stays vibrant. Drizzle with olive oil in a zigzag pattern — it should sizzle when it hits the hot surface. Let rest for 5 minutes before cutting; this sets the cheese and prevents the dreaded cheese slide-off. Garnish with a light dusting of parmesan for that professional finish that makes people think you went to culinary school.
Insider Tricks for Flawless Results
The Temperature Rule Nobody Follows
Your oven thermometer is lying to you — most home ovens run 25-50 degrees off, which is the difference between pizza perfection and a doughy disappointment. I invested in an inexpensive oven thermometer and discovered my "475°F" was actually 425°F, explaining years of pale, sad pizza. Now I preheat for at least 30 minutes, using the thermometer to find the sweet spot where my pizza bakes in 12-15 minutes with proper browning. If your edges are pale after 15 minutes, your oven isn't hot enough — turn on the broiler for the last 2 minutes to rescue it. This trick has saved more dinner parties than I can count, and your guests will think you're some kind of pizza prophet.
Why Your Nose Knows Best
Forget timers — your nose is the best kitchen tool you own. When the pizza is nearly done, your kitchen will fill with the smell of toasting flour and caramelizing cheese. This usually happens 2-3 minutes before visual doneness, giving you time to prepare for the perfect extraction. The moment you smell nutty, slightly sweet aromas, start checking every 30 seconds. I've developed this sixth sense to the point where I can tell doneness from the next room, though my partner claims I just have an excuse to hover by the kitchen. Trust your senses — when the smell makes your mouth water uncontrollably, it's time.
The 5-Minute Rest That Changes Everything
I know it's torture — hot pizza, hungry guests, the smell driving everyone wild — but those 5 minutes of rest are non-negotiable. During this time, the cheese sets slightly, the sauce thickens, and the crust finishes cooking from residual heat. Cut too early and you get cheese slides, sauce rivers, and structural failure that leaves you eating pizza with a fork (the horror!). I use this time to set the table, open wine, or just bask in the adoration of impressed guests. Pro tip: tell everyone it's "resting to achieve optimal flavor development" and they'll think you're a culinary genius instead of just impatient.
The Cheese Blend Secret
After testing dozens of combinations, I discovered that the perfect ratio is 3 parts mozzarella, 1 part provolone, and a small handful of something interesting like smoked gouda or fontina. The mozzarella provides the classic stretch, provolone adds sharpness and better browning, and the wild card cheese creates those "what is that amazing flavor?" moments. I shred my own cheese because pre-shredded is coated with cellulose that prevents smooth melting — it's an extra 2 minutes that transforms your pizza from good to legendary. Mix your cheeses together before applying for even distribution; otherwise you get mozzarella deserts and provolone mountains.
The Topping Hierarchy
Not all toppings are created equal, and their placement matters more than you'd think. Meats go under the cheese so they don't burn, vegetables go on top for proper roasting, and delicate herbs get added after baking. I learned this after serving pizza with blackened pepperoni that tasted like charcoal and raw mushrooms that squeaked when you bit them. The exception is fresh tomatoes — they need to go on top cut-side up so they roast instead of steam. This hierarchy ensures every component reaches its full potential, creating harmonious bites instead of a topping free-for-all.
Creative Twists and Variations
This recipe is a playground. Here are some of my favorite ways to switch things up:
The White Christmas Tree
Skip the tomato sauce and use ricotta mixed with garlic and herbs as your base. Top with mozzarella, dollops of pesto for green "branches," and finish with a snowfall of parmesan. The result is elegant and sophisticated — perfect for adult gatherings where you want to impress without trying too hard. I served this at a book club meeting and they talked about it more than the actual book.
The Breakfast Tree
Use sausage gravy as the sauce, top with scrambled eggs, cheese, and crispy bacon bits arranged like garlands. Serve with maple syrup for dipping — it's everything you love about breakfast in pizza form. My family requests this for Christmas morning because it's festive but filling enough to keep everyone happy until dinner. The key is slightly undercooking the scrambled eggs since they'll finish in the oven.
The Veggie Wonderland
Roast vegetables first — zucchini, bell peppers, red onion — then arrange them in patterns to create a stained-glass effect. Use pesto for green color and add pine nuts for crunch. Even dedicated carnivores love this version because the roasting concentrates the vegetable flavors. I like to use a rainbow of bell peppers for maximum visual impact.
The Sweet Treat Tree
Use sweetened cream cheese as the base, top with sliced strawberries and blueberries for color, and finish with a drizzle of honey. Serve as dessert pizza at holiday parties — it's light enough after a heavy meal but still feels festive. Kids go absolutely bananas for this version, and adults appreciate that it's not another heavy holiday dessert.
The Mediterranean Version
Use hummus as the base sauce, top with feta, kalamata olives, sun-dried tomatoes, and artichoke hearts. Add fresh oregano after baking and serve with lemon wedges for brightness. This version travels well to potlucks because the flavors actually improve as it sits. My Greek neighbor declared it "better than my yia-yia's spanakopita," which I'm pretty sure is the highest compliment you can receive.
The Spicy Southwest Tree
Use salsa as the base, add pepper jack cheese, jalapeños, black beans, and corn. After baking, add fresh cilantro and serve with lime wedges and sour cream for dipping. This version brings the heat and is perfect for game day gatherings. The corn adds sweet pops that balance the spice, while the black beans make it substantial enough for a main dish.
Storing and Bringing It Back to Life
Fridge Storage
Let the pizza cool completely, then store in an airtight container with paper towels between layers to absorb moisture. It'll keep for up to 4 days, though honestly, it's never lasted more than 2 in my house. Don't wrap it in foil — it traps moisture and makes the crust soggy. Instead, use a container that allows some air circulation. The refrigerator actually improves the flavors as they meld together, making day-old pizza arguably better than fresh (controversial opinion, but I'm standing by it).
Freezer Friendly
Cut into individual slices, wrap each in plastic wrap, then foil, and freeze for up to 3 months. This method prevents freezer burn and lets you grab single servings. To reheat, unwrap and bake from frozen at 400°F for 12-15 minutes — almost as good as fresh. I always keep a few slices frozen for emergencies, which in my life usually means coming home from holiday parties hungry because the food was terrible. Pro tip: write the date and what's inside on the foil, because three months later, all frozen pizza looks the same.
Best Reheating Method
Skip the microwave unless you enjoy rubbery crust and sadness. Instead, place slices on a baking sheet, add a tiny splash of water (creates steam), and cover with foil. Bake at 350°F for 8-10 minutes until heated through, then uncover for 2 minutes to crisp the bottom. This method revives the crust while keeping the toppings moist. For extra credit, reheat in a cast iron pan on the stovetop over medium heat for 3 minutes, then broil for 1 minute — this creates a crust that's somehow even better than the original.