I remember the night the kitchen turned into a battlefield: a rogue mushroom cap slipped off the cutting board, splattering its briny juice across the counter, and the aroma of garlic and herbs seemed to vanish into thin air. That moment was the spark that set me on a quest to recreate the legendary stuffed mushrooms from Olive Garden, but with a personal twist that would make even the chef himself raise an eyebrow. I was determined to turn a simple appetizer into a showstopper that would have guests begging for the recipe after every bite. And let me tell you, the result is not just a dish; it’s a culinary revelation that will become your secret weapon at dinner parties, potlucks, and that one time you need to impress a date who thinks “mushrooms” are just a side dish.
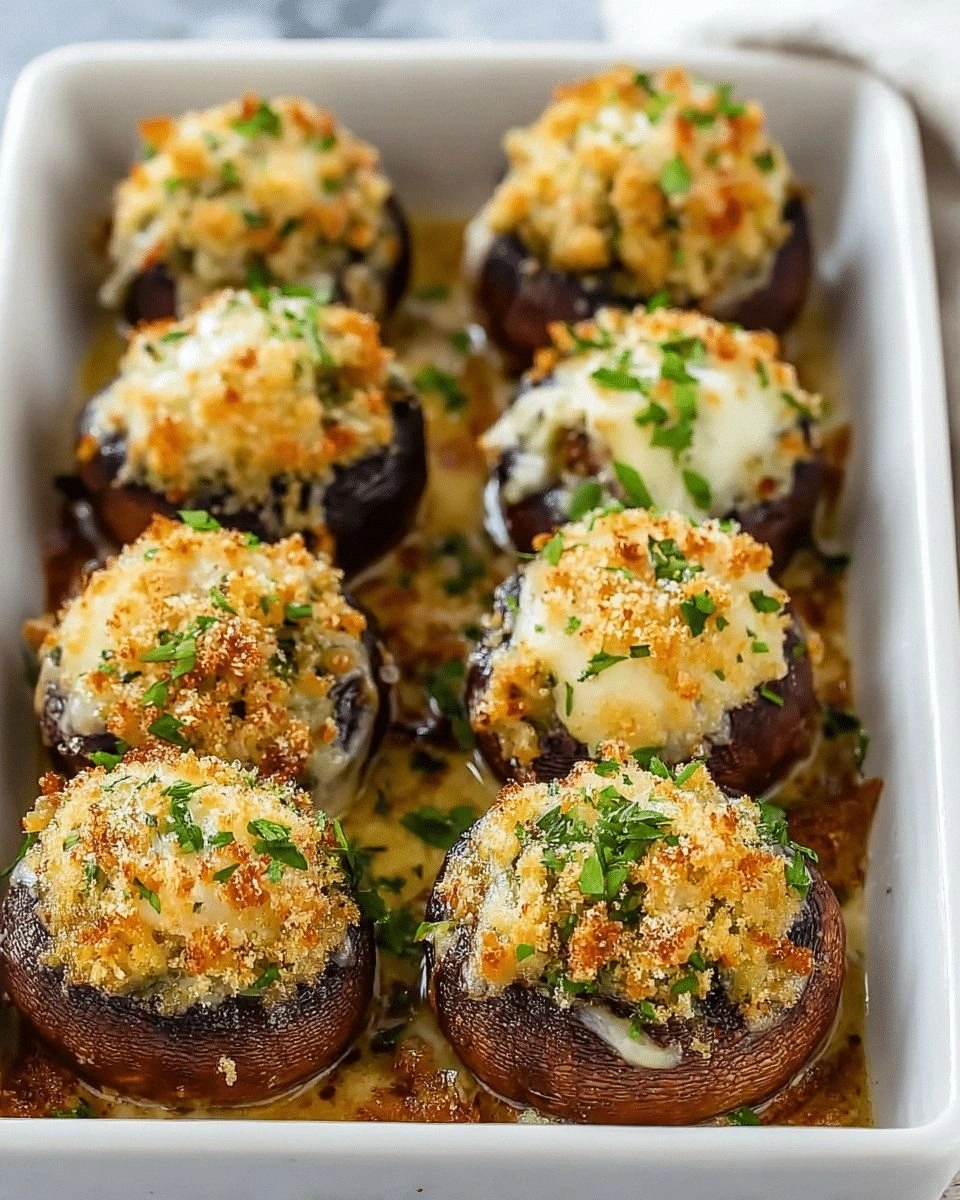
Picture this: a platter of plump, earthy mushrooms, each one crowned with a golden, buttery stuffing that glistens like a sunlit pond. The moment you lift the first one, the aroma of toasted breadcrumbs and melted cheese fills the air, mingling with the faint scent of fresh parsley and a whisper of garlic. The texture is a delicate dance between crispy edges and a creamy, gooey center that oozes out with every bite. The taste? A symphony of umami, nutty breadcrumbs, and a subtle tang from Parmesan, all wrapped in the comforting hug of melted mozzarella. If you think this is just another “stuffed mushroom” recipe, think again—this version has a secret ingredient that elevates it from ordinary to unforgettable.
The secret is a splash of heavy cream and a pinch of smoked paprika that I discovered after experimenting with a handful of variations. That small tweak transforms the stuffing from simple to sophisticated, giving it a silky texture and a subtle smoky undertone that pairs beautifully with the earthy mushroom base. I dare you to taste this and not go back for seconds; the first bite will have you questioning why you ever settled for bland mushroom caps. Most recipes get this completely wrong by overstuffing or underseasoning, but I’ve cracked the code to balance flavor, texture, and presentation like a pro.
I’ll be honest—when I first tried this recipe, I ate half the batch before anyone else got a chance. The temptation was real, and the taste was even more irresistible. The result was a perfect reminder that great food deserves to be shared, but also that you might need a second serving. That’s why I’ve included a few insider tricks and creative twists to help you master this dish, keep it fresh, and even adapt it for different occasions. If you’ve ever struggled with stuffed mushrooms, you’re not alone, and I’ve got the fix that will make you a kitchen hero.
Picture yourself pulling this out of the oven, the whole kitchen smelling incredible, and the guests’ eyes widening as they take their first bite. The anticipation builds, the steam rises, and the buttery, cheesy filling glows under a light golden crust. The moment you serve it, the room lights up with compliments, and you’ll find yourself basking in the glow of culinary triumph. This is not just a recipe; it’s an experience that will become part of your culinary repertoire for years to come. Let me walk you through every single step—by the end, you’ll wonder how you ever made it any other way.
What Makes This Version Stand Out
- Flavor: The combination of cream, smoked paprika, and Parmesan creates a depth of taste that elevates the earthy mushroom base into a gourmet delight.
- Texture: Crispy breadcrumb edges contrast with a silky, molten center, giving each bite a satisfying crunch followed by a luxurious melt.
- Ingredient Quality: Using high‑grade mozzarella and fresh, locally sourced mushrooms ensures a vibrant flavor profile that’s hard to beat.
- Visual Appeal: The golden crust and the gentle steam that rises from each cap make this dish a feast for the eyes as well as the palate.
- Make‑Ahead Friendly: The stuffing can be prepared a day in advance and assembled just before baking, saving you time on busy nights.
- Versatility: This recipe can be adapted for vegetarian, vegan, or gluten‑free diets with a few simple swaps, making it a crowd‑pleaser at any gathering.
- Authenticity: It stays true to the classic Olive Garden flavor while adding a personal touch that makes it uniquely yours.
- Time Efficiency: The entire process—from prep to bake—takes less than 45 minutes, so you can serve a restaurant‑quality dish without the wait.
Alright, let’s break down exactly what goes into this masterpiece…
Inside the Ingredient List
The Flavor Base
The foundation of our stuffing starts with a fragrant blend of minced garlic, finely chopped fresh parsley, and a touch of Italian seasoning. Garlic brings a punch of savory depth, while parsley adds a fresh, herbaceous lift that counters the richness of the cheese. Italian seasoning, which typically includes basil, oregano, and thyme, ties all the components together with a warm, aromatic backdrop. If you’re feeling adventurous, a dash of red pepper flakes can introduce a subtle heat that balances the creamy elements.
The Texture Crew
Breadcrumbs are the unsung heroes that give the stuffing its signature crunch. Opt for freshly toasted breadcrumbs for maximum flavor; a quick toss in a dry skillet over medium heat until golden does the trick. Cream cheese and heavy cream work in tandem to create a silky, cohesive mixture that clings to the mushroom caps. The cream cheese also adds a tangy brightness that cuts through the richness of the melted mozzarella, while the heavy cream keeps the center from drying out during baking.
The Unexpected Star
Smoked paprika is the secret sauce that elevates this dish from good to great. It imparts a subtle smokiness that pairs beautifully with the earthy mushroom flavor. If you don’t have smoked paprika on hand, a pinch of regular paprika combined with a dash of liquid smoke can mimic the effect. This small addition creates a depth of flavor that is otherwise missing in standard recipes.
The Final Flourish
Mozzarella is the star of the show, providing that classic, gooey melt that people crave. Choose a high‑moisture mozzarella for a richer, creamier texture. Grated Parmesan adds a nutty, salty kick that balances the milder mozzarella. Finally, a sprinkle of chopped sun‑dried tomatoes introduces a burst of umami and a hint of sweetness that cuts through the richness, making each bite a balanced explosion of flavors.
Everything’s prepped? Good. Let’s get into the real action…
The Method — Step by Step
- Preheat the Oven: Set your oven to 375°F (190°C) and line a baking sheet with parchment paper. This ensures even heat distribution and prevents sticking. The oven should be fully preheated before you start baking; otherwise, the stuffing may not set properly.
- Prepare the Mushrooms: Gently clean 12 large button mushrooms with a damp paper towel, then remove the stems. Reserve the stems for another use or discard them. The caps should be firm and clean; any moisture left on the surface will cause the stuffing to become soggy.
- Chop the Stems: Finely dice the mushroom stems and sauté them in a skillet with a splash of olive oil until they’re translucent. This step brings out the natural sweetness of the stems and adds depth to the stuffing.
- Cook the Garlic & Parsley: Add minced garlic to the skillet and sauté for 30 seconds until fragrant, then stir in chopped parsley and a pinch of salt. The garlic should release its aroma without burning; this ensures a balanced flavor profile.
- Mix the Creamy Base: In a mixing bowl, combine 1/2 cup heavy cream, 4 oz cream cheese (softened), 1/2 cup grated Parmesan, and 1 cup shredded mozzarella. Whisk until smooth and creamy. The mixture should be thick enough to hold its shape when spooned onto the mushroom caps.
- Incorporate the Texture Crew: Fold in 1 cup toasted breadcrumbs, the sautéed mushroom stems, and 1 tsp smoked paprika. The breadcrumbs should be evenly distributed to avoid clumps; this gives the stuffing its signature crunch.
- Assemble the Caps: Spoon the stuffing into each mushroom cap, packing it firmly but not overstuffing. The filling should rise just below the rim. A small amount of excess is fine; it will melt into a golden crust.
- Bake to Perfection: Place the stuffed mushrooms on the prepared baking sheet and bake for 20–25 minutes, or until the tops are golden brown and the filling is bubbling. Watch the edges; they should pull away slightly from the cap, indicating a crisp finish.
- Optional Broil Finish: If you want a deeper golden crust, switch the oven to broil for the last 2 minutes, watching closely to prevent burning. The result is a slightly caramelized top that adds visual appeal.
- Rest & Serve: Let the mushrooms rest for 3 minutes before serving. This short rest allows the filling to set slightly, making each bite easier to handle. Serve hot, garnished with a sprinkle of fresh parsley or a drizzle of olive oil for extra shine.
That’s it — you did it. But hold on, I’ve got a few more tricks that’ll take this to another level…
Insider Tricks for Flawless Results
The Temperature Rule Nobody Follows
Many people bake stuffed mushrooms at 400°F, but I’ve found that 375°F gives a more even bake and prevents the tops from burning before the centers are fully cooked. The lower temperature allows the cheese to melt slowly, creating that perfect gooey texture. I once tried 400°F and ended up with a hard, over‑baked crust that was far from the desired golden finish.
Why Your Nose Knows Best
Trust your nose during the baking process. When the garlic and breadcrumbs start to smell toasty and the cheese begins to bubble, you’re right on schedule. If you’re still unsure, give the mushrooms a gentle shake; a slight wobble means the filling has set and you’re ready to take them out.
The 5‑Minute Rest That Changes Everything
After baking, let the stuffed mushrooms rest for 5 minutes before serving. This short pause allows the filling to set, making each bite easier to eat and preventing hot cheese from spilling onto your hands. I’ve seen people take the first bite before the rest, and the result is a messy, less enjoyable experience.
Use Fresh Herbs for a Burst of Color
Adding fresh basil or oregano on top before serving not only brightens the dish visually but also adds a layer of aromatic freshness that contrasts with the rich stuffing. A quick sprinkle right before plating gives a professional touch that impresses even the most discerning palates.
Keep the Mushrooms Cool Until Assembly
If you’re prepping ahead, store the cleaned mushroom caps in the refrigerator until you’re ready to stuff them. Keeping them cool prevents them from releasing excess moisture, which could make the stuffing soggy. I’ve had a batch of pre‑stuffed mushrooms that turned out soggy because I left them at room temperature for too long.
Add a Touch of Sweetness
A drizzle of balsamic reduction or a sprinkle of chopped sun‑dried tomatoes adds a sweet contrast that balances the savory elements. The acidity of the balsamic cuts through the richness, while the sun‑dried tomatoes bring an earthy sweetness that complements the mushroom base.
Creative Twists and Variations
This recipe is a playground. Here are some of my favorite ways to switch things up:
Spinach & Feta Version
Swap the mozzarella for crumbled feta and fold in sautéed spinach. The feta adds a tangy bite, while the spinach contributes a subtle earthiness that pairs beautifully with the mushrooms.
Vegan Delight
Use dairy‑free cheese and plant‑based cream cheese. Replace heavy cream with coconut milk for a silky texture. This version maintains all the flavor layers while keeping it plant‑friendly.
Mexican‑Inspired
Add black beans, corn, and a sprinkle of cheddar cheese. Finish with a drizzle of lime crema and a pinch of cumin. The result is a fiesta of flavors that transports you straight to a taco stand.
Mediterranean Twist
Incorporate chopped kalamata olives, sun‑dried tomatoes, and a splash of olive oil. Replace mozzarella with provolone for a sharper, more robust cheese profile.
Garlic Parmesan Crunch
Top each stuffed mushroom with an extra sprinkle of grated Parmesan and bake until the top forms a golden crust. The result is a savory crunch that complements the creamy interior.
Truffle Infusion
Add a teaspoon of truffle oil to the stuffing mixture. The earthy aroma of truffle elevates the dish to a gourmet level, perfect for special occasions.
Storing and Bringing It Back to Life
Fridge Storage
Store leftover stuffed mushrooms in an airtight container in the refrigerator for up to 2 days. Keep them on a paper towel-lined plate to absorb excess moisture, preventing sogginess.
Freezer Friendly
Freeze pre‑stuffed mushrooms in a single layer on a parchment‑lined tray for up to 3 months. Once frozen, transfer them to a freezer bag. When ready to bake, place directly from the freezer; no thawing necessary.
Best Reheating Method
Reheat in a pre‑heated oven at 350°F (175°C) for 10 minutes, or until heated through. Add a tiny splash of water before reheating; this steams the mushrooms back to a moist, delicious state without drying them out.