I was in the middle of a frantic weekday dinner scramble when my roommate dared me to create the ultimate snack that would make us both forget about the looming pizza delivery. I stared at a half‑empty rotisserie chicken, a tub of cream cheese, and a stack of tiny tortillas, and I thought, “What if I could turn these leftovers into something that crackles like fireworks and melts in your mouth like butter on a hot pan?” The kitchen filled with the smell of cumin and sizzling cheese, and I knew I was onto something. That moment of chaos birthed what I now swear is the most addictive, crowd‑pleasing bite you’ll ever make at home.
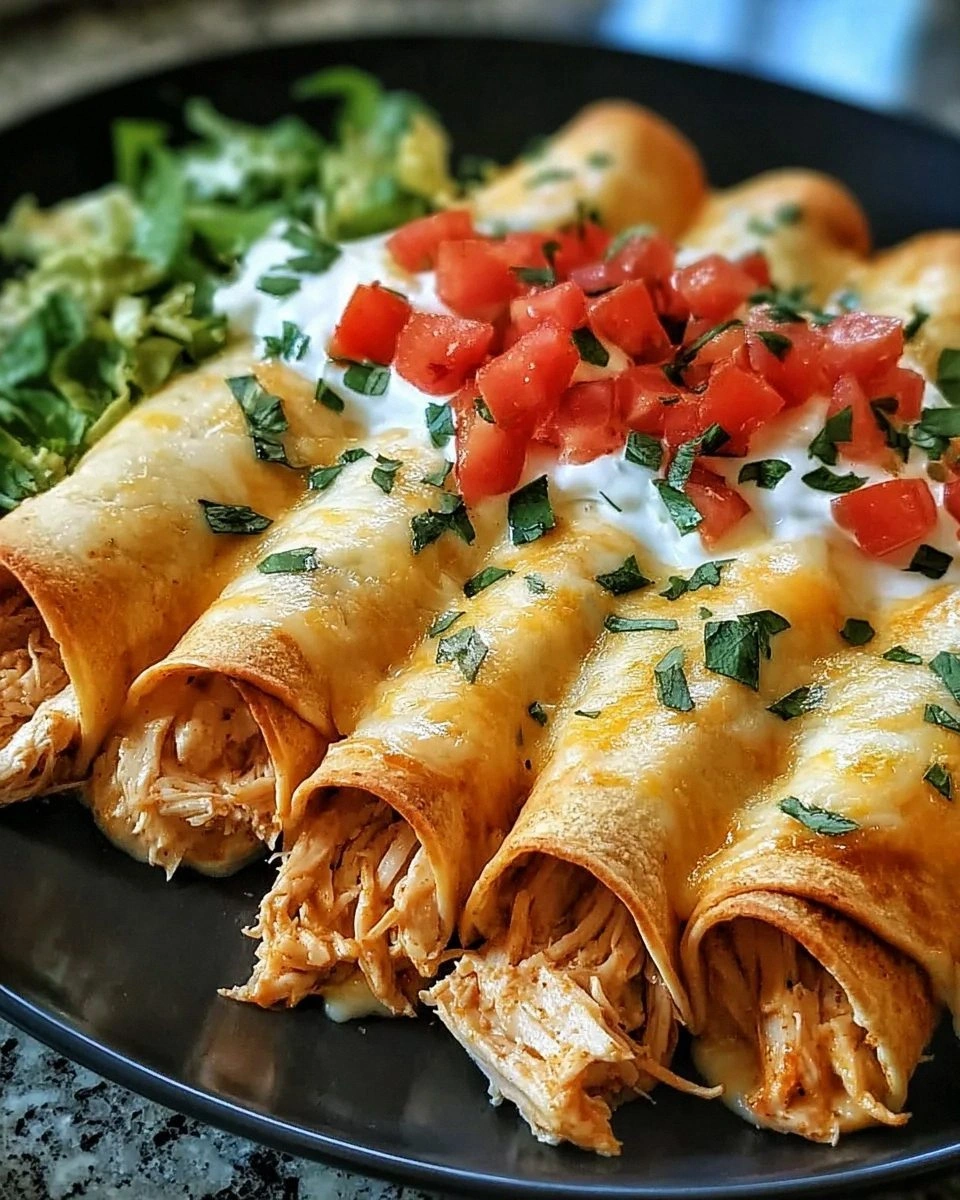
Picture this: the oven door swings open, and a golden river of taquitos slides onto a platter, each one perfectly crisp on the outside, while the interior oozes a creamy chicken‑cheese blend that clings to the tortilla like a velvety blanket. The aroma is a seductive mix of toasted corn, a whisper of smoky chili, and the comforting warmth of melted cheese—so intoxicating that even the neighbor’s cat pauses at the window, ears perked. When you bite in, the first crunch shatters like thin ice, then the silky filling rushes over your taste buds, delivering a punch of flavor that makes you gasp, “I dare you to taste this and not go back for seconds.”
Most taquito recipes either drown the chicken in a bland broth or drown the tortilla in oil, leaving you with soggy, forgettable bites. This version flips the script: we bake them, not fry, preserving that coveted crunch while cutting down on grease. The secret weapon? A generous dollop of softened cream cheese that binds the chicken, salsa, and shredded cheese into a cohesive, melt‑in‑your‑mouth filling. I’ll be honest — I ate half the batch before anyone else could even get a forkful, and that’s a testament to how addictive these are.
But the real game‑changer is the quick‑flash of cumin and chili powder that adds depth without overwhelming heat, and the optional garnish of fresh cilantro that lifts the whole thing like a bright chorus. I’m about to walk you through every single step—by the end, you’ll wonder how you ever made taquitos any other way. Okay, ready for the game‑changer? Let’s dive in.
What Makes This Version Stand Out
- Flavor Explosion: The combination of salsa, cumin, and chili powder creates a layered taste that builds with each bite, delivering heat, zest, and a hint of smokiness.
- Creamy Texture: Cream cheese binds the filling, giving it a luxurious mouthfeel that melts like butter while still holding its shape.
- Effortless Simplicity: With just a handful of pantry staples and a rotisserie chicken, you can have a restaurant‑quality appetizer in under an hour.
- Crunchy Perfection: Baking, not deep‑frying, produces a crisp exterior that stays crunchy even after cooling, perfect for making ahead.
- Universal Appeal: Even picky eaters love these; the mild heat and cheesy goodness win over kids and adults alike.
- Ingredient Quality: Using high‑fat cream cheese and fresh shredded cheese ensures a rich, satisfying bite every time.
- Make‑Ahead Friendly: Assemble the taquitos, freeze them, and bake straight from the freezer for a quick party snack.
- Versatile Dipping: Pair with guacamole, sour cream, or pico de gallo for endless flavor combos.
Inside the Ingredient List
The Flavor Base
The salsa isn’t just a splash of tomato; it’s the heart of the filling, delivering acidity that cuts through the richness of the cream cheese. Choose a medium‑spicy variety if you like a gentle kick, or go bold with a chipotle‑infused salsa for smoky depth. Skipping salsa would leave the mixture flat, like a song without a chorus. If you’re out of salsa, a quick blend of canned tomatoes, lime juice, and a pinch of salt works in a pinch.
The Texture Crew
Shredded cheese (cheddar or Monterey Jack) adds that glorious melt that stretches with each bite, while the cream cheese gives the filling body and a silk‑smooth finish. The cheese should be shredded finely so it melts uniformly; large chunks can create uneven pockets of gooeyness. If you’re dairy‑free, try a blend of dairy‑free cheese shreds and a plant‑based cream cheese alternative, but expect a slightly different mouthfeel.
The Unexpected Star
Ground cumin and chili powder are the unsung heroes that turn a plain chicken‑cheese combo into a Mexican‑inspired masterpiece. Cumin adds an earthy warmth that lingers on the palate, while chili powder brings a subtle heat without overwhelming the dish. Forgetting these spices is a common mistake that leaves the taquitos tasting bland—don’t be that person. A pinch of smoked paprika can be swapped for chili powder if you crave a deeper smoky note.
The Final Flourish
Fresh green onions or cilantro add a burst of brightness that lifts the richness, preventing the dish from feeling heavy. A sprinkle of cilantro right before serving introduces a herbaceous aroma that makes the entire plate feel fresher. If you’re not a cilantro fan, thinly sliced scallions work just as well and add a mild onion bite.
Everything's prepped? Good. Let’s get into the real action—this is where the magic truly begins.
The Method — Step by Step
Preheat your oven to 425°F (220°C). While the oven warms, line a large baking sheet with parchment paper and set a wire rack on top. The rack allows hot air to circulate, giving each taquito a uniform crispness. Power transition: This is the moment of truth—if the oven isn’t hot enough, you’ll lose that coveted crunch.
In a large mixing bowl, combine the 2 cups shredded chicken, 4 oz softened cream cheese, 1 cup shredded cheese, and ½ cup salsa. Using a sturdy spoon, fold everything together until the mixture is uniformly pink and creamy. The cream cheese should melt slightly, coating each chicken strand like velvet.
Add the 1 tsp ground cumin, 1 tsp chili powder, and a pinch of salt and black pepper. If you’re using green onions or cilantro, fold them in now. Taste the mixture—if it needs a little extra zing, add another dash of salsa or a splash of lime juice.
Kitchen Hack: Use a hand mixer on low speed for a few seconds to ensure the cream cheese fully integrates without over‑mixing.Warm each tortilla for about 5 seconds on each side in a dry skillet over medium heat. This makes them pliable and prevents cracking when you roll. Stack them on a plate, cover with a clean kitchen towel, and keep them warm while you finish the filling.
Place a heaping tablespoon of filling near the edge of a tortilla, fold the side over, then roll tightly toward the opposite edge. The roll should be snug but not so tight that the filling leaks. Secure the seam with a gentle press—no toothpicks needed.
Watch Out: Overfilling leads to bursting in the oven; keep the filling amount consistent.Arrange the rolled taquitos seam‑side down on the prepared wire rack. Lightly brush each with 1 tbsp olive oil or spray with cooking spray. This thin coat is the secret to that golden‑brown finish without deep‑frying.
Slide the sheet into the preheated oven and bake for 12‑15 minutes, or until the edges turn a deep amber and the tops are lightly crisped. Halfway through, rotate the pan for even browning. You’ll know they’re done when the cheese starts to ooze just a hint and the tortilla feels firm to the touch.
Remove the taquitos from the oven and let them rest on the rack for 2‑3 minutes. This short rest allows the steam to settle, keeping the interior creamy while the exterior stays crunchy. Serve immediately with your choice of guacamole, sour cream, or fresh pico de gallo. Future pacing: Picture yourself pulling these out of the oven, the whole kitchen smelling incredible, and the first bite sending you straight to snack heaven.
That’s it — you did it. But hold on, I’ve got a few more tricks that’ll take this to another level, ensuring every batch is flawless, whether you’re serving a crowd or just treating yourself.
Insider Tricks for Flawless Results
The Temperature Rule Nobody Follows
Never bake taquitos at a low temperature; the crust will dry out before the filling heats through. A hot 425°F blast creates steam inside the tortilla, puffing it slightly and sealing the edges. I once tried 350°F out of habit, and the result was soggy, sad, and frankly unappetizing. Trust the heat, and the crunch will thank you.
Why Your Nose Knows Best
Instead of watching the clock obsessively, rely on scent. When the taquitos start to smell toasty and you catch a faint caramel note, you’re right on target. My friend once set a timer for 20 minutes and pulled them out early—no aroma, no crunch. Let your nose be the guide; it’s the most reliable kitchen sensor.
The 5‑Minute Rest That Changes Everything
After baking, let the taquitos rest for exactly five minutes on the rack. This short pause lets the interior settle, preventing the filling from spilling out when you bite. I used to serve them hot off the tray, and the first bite was a mess of molten cheese. Now, that rest period is non‑negotiable for a clean, satisfying bite.
The Olive Oil vs. Cooking Spray Debate
A light brush of olive oil adds flavor depth and helps achieve an even golden hue, while cooking spray is convenient and lower‑calorie. If you’re watching calories, go spray; if you crave that buttery note, drizzle a teaspoon of olive oil over each taquito before baking. Both work, but the choice changes the final flavor profile.
The Secret of the Wire Rack
Baking directly on a sheet can trap steam, making the bottom soggy. The wire rack lifts each taquito, allowing hot air to circulate and crisp every side. A friend once tried baking without a rack and ended up with limp bottoms—never again. If you don’t have a rack, flip the taquitos halfway through the bake, but the rack is the gold standard.
Creative Twists and Variations
This recipe is a playground. Here are some of my favorite ways to switch things up:
Southwest BBQ Fusion
Swap salsa for a smoky BBQ sauce and add a tablespoon of chipotle in adobo. The result is a sweet‑smoky bite with a subtle heat that pairs beautifully with a drizzle of lime crema.
Spicy Buffalo Blast
Replace salsa with hot buffalo sauce, add a dash of blue cheese crumbles to the filling, and serve with ranch dip. This version turns the taquito into a handheld wing experience.
Cheesy Veggie Delight
Mix in finely diced bell peppers, corn, and black beans with the chicken. The added veggies give a pop of color and a sweet crunch that balances the richness.
Mediterranean Twist
Use feta cheese instead of cheddar, add chopped Kalamata olives, and a pinch of oregano. Serve with a side of tzatziki for a Mediterranean‑inspired snack.
Breakfast Taquito
Swap the chicken for scrambled eggs, add breakfast sausage crumbles, and use a dash of hot sauce. Perfect for a brunch crowd that loves handheld comfort.
Vegan Version
Replace chicken with seasoned jackfruit, use dairy‑free cream cheese and shredded cheese, and bake on a parchment‑lined sheet. The texture mimics the original, and the flavor stays bold.
Storing and Bringing It Back to Life
Fridge Storage
Place cooled taquitos in an airtight container lined with a paper towel to absorb excess moisture. They’ll stay crisp for up to 3 days. When ready to eat, reheat at 350°F for 8‑10 minutes, and they’ll regain most of their original crunch.
Freezer Friendly
Arrange uncooked taquitos on a baking sheet, freeze until solid, then transfer to a zip‑top bag. They keep for up to 2 months. To bake from frozen, add an extra 5‑7 minutes to the baking time, and you’ll have fresh‑out‑the‑oven perfection.
Best Reheating Method
For the crispiest revival, use a preheated oven or a toaster oven at 425°F for 5‑7 minutes. Add a tiny splash of water (about a teaspoon) on the tray before reheating; the steam helps the interior stay moist while the exterior crisps.