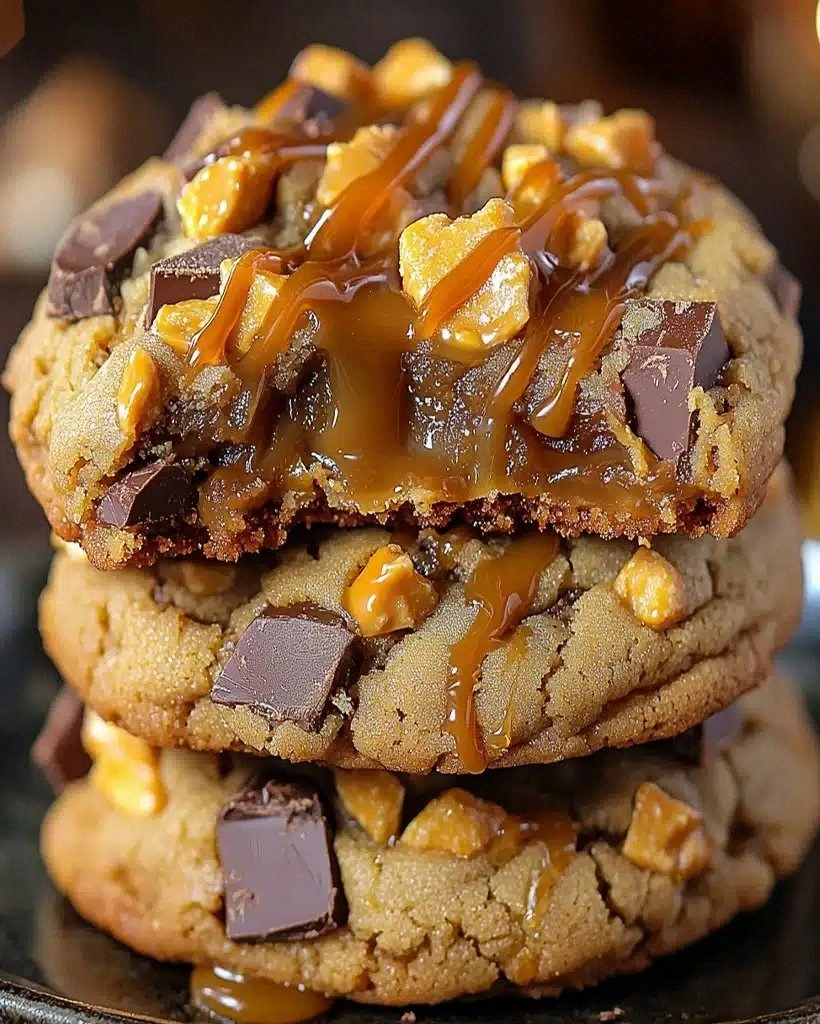
I still remember the first time I tried to make a Black Forest cake for my sister's birthday. What started as a confident culinary adventure ended with a chocolate avalanche that looked more like a crime scene than a celebration dessert. The cake layers crumbled like dry leaves, the cream was weeping like it had just watched a sad movie, and those precious cherries? They sank to the bottom like tiny red submarines. But here's the plot twist — that disaster led me to create something even better: a Black Forest roll cake so spectacular, so ridiculously impressive, that it makes the original cake look like amateur hour.
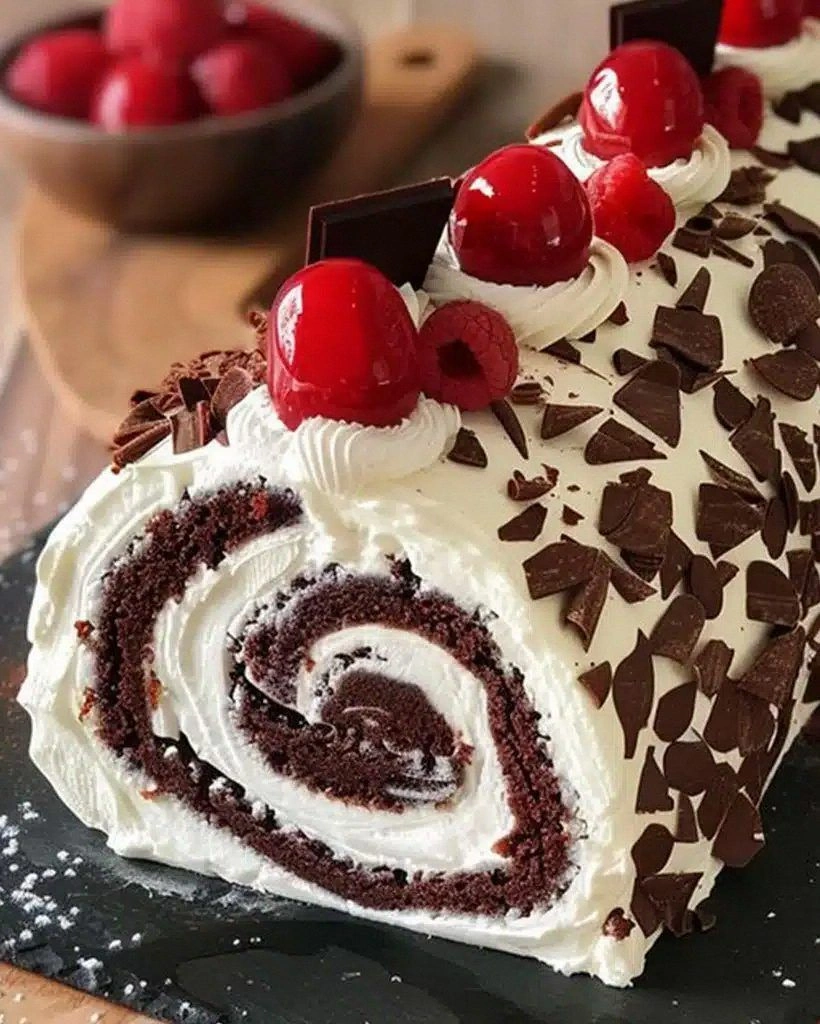
Picture this: a cloud-soft chocolate sponge rolled around billows of whipped cream and studded with jewel-like cherries, their sweet-tart juice creating rivers of flavor through every slice. The aroma alone — that intoxicating blend of dark cocoa, vanilla, and fruit — makes people stop mid-conversation when you walk into a room carrying this beauty. And when you slice it? Oh, the drama of those perfect spirals, each revealing a hypnotic pattern of cream and fruit that looks like it belongs in a Parisian patisserie window.
Most recipes for Black Forest desserts get it completely wrong. They treat the components like separate entities instead of understanding how they should dance together in perfect harmony. The sponge ends up dry and crack-prone, the cream gets grainy from overwhipping, and the cherries either disappear or turn everything into a soggy mess. But not this time. I've cracked the code on a sponge that rolls without cracking, a cream that stays luscious for days, and a cherry distribution system that ensures every bite is a perfect balance of chocolate, cream, and fruit.
The secret weapon? A technique I learned from an elderly German baker who swore by rolling the cake while it's still warm, creating a memory in the sponge that lets it curve gracefully instead of snapping like a stale cookie. Combined with a stabilized whipped cream that holds its shape even on the hottest summer day, and cherries that are treated with the respect they deserve, this roll cake doesn't just taste like the Black Forest — it transports you there with every forkful. Let me walk you through every single step — by the end, you'll wonder how you ever made it any other way.
What Makes This Version Stand Out
Cloud-Soft Sponge: The chocolate roll cake uses a genoise-style method that creates an impossibly light texture. Instead of chemical leaveners, we rely on properly whipped eggs that create a structure so flexible it can roll without a single crack. The result is a sponge that's tender enough to roll but sturdy enough to support the filling.
Cherry Distribution Magic: Instead of randomly scattering cherries and hoping for the best, we create a strategic pattern that ensures every slice reveals a perfect spiral of fruit. No more empty bites or cherry overload — each portion is engineered for maximum visual impact and flavor balance.
Stabilized Cream Secret: Traditional whipped cream collapses within hours, turning your beautiful roll into a sad, weeping mess. Our stabilized version holds its peaks for up to three days, maintaining that fresh-whipped texture even when sliced ahead for entertaining.
Temperature-Perfect Chocolate: Most chocolate sponges taste flat and one-dimensional because they're made with cocoa powder alone. We bloom the cocoa with hot liquid first, unlocking hundreds of flavor compounds that create a deep, complex chocolate experience that rivals any artisanal chocolate bar.
Make-Ahead Champion: This roll cake actually improves overnight as the flavors meld and the cream gently hydrates the sponge. You can assemble it up to two days ahead, making it perfect for dinner parties or holiday gatherings when you want to minimize day-of stress.
Visual Showstopper: The spiral effect when you slice this cake creates such a stunning presentation that people will think you spent hours on decoration. Yet the secret is all in the rolling technique — no piping bags, no fondant, no fancy equipment required.
Authentic Flavor Balance: We don't just dump cherry pie filling into cream and call it Black Forest. The cherries are macerated with kirsch (traditional cherry brandy) and a touch of lemon to brighten their flavor, while the chocolate is rich enough to stand up to the fruit without being overwhelmed.
Alright, let's break down exactly what goes into this masterpiece...
Inside the Ingredient List
The Flavor Foundation
Dutch-processed cocoa powder forms the chocolate backbone of this dessert, but here's where it gets interesting — we bloom it with hot coffee instead of water. The coffee's heat releases cocoa's volatile aromatics while the slight bitterness enhances the chocolate perception without making the cake taste like your morning brew. If you only have natural cocoa, you can use it, but Dutch-processed creates a smoother, less acidic chocolate flavor that plays beautifully with the cherries.
Fresh eggs are non-negotiable for the sponge's structure. We're whipping whole eggs with sugar until they form what's called the ribbon stage — when you lift the beaters, the mixture falls in thick ribbons that hold their shape for a few seconds before dissolving back into the bowl. Old eggs won't whip properly, so check the dates and bring them to room temperature for maximum volume.
Kirsch, the traditional cherry brandy of the Black Forest, adds an authentic note that supermarket cherry extract simply can't match. If you can't find kirsch, a good quality cherry liqueur works, but avoid artificial cherry flavoring that tastes like cough medicine. The alcohol burns off during the maceration process, leaving behind pure cherry essence that permeates every bite.
The Texture Crew
Cake flour creates a tender crumb that rolls without cracking, but here's the secret — we add just one tablespoon of cornstarch to mimic the lower protein content of European flour. American cake flour has slightly more protein than European flour, which can make the sponge too elastic. The cornstarch tenderizes without adding gluten, creating that melt-in-your-mouth texture authentic to German bakeries.
Granulated sugar does double duty here, sweetening the cake while stabilizing the whipped egg foam. The sugar crystals create tiny air pockets as they dissolve, contributing to the sponge's lift. We add it gradually while whipping the eggs, allowing each grain to dissolve completely for maximum stability.
Heavy cream with at least 36% fat content is essential for the filling. Lower fat creams whip up lighter but deflate faster, while ultra-heavy cream (40%+) can taste greasy. The sweet spot is 36-38% fat, which whips into stable peaks that hold their shape for days without weeping.
The Unexpected Star
Sour cherries, not sweet ones, are what make this dessert sing. Sweet cherries become cloying when combined with chocolate, while sour cherries provide the necessary acid balance. If you can't find fresh sour cherries, frozen ones work beautifully — just thaw and drain them first. Canned sour cherries are acceptable in a pinch, but rinse off the syrup to avoid excess sweetness.
Lemon zest and juice might seem out of place in a Black Forest dessert, but they serve a crucial purpose. The acid brightens the cherry flavor, preventing it from tasting flat or jammy. Just a teaspoon of juice and a whisper of zest make the difference between good and unforgettable.
The Final Flourish
Powdered sugar for dusting serves more than an aesthetic purpose. It creates a slight barrier that prevents the cream from absorbing into the sponge too quickly, keeping the roll tender for longer. Plus, it photographs beautifully for those social media moments we all pretend we don't care about but secretly love.
Dark chocolate shavings add texture and intensify the chocolate experience. Use a vegetable peeler on a room-temperature bar of 60-70% chocolate for the most elegant curls. Cold chocolate shatters into dusty crumbs, while too-warm chocolate melts into messy streaks. Room temperature gives you those gorgeous ribbon curls that make professionals look like magicians.
Everything's prepped? Good. Let's get into the real action...
The Method — Step by Step
- Start by preparing your pan properly — this isn't the time for shortcuts. Line a 15x10-inch jelly roll pan with parchment paper, leaving an overhang on the short sides to act as handles later. Butter the parchment and dust it with cocoa powder, tapping out the excess. This creates a non-stick surface that also adds a whisper of chocolate flavor to the cake's exterior. Position your oven rack in the center and preheat to 350°F (175°C), giving it at least 20 minutes to reach a stable temperature.
- Now for the magic moment — blooming the cocoa. Combine 1/3 cup Dutch-processed cocoa powder with 1/4 cup hot coffee in a small bowl, whisking until smooth. The mixture will thicken dramatically and develop a glossy sheen as the cocoa's starches hydrate. Let it cool slightly while you prepare the eggs. This step unlocks flavors that would otherwise stay trapped in the cocoa, creating a chocolate intensity that makes people close their eyes involuntarily when they taste it.
- In the bowl of a stand mixer (or with a hand mixer), beat 4 large room-temperature eggs with 2/3 cup granulated sugar. Start on medium speed for 2 minutes to break up the eggs, then increase to high for 8-10 minutes. The mixture will transform from pale yellow to thick and ivory-colored, increasing dramatically in volume. You're looking for the ribbon stage — when you lift the beaters, the mixture falls in thick ribbons that hold their shape for 5-10 seconds. This step creates the structure that will support the cake without chemical leaveners.
- Gently fold in the cooled cocoa mixture using a large rubber spatula. Cut down through the center, scrape along the bottom, and fold over the top — rotate the bowl a quarter turn with each stroke. Take your time here; rushing creates deflation that results in a dense, rubbery cake. The batter should maintain its lofty volume while taking on a mocha color that promises chocolate richness to come.
- Sift 2/3 cup cake flour with 1 tablespoon cornstarch and 1/4 teaspoon salt directly over the egg mixture. Sifting prevents flour lumps that create unpleasant pockets in the finished cake. Fold gently until just combined — you'll still see a few streaks of flour, which is perfect. Over-mixing develops gluten and creates a tough, crack-prone sponge that refuses to roll gracefully.
- Pour the batter into your prepared pan, spreading it gently to the edges. Don't press down or you'll deflate the precious air bubbles you worked so hard to create. Give the pan a gentle shake to level the top, then bake for 12-15 minutes. The cake is done when it springs back lightly when touched and has pulled slightly away from the sides of the pan. Don't overbake — a dry sponge will crack when rolled, no matter how skillful your technique.
- While the cake bakes, prepare your rolling surface. Lay out a clean kitchen towel larger than your pan and dust it generously with cocoa powder. As soon as the cake comes out of the oven, run a knife around the edges to loosen, then invert it onto the prepared towel. Peel off the parchment paper — this is the moment of truth. If it sticks, don't panic; just work slowly and it will release.
- Starting from one short end, roll the cake up with the towel, jelly-roll style, while it's still warm. This creates a memory in the sponge that prevents cracking later. Roll as tightly as possible without squishing the cake — you want it spiral-shaped, not compressed like a Swiss cake roll from a vending machine. Let it cool completely rolled up; this takes about 45 minutes but resist the urge to speed it up in the fridge.
- While the cake cools, prepare the cherry filling. Combine 2 cups pitted sour cherries with 3 tablespoons sugar, 2 tablespoons kirsch, and 1 teaspoon lemon juice. Let them macerate for at least 30 minutes, stirring occasionally. The cherries will release their juices, creating a natural syrup that's pure cherry essence. Drain them well before using, reserving the syrup for brushing the cake or making cocktails.
- For the stabilized whipped cream, beat 1 cup heavy cream with 2 tablespoons powdered sugar and 1 teaspoon vanilla until soft peaks form. Sprinkle 1 teaspoon unflavored gelatin over 1 tablespoon cold water in a small bowl, let it bloom for 5 minutes, then microwave for 5-10 seconds until melted. Let it cool slightly, then drizzle it into the cream while beating continuously. Continue beating until stiff peaks form — the cream should hold its shape without being grainy or over-whipped.
That's it — you did it. But hold on, I've got a few more tricks that'll take this to another level...
Insider Tricks for Flawless Results
The Temperature Rule Nobody Follows
Room temperature isn't just a suggestion — it's the difference between success and frustration. Cold eggs won't whip properly, creating a dense sponge that cracks when rolled. Take your eggs out of the fridge at least an hour before baking, or speed up the process by placing them in a bowl of warm (not hot) water for 10 minutes. The same goes for your cream — it whips faster and holds its shape longer when it's not ice-cold from the refrigerator.
But here's the twist your bakery friends won't tell you — slightly warm cream actually whips up lighter and more stable than ice-cold cream. The fat crystals form more evenly, creating a network that traps air better. Aim for cream that's around 60°F (15°C) rather than the 40°F (4°C) straight from the fridge. Just don't let it get too warm or you'll end up with butter!
Why Your Nose Knows Best
Trust your sense of smell throughout this process — it's more reliable than any timer. When the cake is baking, you'll first smell sweet egg and sugar, then gradually the chocolate aroma intensifies. When it smells deeply chocolatey and you can detect a slight nuttiness, it's done. Overbaked cake smells sharp and slightly bitter, while underbaked cake smells primarily of eggs with just a hint of chocolate.
The same principle applies to whipping cream. When it reaches the perfect consistency, it smells fresh and slightly sweet. Over-whipped cream develops a slightly sour, buttery aroma that's your cue to stop immediately. Your nose has been trained by thousands of meals — listen to it!
The 5-Minute Rest That Changes Everything
After rolling your warm cake, let it rest for exactly 5 minutes before moving it to a cooling rack. This brief pause allows the steam to redistribute throughout the cake, preventing the bottom from becoming soggy while keeping the interior moist. It's like pressing the pause button on a process that would otherwise result in a wet, unappetizing bottom layer.
During this rest, the cake's structure also sets slightly, making it less fragile when you unroll it later. Think of it as the cake taking a deep breath and settling into its new spiral shape. Skip this step and you'll find the cake tears more easily when you try to fill it.
The Unrolling Secret
When you're ready to fill the cooled cake, unroll it slowly and don't worry if it seems too curved. The warmth from your hands will help it relax and flatten slightly. If you try to force it flat while cold, you'll create stress cracks that show up later. Work with the cake's natural curve rather than against it.
Brush the surface lightly with the reserved cherry syrup before adding the cream. This adds moisture and flavor while creating a barrier that prevents the cream from being absorbed into the cake. Don't soak it — just a light misting that adds shine and flavor without creating a soggy base.
The Final Roll Technique
When rolling the filled cake, use the towel to help you lift and guide rather than rolling the cake directly. Start by lifting the edge nearest you and using the towel to fold it over the filling, creating a tight spiral from the beginning. Once you have the first roll established, you can lift the towel and let the cake's weight help create a tight, even spiral.
Don't worry if some cream squidges out — that's normal and actually helps seal the seam. Use a bench scraper or offset spatula to gently push it back in as you roll. The goal is a tight spiral, not a compressed log, so use gentle pressure while maintaining consistent tension.
Creative Twists and Variations
This recipe is a playground. Here are some of my favorite ways to switch things up:
The White Forest Roll
Replace the chocolate sponge with a vanilla version by omitting the cocoa and adding 1 teaspoon vanilla extract. Use white chocolate in the cream by melting 2 ounces and cooling it slightly before whipping it in. The result is a stunning black-and-white spiral that tastes like the best cookies-and-cream ice cream you've ever had. Kids go absolutely wild for this version, and it photographs like a dream for social media.
The Adult Version
Replace half the coffee in the sponge with espresso and add 2 tablespoons of kirsch to the cream along with a pinch of cardamom. The coffee intensifies the chocolate flavor while the cardamom adds a sophisticated note that makes this perfect for dinner parties. Serve small slices — this version is rich enough that a little goes a long way, and the flavors develop beautifully as it sits.
The Berry Medley
Can't find sour cherries? Use a mix of raspberries, blackberries, and blueberries instead. Macerate them with a touch of framboise (raspberry brandy) and lemon zest. The mixed berries create a more complex flavor profile and stunning color variations in each slice. Plus, berries are available year-round, making this a reliable option when cherries are out of season.
The Nutty Professor
Add 1/2 cup finely ground hazelnuts to the sponge batter, replacing 2 tablespoons of the flour. The nuts add richness and create a flavor reminiscent of Nutella when combined with the chocolate. Toast the hazelnuts first for maximum flavor, then grind them with a tablespoon of the measured sugar to prevent them from becoming hazelnut butter.
The Tropical Escape
Replace the cherries with diced fresh pineapple that's been grilled briefly for caramelization. Use coconut milk instead of regular milk in the sponge, and add toasted coconut flakes to the cream. The tropical twist is unexpected but absolutely delicious, especially in summer when you want something lighter than traditional Black Forest.
The Mini Rolls
Instead of one large roll, divide the batter between two 9-inch square pans to create mini rolls. These are perfect for lunch boxes, individual desserts, or when you want to gift someone a special treat without making a full-sized cake. They also freeze beautifully, so you can always have a special dessert ready for unexpected guests.
Storing and Bringing It Back to Life
Fridge Storage
Wrap the finished roll tightly in plastic wrap, then place it in an airtight container. It will keep for up to 4 days in the refrigerator, though it's best within the first 48 hours. The cream will gradually absorb into the cake, creating an almost tiramisu-like texture that's actually quite delicious. If you notice the cream starting to weep, simply dust with additional powdered sugar before serving.
For best results, store it in the coldest part of your refrigerator, away from strong-smelling foods. The cake acts like a sponge for odors, so keep it away from onions, garlic, and strong cheeses. If your fridge tends to be humid, place a paper towel in the container to absorb excess moisture.
Freezer Friendly
This roll cake freezes beautifully for up to 2 months. Wrap individual slices in plastic wrap, then place them in a freezer bag. Thaw overnight in the refrigerator for best texture, though you can also thaw at room temperature for 30-45 minutes if you're in a hurry. The cream might separate slightly after freezing, but a quick dusting of powdered sugar disguises any imperfections.
For entertaining, you can freeze the entire roll. Wrap it in a double layer of plastic wrap, then in foil. Thaw overnight in the refrigerator, then let it sit at room temperature for 30 minutes before serving. The texture will be slightly denser than fresh, but the flavors actually intensify during freezing.
Best Reheating Method
While this cake is best served chilled or at room temperature, if your refrigerator has dried it out slightly, you can refresh it. Remove it from the refrigerator 30-45 minutes before serving to take the chill off. If it's been in the fridge for several days and seems dry, lightly brush the cut surfaces with the reserved cherry syrup or a simple syrup flavored with vanilla.
Never microwave this cake — the cream will melt and the sponge will become rubbery. If you must serve it slightly warm (some people prefer it this way), let it sit at room temperature for an hour. The flavors actually bloom as the cake warms, creating a more intense chocolate-cherry experience that some people prefer to the chilled version.