I was halfway through a midnight snack spree when my kitchen turned into a chaotic symphony of sizzling pans, burnt sauces, and the faint smell of disappointment. I stared at the burnt edges of a chicken stir‑fry that had gone from golden to charred in seconds, and I thought, “There has to be a better way.” That moment sparked a quest for a dish that balances crispness, flavor depth, and a dash of health. What I discovered is a sesame chicken that feels like a gourmet secret, yet you can whip it up in a fraction of the time. This recipe will make you question why you ever settled for bland takeout.
The first time I tried this version, I was skeptical—how could something so simple deliver that kind of wow factor? I whisked together soy sauce, honey, rice vinegar, and a splash of sesame oil, and the aroma that unfurled was a promise of something extraordinary. As the sauce simmered, the honey melted into a glossy glaze that clung to the chicken like velvet. When the final toss of toasted sesame seeds and scallions landed, the dish transformed into a sensory masterpiece. The crunch of the seeds, the umami of the soy, and the subtle sweetness of the honey danced together, leaving my taste buds singing.
I dare you to taste this and not go back for seconds—once you experience the harmony of flavors, the craving for more becomes inevitable. The sauce coats each piece of chicken so evenly that every bite is a burst of caramelized sweetness balanced by a hint of salt and spice. The texture is a perfect marriage of a crisp exterior and a tender interior, a contrast that makes the dish endlessly satisfying. The subtle heat from the ginger and optional chili flakes gives the dish a gentle kick that wakes up the palate. This isn’t just another chicken recipe; it’s a culinary revelation that will change how you think about quick week‑night meals.
If you've ever struggled with finding the right balance between sweet and savory in a stir‑fry, you're not alone—and I've got the fix. Most recipes get this completely wrong by overcooking the chicken or using too much sugar, resulting in a mushy mess. The trick is to sear the chicken until the edges are golden, then let the sauce reduce to a thick glaze that sticks without weighing the meat down. Picture yourself pulling this out of the pan, the whole kitchen smelling incredible, and watching the glossy sauce shimmer like liquid gold. The moment you taste the first bite, you’ll realize that this is hands down the best version you'll ever make at home.
The secret behind this dish’s incredible flavor is the marriage of simple pantry staples with a few strategic techniques. The honey or maple syrup adds a natural sweetness that caramelizes beautifully, while the rice vinegar provides a bright counterpoint that cuts through the richness. The sesame oil not only infuses the chicken with an unmistakable nutty aroma but also helps create a crisp crust when seared. The cornstarch slurry thickens the sauce just enough to cling to the chicken without making it soggy. Every ingredient plays a role, and the result is a dish that feels indulgent without the guilt.
And now the fun part—watching the sauce transform into a glossy, fragrant coat that clings to every piece. The moment the chicken hits the pan, the sizzle is unmistakable, and the aroma begins to fill the kitchen like a promise of comfort. As the sauce simmers, it thickens, glistening with a sheen that makes the dish look like a masterpiece on a plate. When you toss the chicken with the sauce, the glossy glaze becomes a visible testament to the careful balance of sweet, salty, and umami. This is the moment of truth, and the anticipation is almost tangible.
Alright, let’s break down exactly what goes into this masterpiece. The ingredients are simple, the techniques are straightforward, and the result is a dish that feels both comforting and sophisticated. If you’re ready to elevate your chicken game, follow along closely. I’ll guide you through each step, ensuring that every element shines. By the end, you’ll wonder how you ever made it any other way.
What Makes This Version Stand Out
- Flavor: The sauce balances sweet, salty, and tangy notes, creating a complex taste profile that feels both familiar and adventurous.
- Texture: A crisp exterior meets a juicy interior, delivering a satisfying bite that keeps you coming back for more.
- Simplicity: Only a handful of pantry staples are required, making this dish approachable for even novice cooks.
- Health: Low in added fats and sugars, it offers a lighter alternative to traditional fried sesame chicken.
- Time‑Efficiency: From prep to plate, the entire process takes under an hour, ideal for busy week‑nights.
- Versatility: Works beautifully with rice, quinoa, or a fresh green salad, allowing endless meal combinations.
- Make‑Ahead: The sauce can be prepared in advance and reheated without losing its glossy sheen.
- Crowd‑Pleaser: Even the pickiest eaters love the gentle sweetness and subtle heat, making it a family favorite.
- Ingredient Quality: Using high‑quality sesame oil and fresh ginger elevates the dish beyond the ordinary.
- Presentation: The final garnish of toasted sesame seeds and scallions adds a pop of color and crunch.
Inside the Ingredient List
The Flavor Base
Low‑sodium soy sauce provides the umami backbone of the glaze, offering depth without overwhelming saltiness. Rice vinegar adds a bright, tangy counterpoint that lifts the sweetness, ensuring the sauce doesn’t taste cloying. A splash of sesame oil infuses the dish with a nutty aroma that ties the flavors together. Together, these three components create a sauce that’s both complex and approachable.
The Sweetness Factor
Honey or maple syrup brings natural sweetness that caramelizes beautifully when heated, forming a glossy coat that clings to the chicken. The choice between honey and maple depends on your dietary preferences; both deliver a smooth, mellow sweetness. If you’re watching calories, a light drizzle of agave nectar can substitute, though it slightly alters the flavor profile. Skipping this step will leave the sauce bland and flat.
The Texture Crew
Cornstarch slurry thickens the sauce just enough to coat the chicken without making it gummy. It also helps the glaze set into a silky, clingy consistency that enhances every bite. Water balances the slurry’s thickness, preventing clumping and ensuring a smooth finish. Without cornstarch, the sauce would be too thin, and the chicken would lack that coveted glossy sheen.
The Final Flourish
Toasted sesame seeds add a subtle crunch and a nutty finish that elevates the dish. Sliced scallions provide a fresh, peppery contrast that cuts through the richness. A pinch of chili flakes introduces a gentle heat that awakens the palate. These final touches transform the dish from good to unforgettable.
Everything's prepped? Good. Let's get into the real action.
The Method — Step by Step
- Start by patting the chicken breasts dry with paper towels; moisture is the enemy of a crisp sear. Season each piece generously with salt and pepper, then let them sit at room temperature for 10 minutes. This step ensures even cooking and a better crust. While the chicken rests, you can begin assembling the sauce components. The aroma of fresh garlic already starts to build anticipation.
- Heat a large skillet over medium‑high heat and add 1 tablespoon of sesame oil. Once the oil shimmers, add the chicken pieces in a single layer, making sure not to overcrowd the pan. Sear the chicken for about 3–4 minutes per side until golden brown; you’ll hear a satisfying sizzle that signals the start of flavor development. Flip the chicken carefully to avoid tearing the skin. As the chicken cooks, the surface will develop a caramelized crust that locks in juices.
- While the chicken is searing, whisk together soy sauce, honey, rice vinegar, and a splash of water in a small bowl. This mixture will form the base of the glaze. The acidity from the vinegar balances the sweetness of the honey, preventing a cloying finish. Keep the whisking smooth to avoid lumps. The sauce should be ready by the time the chicken is halfway cooked.
- Add the minced garlic and grated ginger to the skillet once the chicken is browned. Stir quickly to coat the meat and allow the aromatics to bloom for about 30 seconds. The garlic should release its fragrance without turning bitter, and the ginger will add a fresh, slightly peppery undertone. This step is critical for building depth; skipping it leaves the dish flat.
- Pour the pre‑whisked sauce over the chicken, ensuring each piece is fully coated. Reduce the heat to medium and let the sauce simmer for 4–5 minutes, stirring occasionally. The sauce should thicken and become glossy, clinging to the chicken. Keep a close eye on the consistency; if it starts to dry out, add a splash of water to maintain moisture. This simmering phase is where the flavors meld into a cohesive whole.
- When the sauce has thickened to a syrupy consistency, remove the skillet from heat. Sprinkle the sliced scallions over the chicken and give everything a final gentle toss. The scallions add a fresh, peppery contrast that brightens the dish. The final coat should look like liquid gold, shimmering in the light. The aroma will be irresistibly inviting.
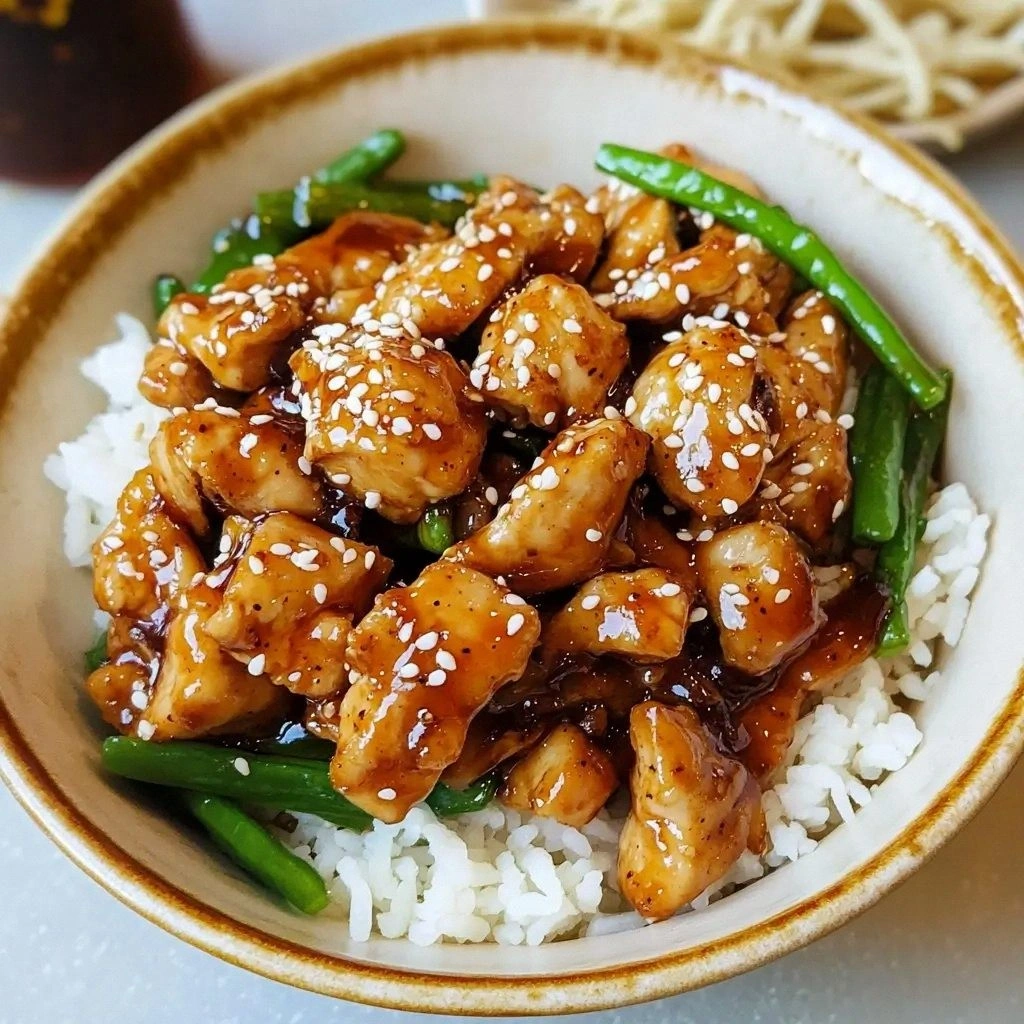
- Transfer the chicken to a serving platter and drizzle any remaining sauce over the top. Garnish with the remaining toasted sesame seeds for that satisfying crunch. Serve immediately over steamed rice or quinoa, or pair with a crisp green salad for a lighter option. The dish is best enjoyed hot, so make sure your plate is ready to receive the steam. Your guests will be amazed by the depth of flavor and the beautiful presentation.
- If you’re not plating right away, allow the chicken to rest for 5 minutes; this lets the juices redistribute, keeping the meat moist. Store any leftovers in an airtight container in the refrigerator for up to 3 days. To reheat, gently warm the chicken in a skillet over low heat, adding a splash of water to re‑moisten the glaze. The dish will regain its glossy sheen and fresh flavor. This step ensures that the dish remains as delicious tomorrow as it was today.
That's it — you did it. But hold on, I've got a few more tricks that'll take this to another level. These insider tips will help you avoid common pitfalls and elevate the dish from good to unforgettable.
Insider Tricks for Flawless Results
The Temperature Rule Nobody Follows
Heat the skillet to a medium‑high setting before adding oil; if the oil starts smoking immediately, the pan is too hot. A properly heated pan allows the chicken to sear without steaming, creating that coveted caramelized crust. A common mistake is to lower the heat too early, which results in soggy meat. Keep the heat steady until the chicken is fully browned on both sides.
Why Your Nose Knows Best
The scent of garlic and ginger is a reliable indicator of flavor development. When the aroma is sharp and fragrant, the sauce is on track. If it smells flat, give the sauce a few more minutes to reduce. Trusting your nose can save you from an underseasoned dish.
The 5‑Minute Rest That Changes Everything
Letting the chicken rest after cooking allows the juices to redistribute, keeping the meat moist. A quick 5‑minute pause can make the difference between a dry bite and a succulent bite. This simple step is often overlooked but is essential for restaurant‑quality results. Your family will notice the juiciness immediately.
The Secret of the Glaze
Adding a teaspoon of cornstarch before the sauce simmers ensures a silky, clingy glaze that doesn’t separate. Skipping this step will leave the sauce watery and less flavorful. The cornstarch thickens the glaze without adding extra carbs if you keep the quantity small. This trick elevates the dish from ordinary to extraordinary.
The Finish Line
Finish the dish with a sprinkle of toasted sesame seeds right before serving. The seeds release a nutty aroma that instantly elevates the dish’s sensory appeal. A final drizzle of sesame oil adds a glossy sheen and a subtle depth of flavor. This last touch is what separates a good meal from a memorable one.
The Sauce’s Secret Ingredient
A splash of orange juice or a dash of soy sauce with a hint of citrus can brighten the glaze. This subtle tweak adds a layer of freshness that complements the richness of the honey. It’s a small change that yields a noticeable difference in flavor. Try it next time you feel adventurous.
Creative Twists and Variations
This recipe is a playground. Here are some of my favorite ways to switch things up:
Thai‑Inspired Twist
Swap the soy sauce for coconut aminos and add a tablespoon of fish sauce. Toss in sliced red bell pepper and a handful of fresh cilantro. The result is a bright, slightly spicy dish that feels like a Thai takeout favorite. Perfect for a quick week‑night dinner that feels exotic.
Keto‑Friendly Version
Replace the honey with a sugar‑free syrup and use almond flour instead of regular flour for a crunchy coating. Keep the sesame oil and soy sauce low‑sodium. This version keeps the flavor profile intact while cutting carbs to a minimum. Great for those following a low‑carb lifestyle.
Vegetarian Take
Use firm tofu instead of chicken, pressing it to remove excess moisture. Follow the same sauce and searing steps for a plant‑based version. The tofu will absorb the glaze, delivering the same satisfying crunch and flavor. This option is ideal for meatless nights.
Spicy Sriracha Kick
Fold in a tablespoon of sriracha into the sauce for a fiery punch. The heat will balance the sweetness, creating a bold flavor profile. This variation is great for those who love a little heat in their meals. The dish will be unforgettable.
Herb‑Infused Variation
Add a handful of fresh thyme or rosemary to the sauce while it simmers. The herbs impart a subtle earthy tone that complements the sesame flavor. This twist is perfect for a cozy, rustic dinner. Your guests will appreciate the depth of aroma.
Gluten‑Free Option
Use tamari instead of soy sauce and ensure the cornstarch is certified gluten‑free. The sauce remains thick and flavorful without the gluten component. This version is safe for those with gluten sensitivities. The dish stays just as delicious.
Storing and Bringing It Back to Life
Fridge Storage
Store leftovers in an airtight container in the refrigerator for up to 3 days. Keep the sauce separate if you plan to reheat; this prevents the glaze from becoming too thick. When ready to serve, reheat gently to avoid overcooking. A quick stir will bring back the glossy sheen. The dish tastes almost as fresh as when it was first plated.
Freezer Friendly
Freeze the chicken pieces and sauce separately in freezer‑safe bags for up to 2 months. Thaw overnight in the refrigerator before reheating. Reheat in a skillet over low heat, adding a splash of water to re‑moisten the glaze. This method preserves the texture and flavor remarkably well. The dish will still feel like a homemade masterpiece.
Best Reheating Method
Reheat in a non‑stick skillet over medium heat, adding a tablespoon of water to keep the sauce from drying out. Stir frequently to ensure even heating. The key is low, steady heat; this prevents the chicken from becoming rubbery. Once the sauce is hot and glossy again, serve immediately. The dish will taste almost brand‑new.