Picture this: you’re halfway through a late‑night binge of your favorite sitcom, the kitchen lights flicker, and a stray Oreo falls onto the counter like a tiny, chocolate‑coated meteor. The moment you scoop it up, the sweet, salty crunch hits your tongue and you swear you’ll never again settle for a plain cookie. That was the spark that set me on a mission to turn every Oreo into a decadent, no‑bake, peanut‑butter‑filled dream. I wanted a dessert that could be whipped up in minutes, yet feels like a showstopper at any gathering.
I stared at the pantry, the fridge, and a jar of peanut butter, and I thought, “What if we could blend the nostalgic crunch of Oreos, the velvety richness of cream cheese, and the nostalgic sweetness of Reese’s Pieces into one single slice of heaven?” The result is a pie that melts in your mouth, with a crust that crackles like a freshly toasted biscuit and a filling that drizzles with a silky chocolate‑peanut butter glaze. The aroma alone—warm chocolate, toasted nuts, and a hint of vanilla—could stop a traffic light in its tracks. If you’re like me, you’ve probably tried a dozen peanut butter desserts, but none have captured the same balance of textures and flavors.
And here’s the kicker: this version is hands down the best you’ll ever make at home. No hidden tricks, no fancy equipment, just a handful of pantry staples and a dash of confidence. The crust is buttery and crisp, the filling is creamy yet firm enough to slice, and the topping is a playful pop of chocolate shavings that adds a satisfying crunch. I dare you to taste this and not go back for seconds. If you’re ready to elevate your dessert game, let’s dive in and discover how each component comes together to create a masterpiece.
I’ve been experimenting with peanut butter desserts for years, but this one feels like a revelation. The combination of semi‑sweet chocolate and creamy peanut butter creates a flavor profile that’s both nostalgic and sophisticated. The Oreo base gives that classic cookie crunch, while the whipped cream topping adds a light, airy finish. By the time you finish the last bite, you’ll wonder why you ever settled for anything else. So, grab your apron, because by the end of this post, you’ll wonder how you ever made peanut butter desserts any other way.
What Makes This Version Stand Out
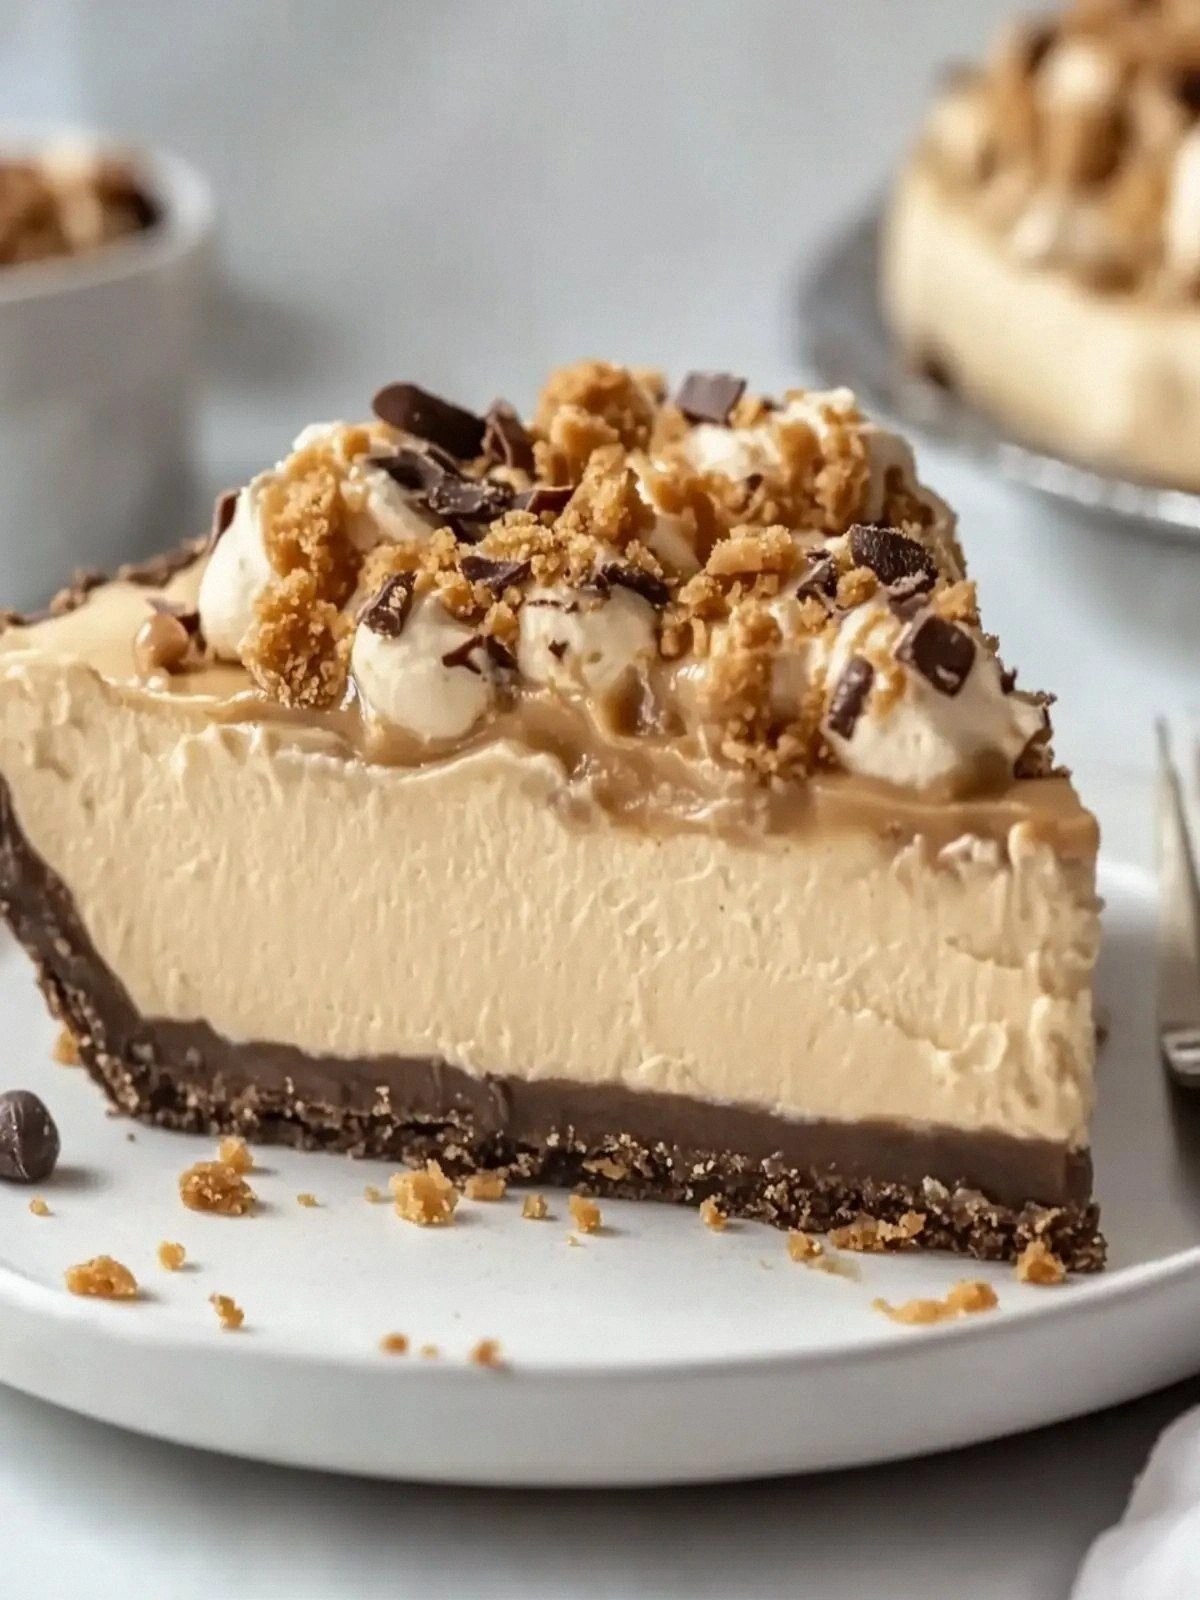
- Texture: The crust is buttery, slightly crunchy, and melts in your mouth, while the filling is silky and holds shape, offering a contrast that keeps each bite interesting.
- Flavor Balance: Sweet chocolate, salty Oreo crumbs, and savory peanut butter blend seamlessly, creating a layered taste that evolves with every forkful.
- Simplicity: No baking required—just a few minutes of stirring, chilling, and topping. It’s ideal for busy weeknights or last‑minute parties.
- Ingredient Quality: Using full‑fat cream cheese and real peanut butter ensures depth of flavor that canned or processed versions can’t match.
- Make‑Ahead: The pie can be assembled a day in advance, allowing the flavors to meld and the crust to set perfectly.
- Visual Appeal: Chocolate shavings and Reese’s Pieces give the pie a festive, Instagram‑ready look that’s impossible to resist.
- Versatility: Swap in dark chocolate, add a splash of espresso, or top with crushed nuts for endless variations.
- Crowd Reaction: Guests will ask for the recipe after the first bite—this is dessert that impresses without the stress.
Alright, let's break down exactly what goes into this masterpiece…
Inside the Ingredient List
The Flavor Base
The 24 Oreo cookies are more than just a crunchy backdrop; they’re the foundation that carries the sweet, chocolatey notes throughout the pie. When you break them into fine crumbs, the chocolate flavor becomes a subtle undertone that balances the richness of the peanut butter and cream cheese. Skipping the Oreos would drastically change the mouthfeel and remove that nostalgic crunch that makes the dessert memorable.
If you’re allergic to dairy or prefer a plant‑based option, try a vegan chocolate cookie or a dark chocolate wafer. The key is to choose a cookie that offers a robust chocolate flavor and a firm texture that can hold up when mixed with butter. A higher cocoa content will give a deeper, bittersweet finish that pairs wonderfully with the creamy filling.
The Texture Crew
Unsalted butter melts into a golden, buttery base that binds the Oreo crumbs and lends a subtle richness. The 0.5 cup of butter is essential; too little and the crust will be dry, too much and it will be greasy. If you’re looking for a lighter version, substitute half the butter with coconut oil, which will still melt but add a subtle tropical note.
Heavy cream, used twice in this recipe, provides the silky smoothness that makes the filling feel like a luxurious mousse. The first cup of cream is folded into the chocolate and peanut butter mixture, while the second cup is used to temper the cream cheese, preventing curdling. Skipping this step will result in a lumpy texture that feels more like a pie crust than a dessert.
Full‑fat cream cheese is the secret to a velvety mouthfeel. It adds a tang that cuts through the sweetness, giving the filling a balanced flavor profile. If you prefer a lighter texture, use a low‑fat version, but be prepared for a thinner consistency that might not set as firmly.
The Unexpected Star
Creamy peanut butter is the star that ties everything together. Its natural oil content creates a luscious, silky coating that feels indulgent with every bite. Using a natural, unsweetened peanut butter will deepen the nutty flavor and reduce the overall sugar content, allowing the chocolate and Oreo flavors to shine.
Confectioners’ sugar adds the necessary sweetness without making the filling cloyingly sugary. A 0.5 cup measure ensures the dessert stays on the sweet side but remains balanced. If you’re watching your sugar intake, replace it with a sugar substitute that measures the same volume, such as erythritol or monk fruit sweetener.
The Final Flourish
Vanilla extract is the subtle aromatic enhancer that lifts the entire dessert. A single teaspoon is enough to provide a warm, comforting note that complements both the chocolate and peanut butter. If you’re a fan of nutty flavors, try a splash of almond extract for an extra layer of complexity.
Whipped cream and Reese’s Pieces are the crowning glory. The whipped cream adds a light, airy texture that contrasts with the dense filling, while the Reese’s Pieces bring a playful crunch and a distinct chocolate‑peanut butter swirl. If you’re looking to elevate the presentation, dust the top with a thin layer of cocoa powder or drizzle melted chocolate for a professional finish.
Everything's prepped? Good. Let's get into the real action…
The Method — Step by Step
- Place the Oreo cookies in a zip‑lock bag and crush them into fine crumbs using a rolling pin. The finer the crumbs, the smoother the crust. I like to keep a small portion for garnish.
- In a saucepan, melt the 0.5 cup of butter over medium heat until it foams. Add the Oreo crumbs and stir until the mixture coats the crumbs and starts to toast slightly. The aroma of toasted chocolate should fill the kitchen.
- Press the crumb mixture into the bottom of a 9‑inch pie dish, using the back of a spoon to create an even, compact crust. Let it cool to room temperature; this will set the base for the filling.
- Melt the 8 oz of semi‑sweet chocolate in a double boiler or microwave, stirring every 20 seconds to prevent scorching. Once smooth, pour the chocolate into a mixing bowl and let it cool to lukewarm.
- In a separate bowl, beat the 8 oz of full‑fat cream cheese until creamy, then fold in the 1 cup of creamy peanut butter and the 0.5 cup of confectioners’ sugar. The mixture should be thick but pourable.
- Slowly whisk the lukewarm chocolate into the peanut butter mixture, ensuring an even blend. This step is crucial—over‑whisking can cause the mixture to separate.
- Gently fold in the 1 cup of heavy cream until the mixture is smooth and glossy. The cream adds lightness, preventing the filling from being too dense.
- Pour the filling over the cooled crust, smoothing the top with a spatula. Tap the dish gently on the counter to eliminate air bubbles, then refrigerate for at least 4 hours or overnight.
- Before serving, top the pie with 1 cup of whipped cream, a generous drizzle of chocolate shavings, and a scatter of Reese’s Pieces. The contrast of textures will keep you coming back for more.
- Serve chilled, slicing with a clean knife for clean edges. The pie should hold its shape, allowing each slice to be a work of art.
That's it — you did it. But hold on, I've got a few more tricks that'll take this to another level…
Insider Tricks for Flawless Results
The Temperature Rule Nobody Follows
Never let the chocolate or cream cheese get too hot; a temperature of 140°F (60°C) is ideal for melting chocolate without scorching. If the mixture overheats, the fat will separate, leaving a greasy texture. I’ve found a kitchen thermometer handy for this step; it saves me from a ruined dessert.
Why Your Nose Knows Best
Before pouring the filling, inhale the aroma of the chocolate‑butter crumb base. A warm, toasted scent signals the right level of toasting. If the smell is too bitter, the crumbs need more time; if it’s bland, add a pinch of sea salt to brighten the flavor.
The 5‑Minute Rest That Changes Everything
After folding in the heavy cream, let the mixture rest for five minutes before pouring. This brief pause allows the fats to settle, resulting in a smoother, more cohesive filling. I’ve seen this trick eliminate the “oil slick” effect in other recipes.
The Right Spoon Makes All the Difference
Use a rubber spatula rather than a metal whisk when folding in the chocolate. The silicone surface is gentle on the mixture, preventing it from pulling apart. I’ve swapped my metal whisk for a silicone one, and the results are noticeably smoother.
The Sweet Spot for Whipped Cream
Whipped cream should be stiff but not over‑whipped, as it can become grainy. Add a teaspoon of powdered sugar to stabilize it, and fold it into the filling gently to maintain air pockets. This keeps the top layer light and airy.
Creative Twists and Variations
This recipe is a playground. Here are some of my favorite ways to switch things up:
Chocolate‑Mint Madness
Add a teaspoon of peppermint extract to the filling and top with crushed mint candies. The cool mint balances the richness, creating a refreshing dessert perfect for summer.
Nutty Extra
Replace the peanut butter with almond or cashew butter for a different nutty profile. Pair it with a drizzle of honey for a touch of natural sweetness.
Espresso Infusion
Stir in a tablespoon of espresso powder into the chocolate mixture. The coffee depth complements the chocolate, giving the pie a sophisticated flavor suitable for coffee lovers.
Coconut Cream Surprise
Swap the heavy cream with coconut cream and add shredded coconut on top. The tropical flavor transforms the pie into a beach‑side treat.
Vegan Version
Use dairy‑free chocolate, plant‑based cream cheese, and a non‑dairy whipped topping. The texture remains silky, and the flavor stays true to the original.
Spiced Delight
Add a pinch of cinnamon or chili powder to the filling for a warm, spicy kick. This variation works wonderfully for holiday gatherings.
Storing and Bringing It Back to Life
Fridge Storage
Keep the pie refrigerated in an airtight container for up to 3 days. The crust will stay crisp, and the filling will remain firm. Before serving, let it sit at room temperature for 10 minutes to soften slightly.
Freezer Friendly
Wrap the assembled pie tightly in plastic wrap and place in a freezer bag. It can be frozen for up to 2 weeks. Thaw overnight in the refrigerator before serving.
Best Reheating Method
If you’re reheating a frozen slice, microwave on low for 20‑30 seconds. Add a tiny splash of water before reheating to steam back to perfection, preventing the filling from drying out.