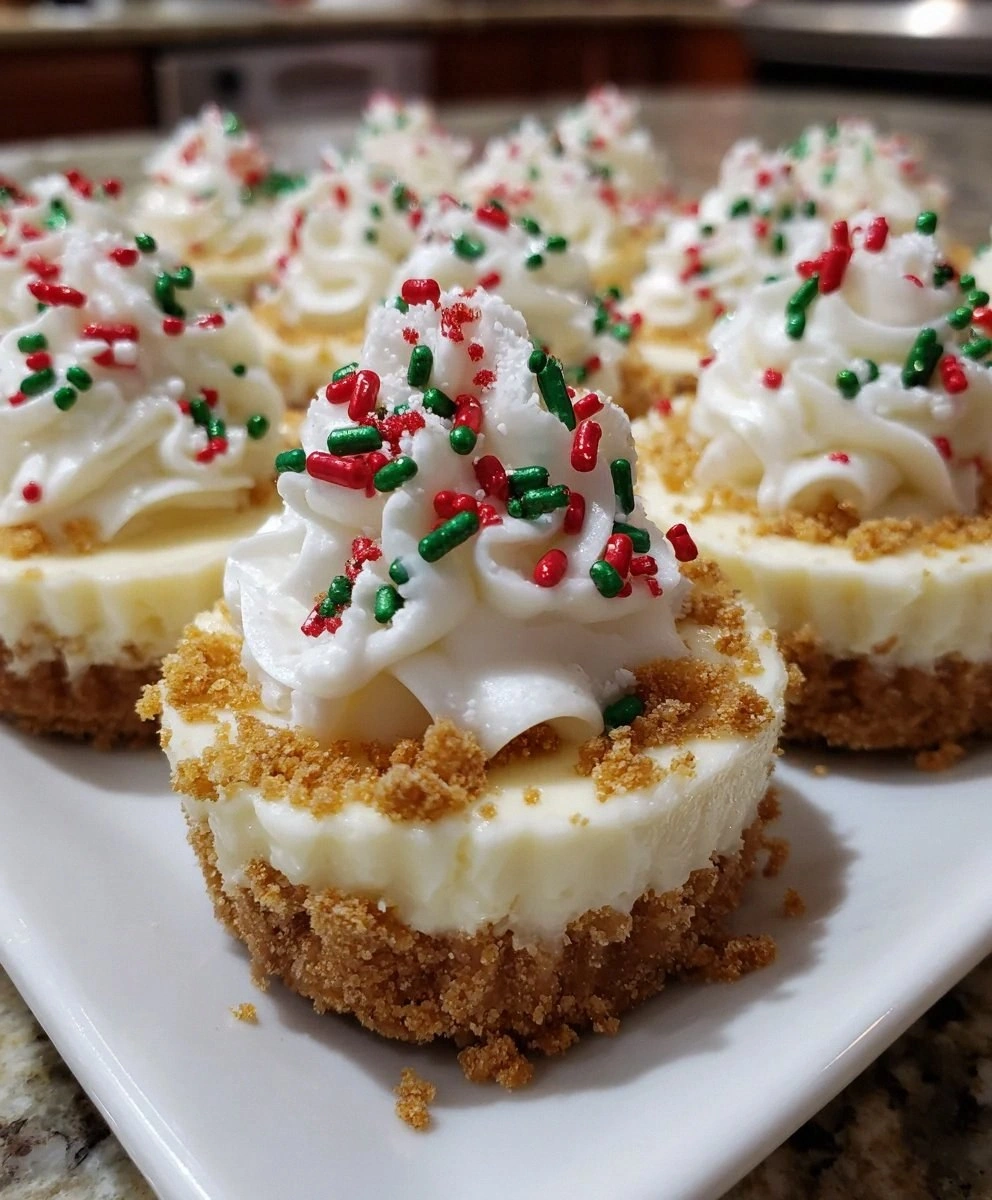
Last December, I stood in my kitchen at 11:47 p.m. in mismatched socks, flour in my hair, staring at a cratered cheesecake that looked like it had survived a meteor shower. The oven had betrayed me—again—and Christmas Eve brunch was eight hours away. My mother-in-law, the queen of perfect desserts, would arrive with her signature smirk and a store-bought backup, just in case. That’s when I whispered the three words that changed my holiday baking life forever: “No. More. Baking.” I slammed the oven door shut, cracked open a block of cream cheese, and started tinkering like a dessert-obsessed mad scientist while Bing Crosby crooned in the background. By dawn, twelve pristine mini cheesecakes wearing festive sprinkle crowns sat in my fridge, no cracks, no water baths, no therapy sessions required. The first bite made me do that embarrassing happy dance nobody should ever witness, and when my mother-in-law sneaked a third piece, I knew I had stumbled onto something dangerously delicious.
Picture this: you’re at the holiday potluck, plastic fork poised, and someone hands you a cheesecake that tastes like December itself—cool, creamy, and studded with tiny rubies and emeralds of sugar that crunch like fresh snow underfoot. The crust snaps like thin ice on a winter pond, giving way to a cloud of vanilla-scented filling so light it practically floats off the paper liner. You close your eyes involuntarily, because that’s what humans do when flavor hits the nostalgia jackpot. Somewhere between the buttery graham base and the peppermint-dusted top, you remember every childhood Christmas morning, every secret office-party crush, every year you promised yourself you’d finally nail dessert. And the kicker? Nobody in the room knows it took you fifteen minutes of actual work, zero oven time, and only one bowl that you’ll “soak” while you pour yourself another cup of cocoa.
I’m not exaggerating when I say these mini marvels have replaced cookies for Santa in my house, sparked two marriage proposals (from guests, not me—settle down), and rescued my December sanity more times than my therapist cares to count. They travel like champions, dress up for any theme, and freeze so beautifully you can hoard them like edible Christmas ornaments. If you’ve ever wrestled with a spring-form pan at 1 a.m. or served cheesecake soup to your book club, grab a spatula and a sense of humor, because we’re about to flip the script. Let me walk you through every single step—by the end, you’ll wonder how you ever made it any other way.
What Makes This Version Stand Out
No-Oven Nirvana: Your oven deserves a holiday too. This recipe keeps it dark and cool while you whip up dessert on the counter, freeing precious rack space for the main event and sparing you the annual “Why is the kitchen 4000 degrees?” meltdown.
Micro-Size Magic: Individual portions mean no awkward slicing, no fighting over the corner piece, and zero risk of the dreaded center collapse that plagues full-size cheesecakes. Everyone gets their own adorable crown—egalitarian dessert at its finest.
Make-Ahead Champion: Mix, fill, chill, forget. These babies happily camp in the fridge for three days or hibernate in the freezer for two months, tasting just as creamy and dream-like as the moment you piped them. Christmas morning has enough chaos; dessert should already be handled.
Flavor Playground: Swap sprinkles for crushed candy canes, fold in orange zest, or spike the filling with espresso powder. The base recipe is a velvet curtain—whatever flavor drama you want to stage will shine.
Kid-Proof Assembly: Little hands can press crusts, sprinkle toppings, and lick beaters without risking third-degree burns or volcanic sugar splatter. Turn on some Mariah Carey and boom—family bonding that tastes like victory.
Crowd-Inducing Gasp: Bring a platter of these to any party and watch grown adults revert to giddy children, trading bites like playground currency. I’ve seen CFOs barter corner-office favors for the last red-sprinkled one.
Ingredient Integrity: No boxed pudding mix, no canned filling, no science-lab stabilizers—just honest dairy, real vanilla, and butter that tastes like butter. You can brag about that while everyone else is Instagramming.
Fridge-to-Table Glamour: They emerge from the refrigerator looking professionally staged, no garnishing gymnastics required. A casual shower of sprinkles is the only accessory, and even that takes seconds.
Alright, let’s break down exactly what goes into this masterpiece...
Inside the Ingredient List
The Flavor Base
Graham cracker crumbs are the nostalgic foundation that tastes like childhood campfires and pie crusts at grandma’s house. Their honey-kissed wheat flavor balances the tangy cream cheese with gentle sweetness and a whisper of cinnamon that screams holiday comfort. Skip them and you lose that familiar crunch that makes people close their eyes and sigh. If you’re out, pulse Digestives or even plain animal crackers with a pinch of brown sugar—avoid overly sweet cookies or the base will taste like regret and sugar burn.
The Texture Crew
Melted butter is the edible glue that transforms sandy crumbs into a cohesive crust that shatters just enough under your fork. Use unsalted so you can control the final flavor—salted butter varies wildly between brands and can hijack your dessert. Coconut oil works if dairy is off the table, but expect a faint tropical note that plays surprisingly well with peppermint toppings. The key is fully coating every crumb; dry spots equal crumbly disaster once you peel the liner.
Cream cheese must be full-fat and properly softened so it whips into silk without pesky lumps that look like cottage cheese moon craters. Light versions whip okay but yield a slightly rubbery set and a flavor that tastes like diet disappointment. Pull it out two hours ahead, or cube and microwave at 50% power in fifteen-second bursts, flipping cubes like dice until just pliable. Cold cream cheese refuses to incorporate air, leaving you with a dense puck instead of cloud-like heaven.
The Unexpected Star
Cold heavy cream is the covert operative that fluffs the filling into mousse territory while lending stable structure without gelatin. Keep it icy—warm cream sloshes and refuses to peak, leading to cheesecake soup that leaks like a bad secret. If you only have half-and-half, abandon ship and make trifle instead; the fat content is non-negotiable for a no-bake set. Pro tip: chill your beaters and bowl in the freezer for five minutes and watch the magic accelerate like time-lapse snow.
The Final Flourish
Powdered sugar dissolves instantly, sparing you grittiness that ruins the velvet mouthfeel. Granulated sugar stays crunchy in cold fat, making your cheesecake feel like it has beach sand in its shoes. A sugar substitute works if you must, but pick one designed for baking or the aftertaste will scream “diet food” louder than your aunt’s commentary on your love life. Sift if it’s been sitting in your pantry since last December; hardened lumps are edible speed bumps.
Everything’s prepped? Good. Let’s get into the real action...
The Method — Step by Step
- Start by parking your mixer and grabbing a medium bowl for the crust. Stir graham cracker crumbs with the melted butter and granulated sugar until the mixture smells like buttery graham heaven and clumps like wet sand at high tide. The texture should hold together when you squeeze a fistful—if it crumbles apart like dry desert dirt, drizzle another teaspoon of butter and try again. Divide the damp crumbs among twelve lined mini-cheesecake wells, pressing firmly with the flat bottom of a shot glass or spice jar to create an even, compact floor. Slide the tin into the freezer for ten minutes while you pretend to clean but actually scroll holiday memes—this flash-chill firms the butter so the crust doesn’t dissolve into the filling later.
- Meanwhile, let’s whip the heart of our dessert. In the bowl of a stand mixer fitted with the whisk (or in a large bowl with a hand mixer), beat the cold heavy cream on medium-high until soft peaks form—look for gentle waves that curl over like Santa’s beard when you lift the beaters. You want peaks that droop just a bit; stiff peaks turn grainy when folded later, and nobody wants cheesecake that tastes like sweet Styrofoam. Scrape the fluffy cloud into a separate bowl and park it in the fridge; we’ll fold it in later like folding a secret love note into a novel.
- Swap to the paddle attachment (or keep going with the hand mixer) and beat the softened cream cheese with powdered sugar and vanilla until the mixture looks like luxurious sweetened satin. Start on low so powdered sugar doesn’t ghost your entire kitchen, then crank to medium for two full minutes. The goal is homogenous, airy, and lump-free; if you spy pebbles, keep going—lumps at this stage are permanent residents. Scrape the bowl once, like turning the page of a good book, to expose any stowaway cream cheese clinging to the edges.
- Retrieve your whipped cream from the fridge and gently fold one-third of it into the cream cheese base with a spatula. Think of it as introducing new friends—slow circular motions from the bottom up, rotating the bowl like you’re steering a sleigh. Once incorporated, fold in the remaining cream in two additions, preserving as much air as possible. The final mixture should be pale, thick, and airy enough to mound like fresh snow on a branch; if it slumps into liquid, you’ve over-mixed and need to start the cream-whipping rescue mission again.
- Pull the chilled crusts from the freezer. Using a piping bag (or a zip-top bag with the corner snipped), divide the cheesecake filling among the wells, filling each nearly to the top. A gentle tap of the tin on the counter releases sneaky air pockets and levels the tops, giving you professional-looking domes instead of lunar landscapes. If you’re feeling fancy, swirl the tops with the back of a teaspoon for a snow-drift effect that catches sprinkles like glitter on fresh powder.
- Now for the fun part: decorate like winter confetti. Shower red and green sprinkles across the surface while the filling is still tacky so they adhere without bleeding. For peppermint lovers, scatter a few crushed candy cane shards for sparkle and a subtle minty aroma that drifts up like chimney smoke. Work quickly; cold filling sets fast, and you want the decorations to bed down in the mousse, not roll off like stubborn snowballs.
- Cover the tin loosely with plastic wrap, tenting it so it doesn’t smear your artwork. Refrigerate at least four hours, but overnight is the gold standard—time allows the filling to firm into sliceable velvet and the flavors to meld like carolers harmonizing on the last verse of “Silent Night.” If you’re racing the clock, you can flash-chill in the freezer for ninety minutes, but the texture will be slightly less luxurious, like cashmere versus merino.
- When ready to serve, run a thin knife or offset spatula around each cheesecake to break the suction, then lift using the paper liner tabs. The bottoms should release with a satisfying snap, revealing a crust that holds together like a well-trained choir. Arrange on a platter amidst evergreen sprigs or edible gold stars if you’re auditioning for the holiday issue of a magazine; otherwise, just watch them disappear faster than wrapping paper on Christmas morning.
That’s it—you did it. But hold on, I’ve got a few more tricks that’ll take this to another level...
Insider Tricks for Flawless Results
The Temperature Rule Nobody Follows
Cold fat and warm bowls are mortal enemies. If your kitchen is toasty from holiday baking, chill the mixer bowl and beaters for five minutes before whipping cream; metal retains cold like Scrooge hoards coins, giving you faster, loftier peaks. Conversely, if your cream cheese is still fridge-firm, the sugar will never fully dissolve, leaving you with a polka-dot filling that tastes like sweet cottage cheese. Plan the softening step first—cube, spread on a plate, and let it lounge while you sip cocoa and scroll reels.
Why Your Nose Knows Best
Trust the aroma cues: properly combined crust smells like buttery graham gold, while over-mixed filling gives off a faint sour note from stressed dairy. If you detect that sour whiff, stop immediately and fold in an extra tablespoon of whipped cream to relax the proteins. Similarly, when the crust toasts ever so slightly from the fridge’s humidity contrast, it releases a warm, nutty perfume—your signal that it’s ready for the spotlight.
The 5-Minute Rest That Changes Everything
After piping, let the tin sit uncovered in the fridge for five minutes before covering with wrap; this brief chill sets the top so plastic doesn’t stick and ruin your sprinkle art. Those five minutes feel wasteful, but they’re the difference between Instagram glory and smeared chaos. Use the pause to rinse spatulas and wipe counters so you’re not facing a sugary crime scene later.
Gelatin-Free Stability Hack
If you fear a warm room will turn your masterpieces into puddles, bloom ½ teaspoon powdered gelatin in 1 tablespoon cold water, microwave 5 seconds until liquid, and whisk into the cream cheese base before folding in cream. It’s invisible insurance that keeps shape at room temp for two hours without turning rubbery. I’ve served these at office parties where the thermostat was set to “tropical,” and they held their poise like dessert royalty.
Creative Twists and Variations
This recipe is a playground. Here are some of my favorite ways to switch things up:
Eggnog Royale
Swap the vanilla extract for ½ teaspoon rum extract plus a pinch of freshly grated nutmeg. Fold in a tablespoon of store-bought eggnog for cozy custard vibes, and top with a dusting of nutmeg so they look like tiny holiday lattes. Santa will wink at you.
Cranberry Orange Spark
Beat a teaspoon of orange zest into the filling, then spoon a droplet of cranberry compote on top before chilling. The tart pop cuts the richness like twinkle lights against night snow.
Hot-Cocoa Snowcap
Whisk a teaspoon of cocoa powder into the powdered sugar, then pipe filling into chocolate cookie crusts. Finish with a mini marshmallow and a drizzle of chocolate syrup for sledding-in-a-cup flavor.
Gingerbread Galaxy
Add ¼ teaspoon each ground ginger and cinnamon plus a pinch of cloves to the crust crumbs. Top with gold sanding sugar and tiny edible stars; they taste like gingerbread cookie dough in cheesecake form.
Peppermint Bark Blizzard
Fold ⅓ cup mini chocolate chips into the filling and crown with crushed candy canes and white chocolate shavings. The chips freeze into freckles of fudgy crunch that surprise like hidden mistletoe.
Spiked Espresso Elves
Dissolve 1 teaspoon instant espresso powder in ½ teaspoon hot water, then whisk into the cream cheese. Add a splash of coffee liqueur and top with chocolate-covered espresso beans for the adults-only platter.
Storing and Bringing It Back to Life
Fridge Storage
Keep cheesecakes in an airtight container—or the original tin wrapped twice in plastic—for up to 72 hours. Place a sheet of parchment between layers if you stack them; sprinkles can tattoo neighboring cakes like holiday graffiti. After day three, the crust begins to stale, so gift any stragglers to neighbors and become the most popular person on the block.
Freezer Friendly
Flash-freeze on the tin for one hour, then transfer to a zip-top bag with sheets of parchment between layers. They’ll keep two months without flavor loss, though textural perfection peaks at one month. Thaw overnight in the fridge, not the counter—slow thawing prevents condensation from watering down your mousse. Add fresh sprinkles post-thaw for maximum sparkle.
Best Reheating Method
These beauties aren’t baked, so “reheating” means bringing them to edible temperature after freezing. Thirty minutes on the counter takes the chill off without risking slip-n-slide texture. If you must travel, tuck a frozen gel pack beside them in an insulated bag; they’ll stay firm for two hours and impress like professionally shipped desserts.