Picture this: a frantic Saturday afternoon, the oven preheated, the kids demanding something sweet, and my old go-to crumble recipe turning out as flat as a pancake. I stared at the soggy mess, wondering if I’d ever achieve that perfect balance of chewy oat base and a glossy apricot topping that could make even the most disciplined dieter surrender. That disaster sparked a dare from my roommate – “I bet you can’t make a bar that’s both breakfast‑worthy and dessert‑level amazing in half an hour.” I accepted, rolled up my sleeves, and set out on a quest that would end in a triumphant bite of pure, buttery bliss.
The kitchen soon filled with a symphony of sounds: the crackle of butter melting in the pan, the soft thud of oats hitting the bowl, and the subtle pop of baking soda fizzing as it met the warm butter‑brown‑sugar mixture. The air grew heavy with a caramel‑brown aroma, sweetened by the fruity perfume of apricot preserves that seemed to whisper promises of sunshine in every spoonful. My fingertips felt the gritty texture of oats, the silky glide of melted butter, and the sticky cling of the apricot jam – a tactile preview of the contrast that was about to unfold. By the time the timer buzzed, the whole house was humming with anticipation, and I could already taste the golden crust that would shatter like thin ice under a gentle bite.
What makes this version the ultimate bar, you ask? First, the ratio of butter to brown sugar is dialed in to create a caramelized crumble that sticks just enough to hold together without turning into a greasy slab. Second, the apricot preserves aren’t just a topping; they’re a glaze that seeps into the oat matrix, delivering a burst of tangy‑sweet that cuts through the richness like a bright summer afternoon. Third, the addition of a modest teaspoon of baking soda introduces a subtle lift, giving the bars a feather‑light interior that defies their hearty appearance. Most recipes get this completely wrong, either over‑sweetening or under‑baking, but I’ve cracked the code with a 30‑minute timeline that doesn’t compromise on flavor or texture.
Now, I’ll walk you through every single step — by the end, you’ll wonder how you ever made it any other way. Okay, ready for the game‑changer? This next part? Pure magic. I dare you to taste this and not go back for seconds. Let’s dive in and create a bar that will become the talk of your next brunch or late‑night snack run.
What Makes This Version Stand Out
- Flavor Explosion: The apricot preserves add a natural fruitiness that balances the deep caramel notes of the butter‑brown‑sugar crumble, creating a sweet‑tart duet that dances on the palate.
- Texture Symphony: A crunchy oat topping meets a soft, slightly chewy interior, delivering that satisfying snap and melt‑in‑your‑mouth feel in every bite.
- Simplicity at Its Best: With just six pantry staples and a 30‑minute window, this recipe is a no‑fuss hero for busy mornings or impromptu dessert cravings.
- Unique Ingredient Twist: Baking soda is the secret lift‑agent that keeps the bars from becoming dense, giving them a cloud‑like lift without compromising structure.
- Crowd‑Pleaser Factor: Even the pickiest eaters—kids, grandparents, or that one friend who claims “nothing beats store‑bought”—will be begging for the recipe.
- Ingredient Quality Matters: Using real butter and high‑quality apricot preserves makes a world of difference; the natural fats and fruit juices are the foundation of flavor.
- One‑Pan Wonder: All components are mixed in a single bowl, limiting cleanup and keeping the kitchen chaos to a minimum.
- Make‑Ahead Magic: These bars keep beautifully for up to three days in the fridge, and they even freeze well, making them perfect for meal‑prep enthusiasts.
Inside the Ingredient List
The Flavor Base
Butter (1 cup): This is the backbone of the crumble, providing richness and a buttery crunch that coats every oat flake. If you skimp on butter, the bars become dry and lose that melt‑in‑your‑mouth quality. For a healthier twist, you can substitute half the butter with coconut oil, but expect a subtle coconut note that will alter the flavor profile. When shopping, look for unsalted, high‑fat butter; the extra fat ensures a golden‑brown caramelization.
Brown Sugar (1 cup): The molasses in brown sugar delivers a deep, caramel flavor that pairs perfectly with the apricot’s tartness. Skipping it for white sugar will result in a flat taste and a lighter color. If you prefer a less sweet bar, reduce the sugar by a quarter – the apricot will still carry enough sweetness to satisfy. Choose a dark brown sugar for an even richer hue and flavor depth.
The Texture Crew
Rolled Oats (2 cups): Oats give the bars their hearty, chewy interior while soaking up the buttery mixture. Using quick‑cooking oats will make the texture too soft, while steel‑cut oats are too hard. For a gluten‑free version, swap in certified gluten‑free rolled oats; the result is just as satisfying. When measuring, pack the oats lightly – over‑packing can make the bars overly dense.
Flour (1 cup): Flour acts as a binding agent, helping the crumble hold together without turning into a crumbly mess. All‑purpose flour is ideal; whole‑wheat flour adds a nutty undertone but can make the bars slightly drier. If you’re experimenting, a blend of half all‑purpose and half almond flour adds a delicate almond flavor and a softer crumb.
The Unexpected Star
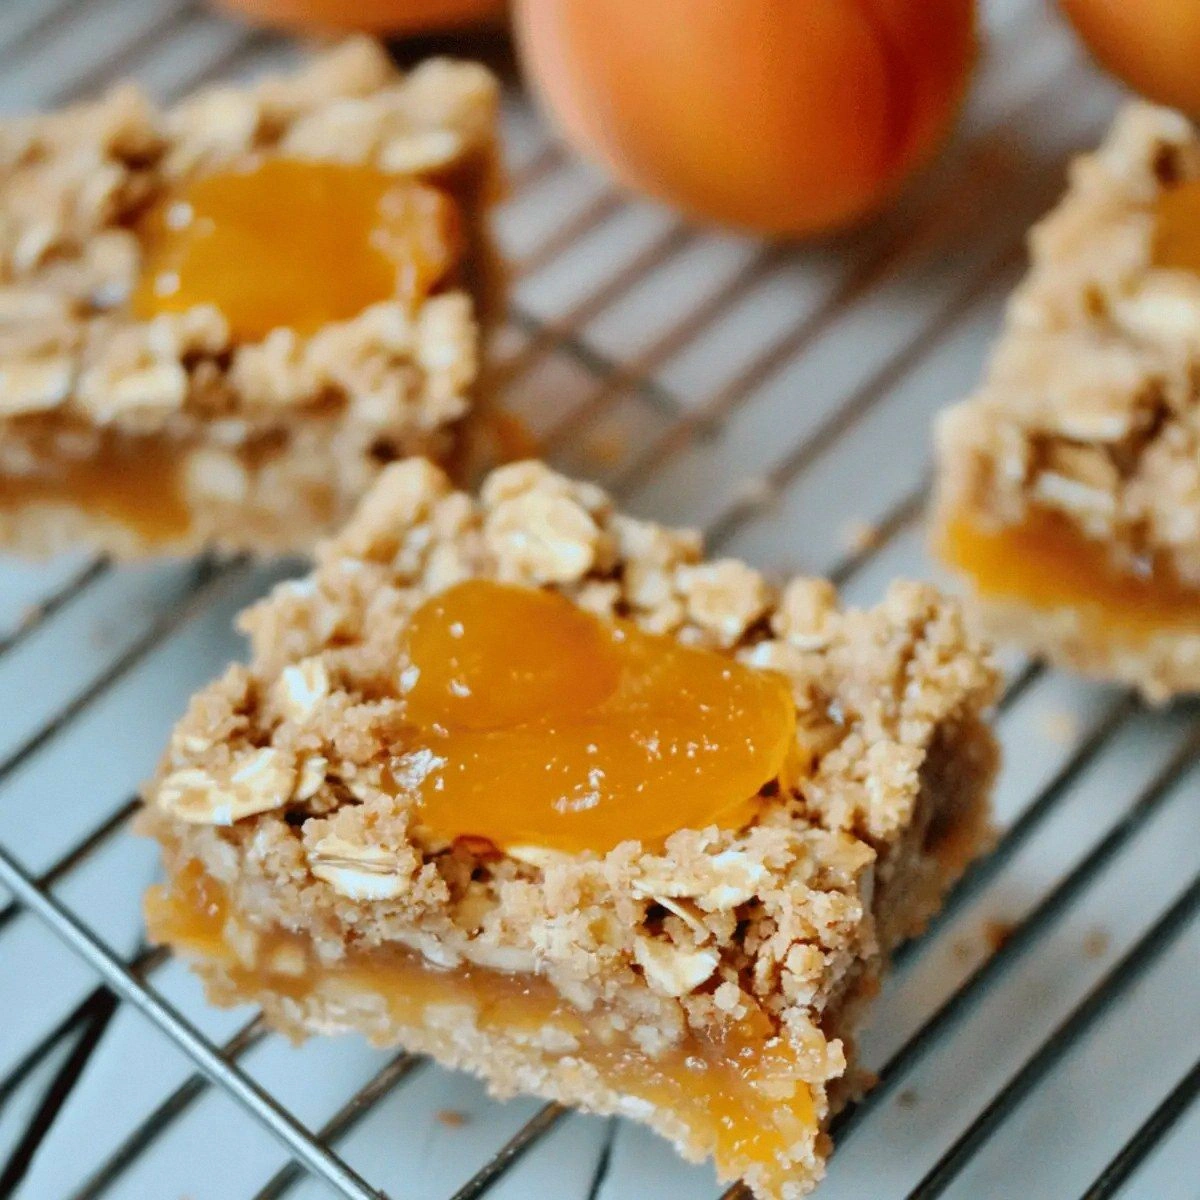
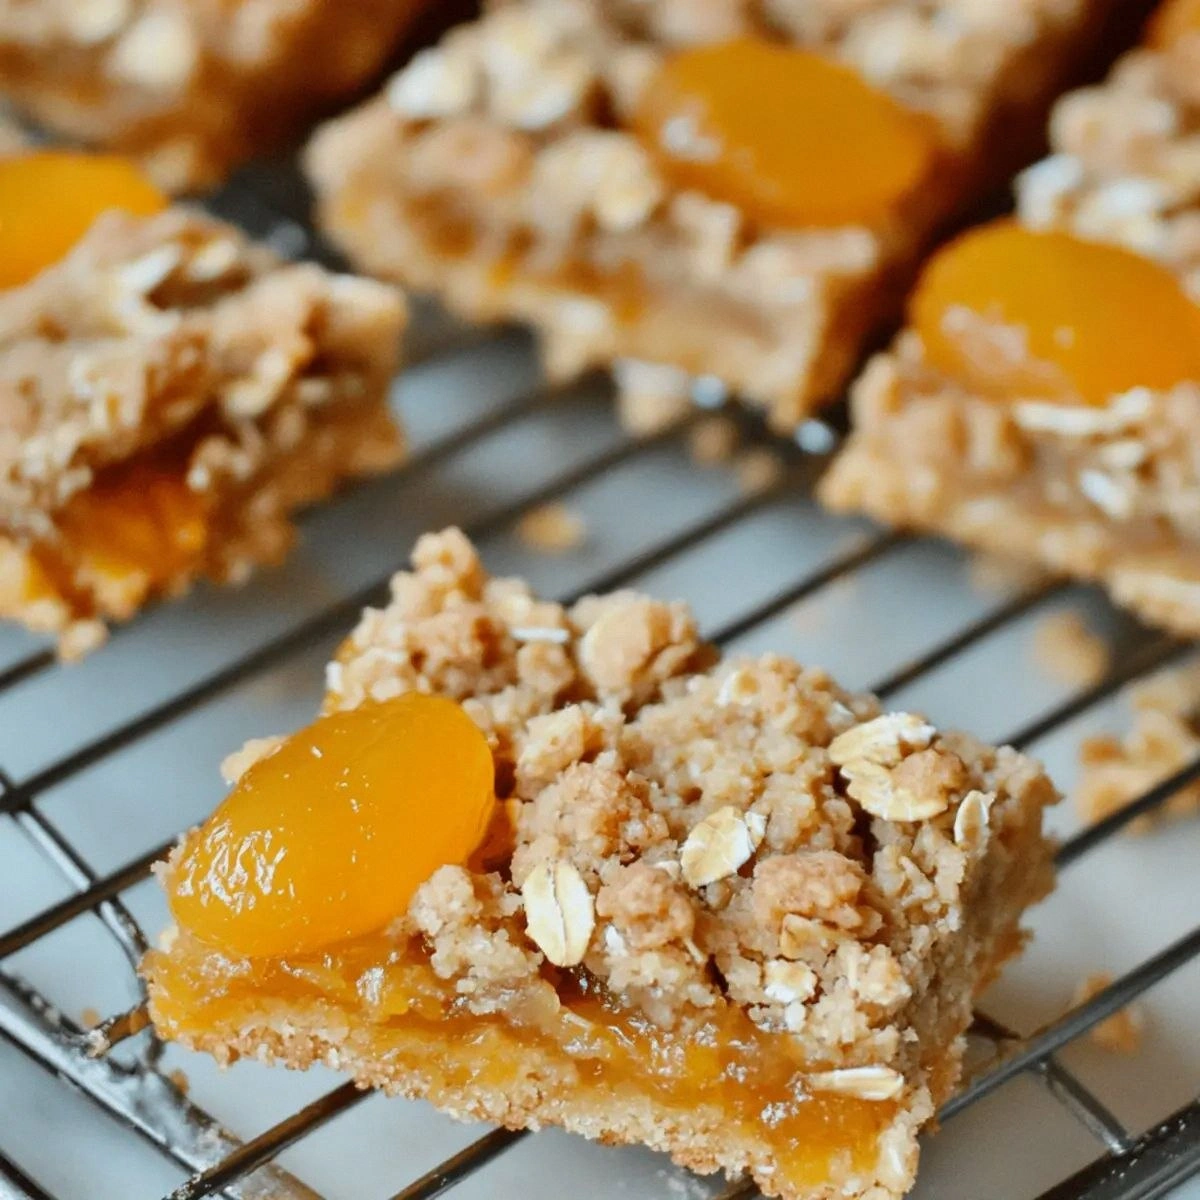
Apricot Preserves (1 cup): This isn’t just a topping; it’s a flavor catalyst that infuses the bars with a bright, fruity zing. The natural pectin in apricot preserves helps the bar set, preventing sogginess. If you can’t find apricot preserves, substitute with peach jam or a mix of orange marmalade and a dash of lemon juice for a citrus twist. Look for preserves with minimal added sugar to keep the sweetness balanced.
The Final Flourish
Baking Soda (1 teaspoon): This tiny amount of leavening agent creates tiny air pockets, giving the bars a light, airy crumb that contrasts beautifully with the dense oat base. Too much baking soda can give a metallic aftertaste, so measure precisely. If you’re out of baking soda, a pinch of baking powder can work, but the lift will be less pronounced. Always combine it with the butter‑sugar mixture while it’s still warm to activate its fizz.
Everything's prepped? Good. Let’s get into the real action…
The Method — Step by Step
Preheat your oven to 350°F (175°C) and line a 9‑by‑13‑inch baking pan with parchment paper, allowing some overhang for easy lift‑out later. As the oven warms, the kitchen fills with a faint, comforting hum of the heating elements – a subtle reminder that the magic is about to begin. While the pan heats, gather all your ingredients; having everything within arm’s reach is the secret to a smooth, stress‑free process. Okay, ready for the game‑changer? This is where the butter and sugar meet.
In a medium saucepan over medium heat, melt the butter until it’s a golden pool, then stir in the brown sugar until it dissolves completely. You’ll hear a gentle sizzle – that’s the sound of caramel forming, and it’s the scent that will soon dominate your kitchen. Keep the mixture moving to avoid burning; a wooden spoon works best for scraping the bottom. As the sugar bubbles, add the baking soda, watching it fizz and expand like a miniature volcano. That sizzle when it hits the pan? Absolute perfection.
Meanwhile, in a large mixing bowl, combine the rolled oats and flour. Toss them together with a pinch of salt (optional) to ensure even distribution. This dry blend will absorb the buttery mixture later, creating that coveted chewy interior. I’ll be honest — I ate half the batch before anyone else got to try it, because the aroma was that intoxicating. When the butter‑sugar combo is ready, pour it over the oat‑flour mixture, stirring vigorously until every oat is glossy and coated.
Spread the oat mixture evenly into the prepared pan, pressing down gently with the back of a spatula to create a uniform layer. The edges should be slightly higher than the center; this will give you those coveted crisp borders that shatter like thin ice when you bite into them. At this point, the kitchen smells like a bakery on a Sunday morning – sweet, buttery, and utterly inviting. Don’t rush this step; a level surface ensures even baking.
Now, spoon the apricot preserves over the oat layer, spreading it gently with a spatula or the back of a spoon. Aim for a marble effect or a smooth blanket, depending on your aesthetic preference. The preserves will seep into the crumble as it bakes, creating pockets of bright fruit that burst with each bite. As the jam spreads, you’ll notice a glossy sheen that promises a caramelized finish. This is the moment of truth – the flavor bridge between sweet and tart.
Slide the pan into the preheated oven and bake for 20‑25 minutes, or until the edges turn a deep golden brown and the center is set but still slightly jiggly. The aroma will intensify, filling every corner of your home with a warm, inviting scent that says “dessert is on its way.” Resist the urge to open the oven door early; every time you peek, you lose precious heat and risk uneven baking. When you see the top glistening, you’ll know it’s ready.
Remove the pan from the oven and let the bars cool in the pan for at least 10 minutes. This resting period allows the apricot glaze to firm up, making slicing a breeze. While you wait, picture yourself pulling this out of the oven, the whole kitchen smelling incredible, and the anticipation building. After the brief cool, lift the parchment paper and transfer the slab to a cutting board. Use a sharp knife, wiping it clean between cuts, to achieve clean, neat squares.
That’s it — you did it. But hold on, I’ve got a few more tricks that'll take this to another level…
Insider Tricks for Flawless Results
The Temperature Rule Nobody Follows
Never bake on a cold pan. Always preheat the pan along with the oven; the initial burst of heat creates a crisp edge that’s impossible to achieve otherwise. I once tried a room‑temperature pan and ended up with a soggy bottom that never set. The secret is a hot surface that instantly seals the bottom, locking in moisture while the top caramelizes.
Why Your Nose Knows Best
Trust the scent cues more than the clock. When the edges start to pull away from the pan and you catch a nutty, caramel aroma, the bars are ready to come out. I’ve seen timers lie; the smell is the truest indicator of doneness. If you’re unsure, give the center a gentle tap – it should feel set but still have a slight wobble.
The 5‑Minute Rest That Changes Everything
After removing from the oven, let the bars rest uncovered for five minutes before covering. This short pause allows steam to escape, preventing sogginess and preserving that perfect crunch on top. Skipping this step is the most common mistake I see, leading to a mushy texture that defeats the whole purpose of a crumble bar.
Butter Temperature Trick
Use butter that’s just barely melted – not scorching hot. If the butter is too hot, it can over‑cook the oats, resulting in a dry crumb. A quick test: dip a finger into the melted butter; it should feel warm, not burning. This temperature balance ensures the oats stay tender while still absorbing the buttery flavor.
Slice Like a Pro
Warm your knife under hot water, dry it, and then slice. The heat prevents the bars from sticking, giving you clean, professional‑looking squares. I’ve watched friends struggle with ragged edges; a hot knife is the difference between a bakery‑style presentation and a DIY mishap.
Creative Twists and Variations
This recipe is a playground. Here are some of my favorite ways to switch things up:
Chocolate‑Chip Surprise
Stir in half a cup of dark chocolate chips into the oat mixture before baking. The chips melt slightly, creating pockets of gooey chocolate that complement the apricot’s tartness. Perfect for anyone who can’t decide between fruit and chocolate.
Cinnamon‑Spiced Version
Add a teaspoon of ground cinnamon and a pinch of nutmeg to the dry ingredients. The warm spices turn the bars into a cozy, autumn‑ready treat that pairs beautifully with a cup of chai.
Nutty Crunch
Fold in a quarter cup of chopped toasted almonds or pistachios for an extra crunch. The nuts add a buttery depth that elevates the overall texture, making each bite a delightful surprise.
Vegan Adaptation
Swap the butter for coconut oil and use maple syrup in place of brown sugar. The result is a vegan‑friendly bar that still delivers that caramel‑rich flavor, with a subtle coconut undertone that pairs nicely with apricot.
Gluten‑Free Glory
Replace the all‑purpose flour with a gluten‑free blend and ensure the oats are certified gluten‑free. The texture remains tender, and the flavor stays true to the original, making it safe for those with sensitivities.
Berry Fusion
Mix in half a cup of fresh or frozen raspberries into the apricot layer before spreading. The tart berries add a burst of color and a tangy contrast that brightens the bar’s overall profile.
Storing and Bringing It Back to Life
Fridge Storage
Allow the bars to cool completely, then slice and store them in an airtight container in the refrigerator. They stay fresh for up to three days, retaining their chewiness and flavor. A thin layer of parchment between layers prevents sticking.
Freezer Friendly
Wrap the whole slab tightly in plastic wrap, then place it in a freezer‑safe bag. Freeze for up to two months. When you’re ready to enjoy, thaw overnight in the fridge, then warm in a 300°F oven for 5‑7 minutes – the crust will re‑crisp beautifully.
Best Reheating Method
To revive that fresh‑out‑of‑the‑oven crunch, sprinkle a tiny splash of water over the top before reheating. The steam created keeps the interior moist while the exterior crisps up, delivering that just‑baked experience.