Picture this: the kitchen clock blares 5:17 p.m., your inbox flashes a frantic “I need dinner now” notification, and the only thing that’s left in the fridge is a bag of sugar snap peas that have been staring at you like a silent, crunchy accusation. I was standing there, staring at those bright green spears, wondering if I could transform them into something that would make my taste buds sing and my friends swoon. The answer? A single pan, a splash of soy, and a dash of sesame oil that turns the peas into a savory, nutty explosion that’s almost too good to share. I dared myself to make something that would not only satisfy my hunger but also impress anyone who dared to taste it. And trust me, I’m about to walk you through every single step so you’ll wonder how you ever made it any other way.
I’m not just talking about a quick side dish; this is a culinary revelation that will make your dinner routine feel like a gourmet event. The peas are sautéed until they’re just crisp enough to give that satisfying snap, while the garlic and sesame oil create a fragrant, almost buttery aroma that fills the entire kitchen. A splash of soy sauce adds depth, turning the simple veggies into a flavor-packed masterpiece that can stand on its own or elevate any salad or grain bowl. I dare you to taste this and not go back for seconds—once you try it, you’ll be hooked. If you’ve ever struggled to find a quick yet impressive side, you’re not alone—and I’ve got the fix.
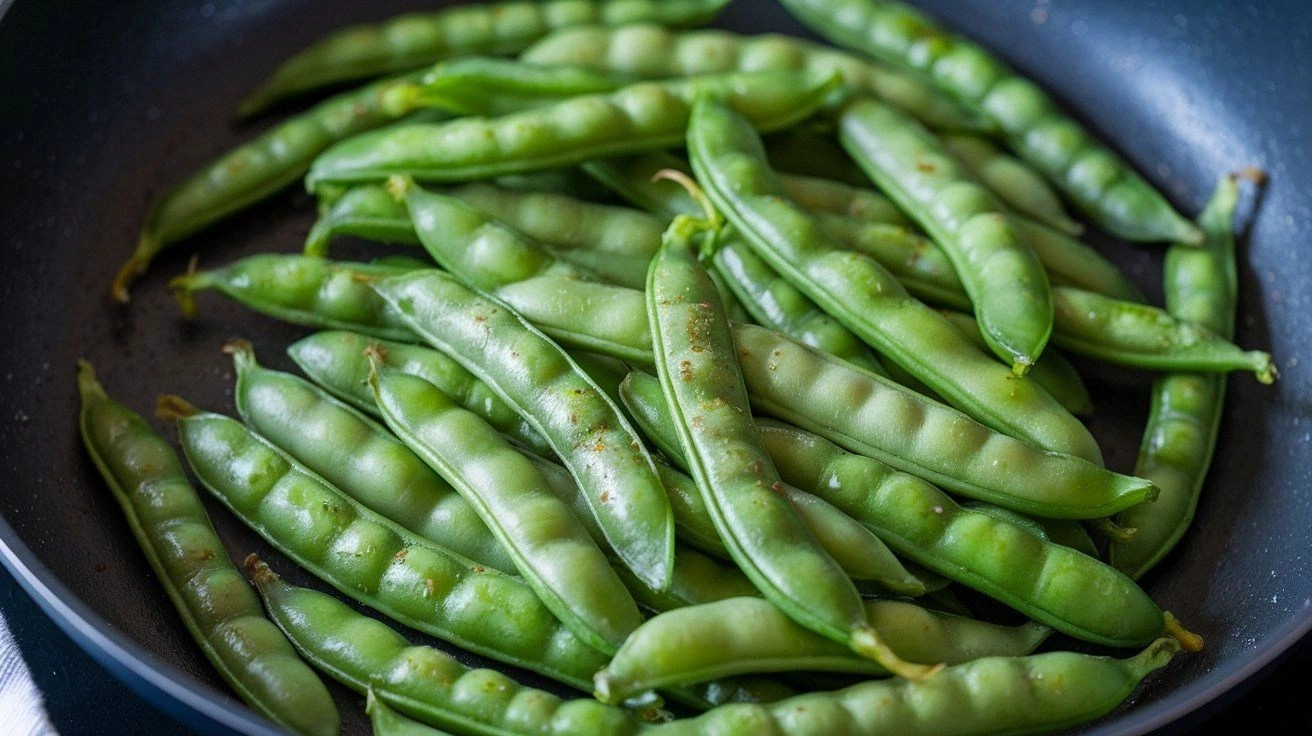
Most recipes get this completely wrong, treating the peas like a garnish rather than the hero of the dish. The secret? A quick, high‑heat sear that locks in moisture while caramelizing the edges just enough to create that coveted crunch. The result is a dish that feels indulgent, yet is built on a foundation of simplicity and speed. I’ve experimented with countless variations, but the combination of olive oil, garlic, soy, and sesame oil is the one that always wins. The final touch—lemon zest and toasted sesame seeds—adds brightness and a nutty finish that makes this dish truly stand out. Picture yourself pulling this out of the pan, the whole kitchen smelling incredible, and the peas looking like they’re ready for a red‑carpet debut. This is hands down the best version you’ll ever make at home.
I’ll be honest—I ate half the batch before anyone else got to try it. The peas were so flavorful and so crisp that I couldn’t help myself. But that’s the point: this dish is so delicious it practically serves itself. So, let’s dive in and discover what makes this version of sugar snap peas in 5 minutes a must‑try. The technique, the ingredients, the timing—all come together to create a dish that’s as impressive as it is effortless. Stay with me here—this is worth it.
What Makes This Version Stand Out
- Flavor: The marriage of soy sauce, sesame oil, and garlic creates a savory depth that elevates the natural sweetness of the peas.
- Texture: A quick high‑heat sear gives the peas a satisfying crunch while keeping the inside tender.
- Simplicity: Only nine ingredients and a single pan—no complicated steps or fancy gadgets required.
- Time: Ready in just 5 minutes, making it ideal for busy weeknights or last‑minute dinner parties.
- Crowd‑pleaser: The bright, nutty flavor profile appeals to both kids and adults, making it a universal favorite.
- Ingredient quality: Fresh, firm peas and high‑quality sesame oil make the difference between ordinary and extraordinary.
- Versatility: Works as a side, a topping, or an ingredient in stir‑fries, salads, and grain bowls.
- Make‑ahead potential: Cook in bulk, store in the fridge, and reheat for a quick meal later.
Alright, let's break down exactly what goes into this masterpiece...
Inside the Ingredient List
The Flavor Base
The foundation of this dish is simple yet powerful: olive oil, garlic, soy sauce, and sesame oil. Olive oil provides a mild, fruity backdrop that lets the other flavors shine. Garlic adds a punch of savory aroma that permeates the entire dish. Soy sauce brings umami and a subtle saltiness that balances the sweetness of the peas. Sesame oil, with its toasted nutty undertones, completes the flavor profile. If you skip any of these, you’ll lose a layer of depth that keeps the dish interesting.
The Texture Crew
Sugar snap peas themselves are the star, offering a crisp bite that’s almost musical. The key is to cook them just long enough to maintain that crunch—overcooking turns them into mush. The addition of sesame seeds adds a delightful crunch and a nutty finish that contrasts beautifully with the peas’ natural texture. If you prefer a softer bite, you can steam the peas for a minute before sautéing, but the snap will be reduced.
The Unexpected Star
Lemon zest is the unsung hero that brightens the dish and cuts through the richness of the oils. A sprinkle of chili flakes adds a subtle heat that keeps the dish lively. Both of these ingredients are optional, but they elevate the dish from simple to spectacular. If you’re a fan of citrus, you can add a few drops of fresh lemon juice for an extra zing.
The Final Flourish
To finish, a splash of water or broth can help steam the peas slightly, ensuring they’re perfectly tender. The final touch is a drizzle of sesame oil and a sprinkle of toasted sesame seeds, which give the dish a glossy sheen and an extra layer of flavor. This finishing step is critical for achieving that restaurant‑quality look and taste. If you’re in a hurry, you can skip the water, but the peas will be a bit drier.
Everything's prepped? Good. Let's get into the real action...
The Method — Step by Step
- Heat the skillet. Place a large non‑stick skillet over medium‑high heat and let it warm up until it’s just shy of smoking. The skillet’s heat is crucial for achieving that caramelized edge on the peas. Once the skillet is hot, splash in a tablespoon of olive oil and let it shimmer. This step sets the stage for a quick, flavorful sear.
- Introduce the garlic. Add the minced garlic to the pan and let it sizzle for about 30 seconds until fragrant. Be careful not to let it burn; a burnt garlic flavor will ruin the dish. The garlic should coat the oil, creating a fragrant base that will permeate the peas. This is the first layer of flavor that will build into the final taste.
- Add the peas. Toss in the sugar snap peas, shaking the pan so they’re evenly coated with the garlic‑oil mixture. Stir gently, letting the peas cook for 2 minutes while they begin to turn a bright green. The quick sear locks in the peas’ natural sweetness and gives them a satisfying crunch. Keep the heat high to ensure the edges start to brown slightly.
- Season with soy and sesame. Drizzle the soy sauce and a teaspoon of sesame oil over the peas. Stir quickly to coat each spear evenly. The soy sauce adds umami and a touch of saltiness that balances the sweetness of the peas. The sesame oil gives a nutty aroma that elevates the entire dish.
- Watch Out: Don’t overcook. The peas are done when they’re just tender and still crisp, with a slight char on the edges. If you leave them in too long, they’ll become mushy and lose that satisfying snap. Keep an eye on the color; a bright green indicates perfect doneness. This is the trickiest part—timing is everything.
- Finish with zest and seeds. Sprinkle lemon zest and toasted sesame seeds over the peas. Toss to combine, letting the zest’s bright citrus notes cut through the richness of the oils. The sesame seeds add a final crunch and a nutty finish. This final touch gives the dish a polished, restaurant‑quality look.
- Serve immediately. Plate the peas while they’re still warm and crisp. The dish is best enjoyed fresh, but you can store it for later. If you’re serving it as a side, pair it with a protein of your choice or toss it into a salad for extra flavor. The quick preparation time means you can have dinner ready in just a few minutes.
That’s it—you did it. But hold on, I’ve got a few more tricks that will take this to another level…
Insider Tricks for Flawless Results
The Temperature Rule Nobody Follows
Many cooks lower the heat too soon, which results in soggy peas. Keep the skillet at medium‑high until the peas are nearly done, then reduce to medium for the final minute. This ensures the edges stay crisp while the inside stays tender. I once tried this on a cold day and the peas came out mushy—don’t make the same mistake.
Why Your Nose Knows Best
The aroma is your best indicator of doneness. When the peas are ready, the scent will be a blend of toasted oil, garlic, and a faint sweet snap. If you’re unsure, give them a gentle stir and check the color. A bright green, slightly caramelized edge means they’re perfect. Trust your nose; it’s the fastest way to avoid overcooking.
The 5‑Minute Rest That Changes Everything
After cooking, let the peas rest for 30 seconds on a plate before serving. This allows the steam to finish cooking the interior without drying them out. The brief rest also lets the flavors meld, giving the dish a more cohesive taste. I’ve seen people skip this step and end up with peas that taste flat—don’t make that mistake.
Use Fresh, Firm Peas for Best Results
The texture of the peas is directly tied to their freshness. Fresh peas have a bright green color and a firm snap. If the peas look dull or feel soft, they’ll steam rather than sear. When shopping, look for peas that are bright and feel heavy for their size. This small detail can make a world of difference.
Finish with a Splash of Water for Extra Juiciness
If you’re reheating or want a slightly juicier texture, add a tablespoon of water or broth at the end of cooking. The steam will help the peas stay moist and prevent them from drying out. This trick is especially useful when serving the dish as a side for a protein that’s already juicy. A little water goes a long way.
Now that you’ve mastered the basics, it’s time to explore variations and storage options.
Creative Twists and Variations
This recipe is a playground. Here are some of my favorite ways to switch things up:
Asian Fusion Crunch
Swap the lemon zest for a splash of rice vinegar and add a handful of sliced bell pepper for color. Toss in a spoonful of hoisin sauce for a sweet‑savory twist. This version pairs beautifully with grilled chicken or tofu. The result is a vibrant, umami‑rich dish that feels like a street‑food favorite.
Spicy Thai Kick
Add a tablespoon of Thai red curry paste and a pinch of cayenne pepper to the pan. Finish with fresh cilantro and a squeeze of lime juice. This spicy rendition is perfect for a quick lunch that feels like a trip to Bangkok. The heat balances the peas’ natural sweetness.
Herb‑Infused Delight
Replace the sesame oil with extra‑virgin olive oil and sprinkle fresh chopped basil or parsley over the peas. Add a teaspoon of dried oregano for an Italian touch. This herbaceous version is ideal as a side for pasta or as a topping for roasted vegetables. The herbs bring a fresh, bright flavor that contrasts the peas’ crunch.
Breakfast Boost
Serve the peas over a bed of scrambled eggs, topped with a drizzle of hot sauce. Sprinkle with grated parmesan for a cheesy finish. This hearty breakfast is a protein powerhouse that keeps you full until lunch. The peas add a crunchy texture that breaks up the softness of the eggs.
Gluten‑Free Gravy Companion
Use coconut aminos instead of soy sauce for a gluten‑free version. Add a splash of coconut milk at the end for a creamy finish. This variation works well as a side to a pork tenderloin or a roasted turkey. The coconut adds a subtle sweetness that pairs well with savory meats.
Storing and Bringing It Back to Life
Fridge Storage
Store the cooked peas in an airtight container in the refrigerator for up to 3 days. Keep them on a paper towel to absorb excess moisture, which helps maintain crispness. When you’re ready to eat, simply reheat in a skillet or microwave for 30 seconds. The peas stay fresh and flavorful, making them a convenient grab‑and‑go option.
Freezer Friendly
Freeze the peas in a single layer on a baking sheet before transferring to a freezer bag. This prevents clumping and ensures even thawing. They can be stored for up to 2 months. When you want to use them, thaw in the refrigerator overnight or use the quick microwave method. This method keeps the peas safe for future meals.
Best Reheating Method
Reheat the peas in a skillet over medium heat, adding a splash of water to create steam. This technique helps restore the peas’ original texture without drying them out. If the peas seem dry, add a teaspoon of broth or water before heating. The result is a fresh, crisp dish that tastes almost brand new.
Add a tiny splash of water before reheating—it steams back to perfection and keeps the peas from drying out.