I was standing in my kitchen on a frosty December evening, staring at a box of Little Debbie Christmas Tree Cakes like it was a mysterious artifact from a holiday‑themed museum. My roommate had dared me to transform those sugary, pine‑shaped wonders into something that would actually make the whole block stop and stare. I thought, “Sure, why not?” and proceeded to crush the cakes into crumbs, only to realize that my hands were already sticky with melted butter from a failed batch of gingerbread cookies earlier that day. That moment of chaos—spilled flour, a squeaky floor, and the faint jingle of a holiday playlist—set the stage for what would become the most unforgettable Christmas treat I’ve ever made.
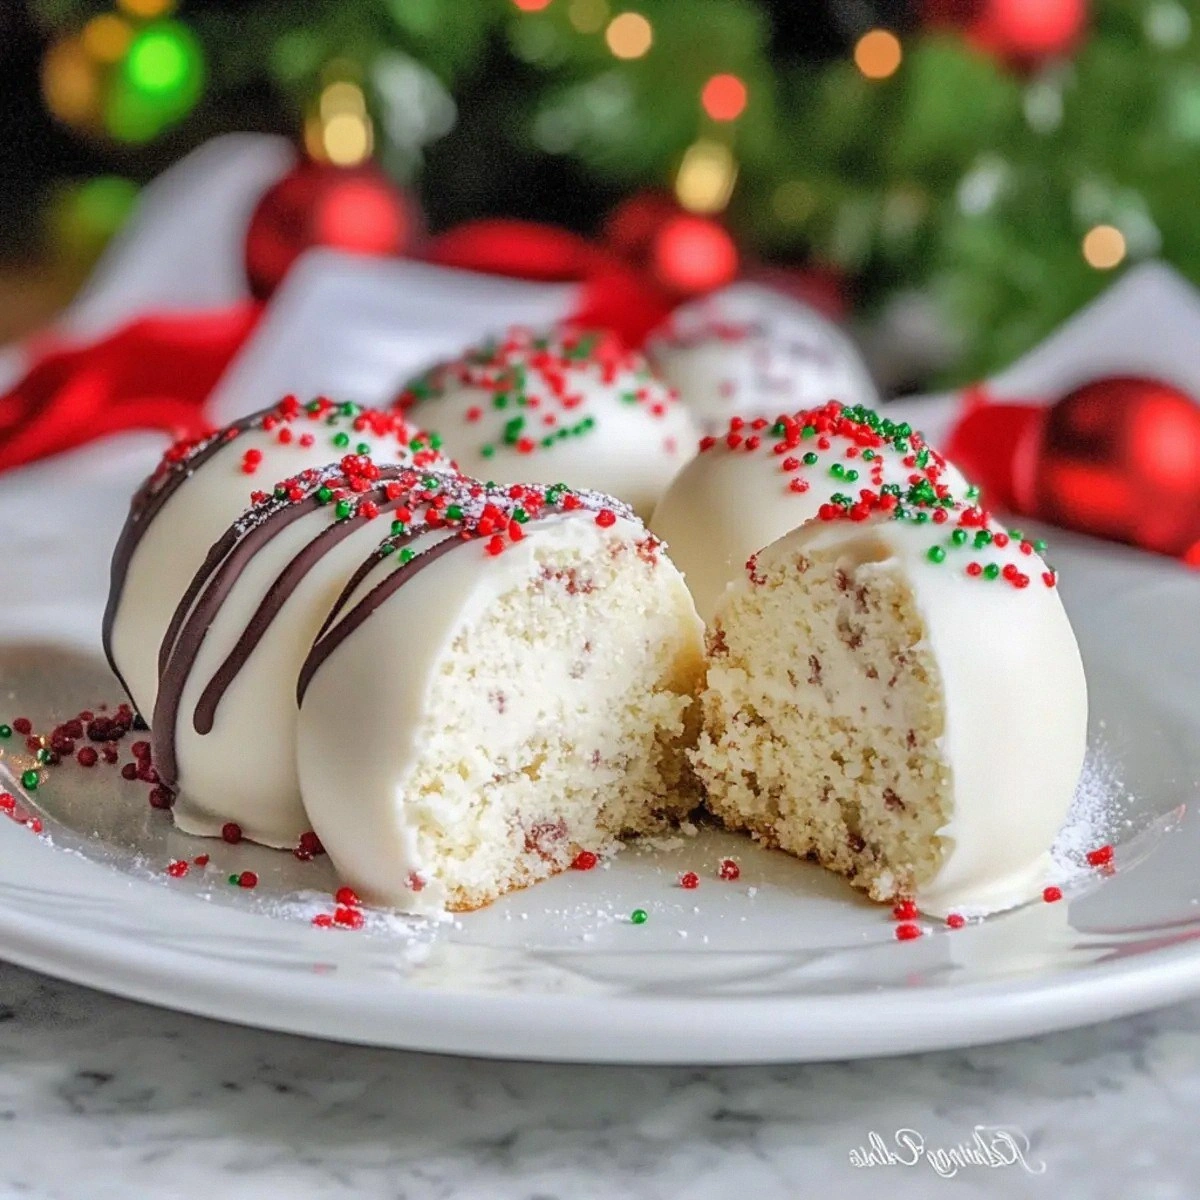
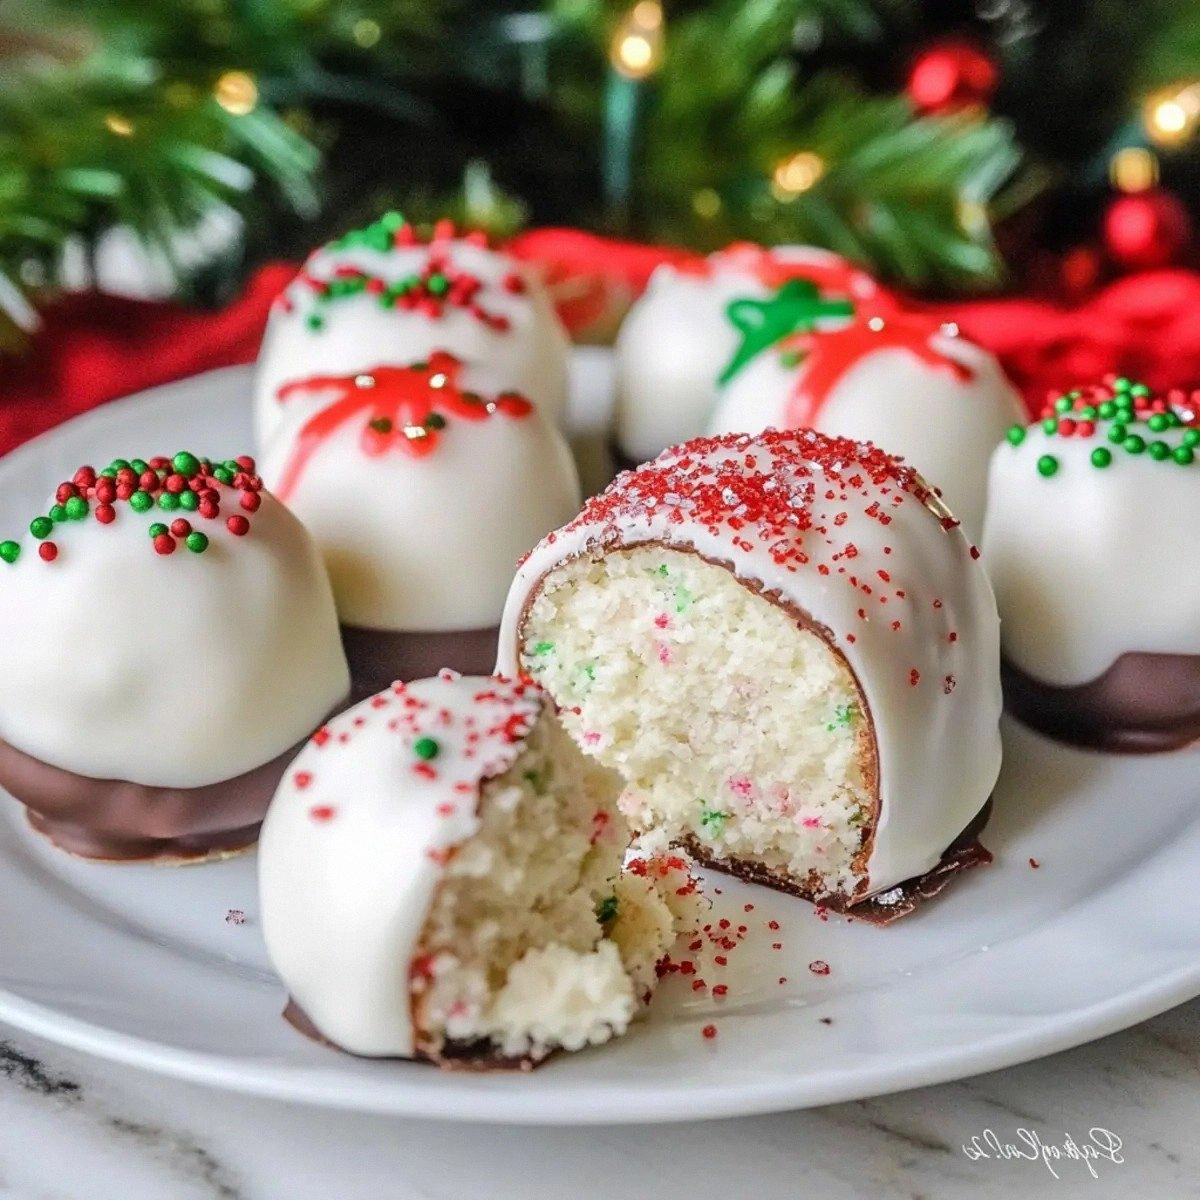
Picture this: the warm glow of the oven casting amber shadows across the countertop, the sweet perfume of vanilla and toasted sugar swirling together, and the faint crackle of candy melts as they melt into a glossy river of white. Your nose twitches with anticipation, your fingertips feel the cool, buttery crumb as you roll it into perfectly sized spheres, and the first bite? It’s like a winter wonderland exploded in your mouth—soft cake, tangy cream cheese, and a sugary crunch that snaps like fresh snow underfoot. The moment you dip those balls into the glossy white coating and then drizzle the scarlet red, you’re not just making a dessert; you’re crafting a piece of holiday magic that could give Santa a run for his money.
Most recipes for Little Debbie cake balls either skim over the crucial step of balancing the cake crumb with enough moisture, or they drown the delicate flavor with an over‑indulgent flood of chocolate. This version, however, is engineered to hit that sweet spot where the cake stays moist, the coating stays glossy, and the sanding sugar adds just the right amount of sparkle without turning the whole thing into a sugar‑coated disaster. I’m talking about a texture that’s creamy on the inside, crisp on the outside, and a flavor profile that sings like a choir of carolers on a snowy night. The secret? A generous splash of cream cheese that adds tang and richness, plus a precise temperature trick that keeps the candy melts from seizing.
And here’s the kicker: I’m going to reveal a technique that most store‑bought versions completely ignore—using a double‑dip method that creates a hard shell on the outside while keeping the interior luxuriously soft. I dare you to taste this and not go back for seconds. Let me walk you through every single step — by the end, you’ll wonder how you ever made it any other way.
What Makes This Version Stand Out
- Taste: The tangy cream cheese balances the sugary cake, creating a flavor contrast that feels like peppermint and hot cocoa together.
- Texture: A soft, melt‑in‑your‑mouth interior meets a firm, glossy shell that cracks like thin ice when you bite.
- Simplicity: No fancy equipment—just a bowl, a microwave, and a couple of spatulas, making it perfect for a last‑minute holiday gathering.
- Uniqueness: The double‑dip method with separate white and red candy melts gives you a professional‑grade finish without the bakery price tag.
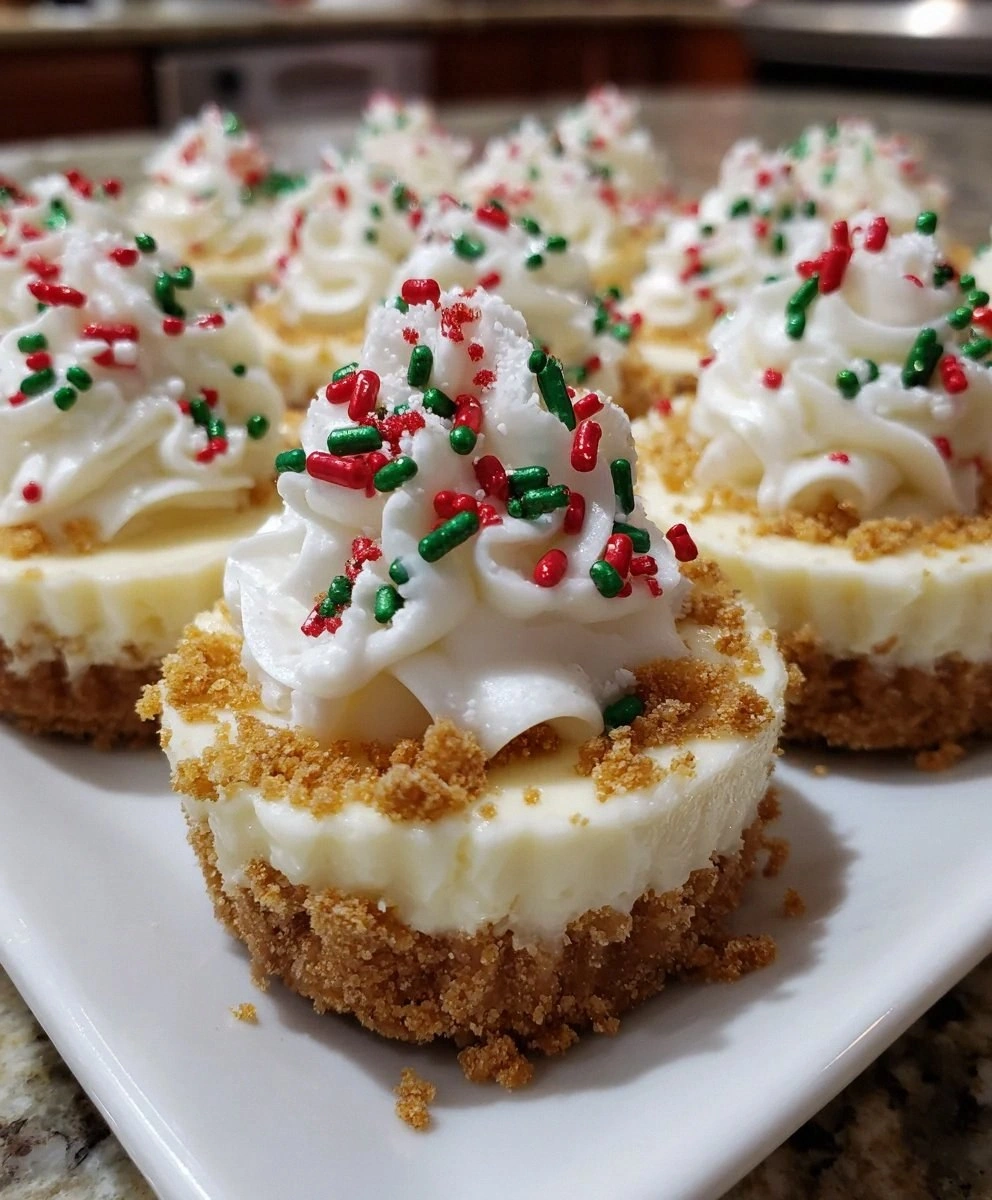
- Crowd Reaction: Guests swear they’ve never seen anything so festive yet so easy; the sanding sugar sparkles like fresh snow on a pine branch.
- Ingredient Quality: Using the original Little Debbie cakes guarantees that nostalgic flavor while the premium candy melts keep the coating smooth.
- Cooking Method: Controlled melting and chilling steps prevent the dreaded “grainy” candy coating that ruins most homemade versions.
- Make‑Ahead Potential: You can prep the balls up to a day ahead, store them chilled, and dip them right before serving for maximum freshness.
Inside the Ingredient List
The Flavor Base
The star of the show is the 1 box Vanilla Little Debbie Christmas Tree Cakes. These little green‑and‑red wonders bring that unmistakable holiday aroma—think vanilla, a hint of almond, and a whisper of cinnamon. Skipping them would be like trying to bake a gingerbread house without ginger; you’d lose the nostalgic flavor that makes this dish instantly recognizable. If you can’t find the exact brand, look for a vanilla cake with a similar sweet profile and a soft crumb structure. When selecting, choose a box that’s still sealed and hasn’t been in the pantry for more than six months; freshness matters more than you think.
The Texture Crew
Next up, 8 oz Cream Cheese. This is the secret sauce that transforms crumbly cake into a cohesive, velvety mixture. The cream cheese adds a subtle tang that cuts through the sweetness, preventing the balls from becoming cloyingly sugary. If you substitute with mascarpone, you’ll get a richer mouthfeel but lose that tangy edge. Make sure the cream cheese is softened to room temperature; otherwise you’ll end up with lumps that ruin the smooth texture.
The Unexpected Star
10 oz White Candy Melts create the glossy, snow‑white coat that makes these balls look like they were plucked straight from a Christmas market. The key is to melt them slowly, stirring constantly to avoid scorching. If you’re using a microwave, pulse in 15‑second intervals and stir in between; this prevents the dreaded “grainy” texture. Skipping this step or using low‑quality melts will give you a dull, rubbery shell that no one wants to bite into.
The Final Flourish
4 oz Red Candy Melts are used for that festive drizzle that mimics candy‑cane ribbons. The red melt is more temperamental than the white, so keep it separate and melt it at a lower temperature to preserve its bright hue. If you accidentally overheat, the color will turn orange and the flavor will become bitter—definitely a holiday faux pas. Finally, 1 cup Red and Green Sanding Sugar adds a sparkly, crunchy finish that catches the light like tinsel on a tree. You can substitute with colored non‑pareve sprinkles if you need a gluten‑free version, but the sanding sugar’s fine texture is unmatched.
Everything's prepped? Good. Let's get into the real action…
The Method — Step by Step
Preheat your oven to a low 200°F (93°C) and line a large baking sheet with parchment paper. While the oven warms, open the box of Little Debbie Christmas Tree Cakes and crumble them into a massive bowl. I like to use my hands for this part because the tactile feedback tells you when the crumbs are fine enough—no large chunks, just a fine sand‑like texture. Once crumbled, set the bowl aside for a minute to let any excess moisture evaporate; this step prevents soggy balls later.
Now, take the 8 oz of cream cheese and let it soften on the counter for about 20 minutes. If you’re in a hurry, microwave it on low power (30% strength) for 10‑15 seconds—just enough to make it pliable but not melted. Add the softened cream cheese to the cake crumbs and, using a sturdy spoon or your hands, blend until the mixture holds together when pressed. This is the moment you’ll feel the texture shift from dry to cohesive, like a dough that’s finally ready to be shaped.
Kitchen Hack: Add a teaspoon of vanilla extract to the cream cheese mixture for an extra layer of holiday aroma.With the mixture ready, lightly grease your hands with a dab of vegetable oil to prevent sticking. Scoop out portions about the size of a walnut and roll them into smooth spheres. This part is therapeutic—think of it as stress‑relief kneading, but the reward is a perfect bite‑size ball. Place each ball onto the parchment‑lined sheet, leaving a little space between them, and pop the tray into the preheated oven for 10 minutes. This gentle “bake‑off” dries the surface just enough to help the candy coating adhere later.
While the balls are cooling, set up a double‑boiler or a microwave‑safe bowl for the candy melts. For the white melts, melt 10 oz in 30‑second bursts, stirring after each burst until the mixture is silky and glossy. The temperature should be around 115°F (46°C); if it gets hotter, the sugars will crystallize and you’ll end up with a gritty coating. Once melted, keep the bowl warm but not hot—an insulated thermos works wonders if you’re juggling multiple steps.
Now comes the fun part: dipping. Using a fork or a candy‑dip tool, lower each cake ball into the white melt, ensuring it’s fully submerged. Gently lift it out and let the excess drip back into the bowl; a quick tap against the side of the bowl removes surplus without breaking the coating. Place the freshly dipped ball onto a fresh piece of parchment paper and let it set for about 2 minutes. The coating should harden to a smooth, glossy finish that catches the light like fresh snow.
While the white coating is still tacky, melt the 4 oz of red candy melts using the same low‑heat method. Once fluid, drizzle the red melt over the white‑coated balls in a zig‑zag pattern, mimicking candy‑cane swirls. If you’re feeling artistic, you can use a small spoon to create delicate ribbons instead of a quick drizzle. This step is where the visual wow factor really shines, so take your time and enjoy the process.
Immediately after the red drizzle, roll each ball in the red and green sanding sugar. The sugar will cling to the still‑wet coating, creating a sparkle that looks like a miniature snowstorm. Press lightly to ensure an even coating; the sugar should stick without clumping. Once all balls are coated, let them sit at room temperature for 10 minutes, then transfer the tray to the refrigerator for at least 30 minutes to set completely.
Watch Out: If the candy melts cool too quickly, they can become brittle and crack when you roll the balls; keep the bowl warm until you finish the entire batch.Finally, give the chilled balls one last look over. If any spots look dull, give them a quick flash dip in the white melt for a second coating—this “gloss boost” is the secret that makes store‑bought versions pale in comparison. Serve them on a festive platter, watch the eyes light up, and bask in the glory of having created a holiday masterpiece that tastes as good as it looks.
That's it — you did it. But hold on, I've got a few more tricks that'll take this to another level…
Insider Tricks for Flawless Results
The Temperature Rule Nobody Follows
Most home cooks think “just melt the chocolate” and move on, but the real magic lies in temperature control. Keep white candy melts between 110‑115°F; any higher and the sugar crystals will seize, turning your coating from silk to sand. I keep a candy thermometer on hand and adjust the microwave power accordingly. A friend once tried to speed things up by cranking the microwave to full power—her balls ended up with a cloudy, grainy shell that looked like melted plastic. Trust the low‑and‑slow approach and you’ll get that flawless, mirror‑like finish.
Why Your Nose Knows Best
Before you even taste the cake balls, your nose is already telling you if you’re on the right track. When the white melt is ready, you’ll smell a buttery, vanilla‑rich aroma that’s unmistakably “candy‑coated.” If you detect any burnt or acrid notes, you’ve overheated the melt. At that point, it’s better to start over than to try to salvage a compromised coating. This sensory checkpoint saves you from a batch of sad, cracked balls.
The 5‑Minute Rest That Changes Everything
After forming the balls but before the first dip, let them rest on a sheet of parchment for exactly five minutes. This brief pause allows the crumb‑cream cheese matrix to firm up, so when you dip them, they don’t fall apart. I once skipped this step in a rush, and the balls disintegrated into a sugary mess the moment they hit the melt. Five minutes is all it takes to lock in shape and guarantee a clean, even coating.
Sanding Sugar Timing Trick
Apply the sanding sugar while the red drizzle is still tacky, not after it’s fully set. The sugar adheres better, creating a uniform sparkle rather than clumping in patches. If you wait until the coating is hard, the sugar will bounce off like snow on a warm sidewalk. A quick roll in the sugar, a gentle tap, and you’ve got a consistent glitter that catches every light source in the room.
The Double‑Dip Defense
For an ultra‑smooth finish, perform a quick second dip in the white melt after the red drizzle has set but before the sanding sugar. This “gloss boost” seals any tiny cracks and gives the balls a professional sheen. I swear by this step; the difference is like night versus day. The extra dip adds just a few seconds to the process, but the visual payoff is massive—your guests will think you hired a pastry chef.
Creative Twists and Variations
This recipe is a playground. Here are some of my favorite ways to switch things up:
Peppermint Crunch
Swap the red candy melt for crushed peppermint candies and add a dash of peppermint extract to the cream cheese. The result is a cool, minty bite that pairs perfectly with hot cocoa. Perfect for anyone who loves the classic candy‑cane flavor.
Chocolate‑Covered Delight
Replace the white candy melts with dark chocolate melts and drizzle with white chocolate instead of red. This creates a sophisticated, bittersweet version that’s ideal for adult holiday parties.
Nutty Noel
Fold finely chopped toasted pecans or walnuts into the cake‑cream cheese mixture before forming the balls. The nutty crunch adds texture and a deeper flavor profile that feels like a holiday hug.
Fruit‑Infused Fantasy
Add a tablespoon of cranberry sauce to the cream cheese mixture for a subtle tartness. Top with a dusting of powdered sugar and a few dried cranberries for a festive look and a burst of flavor.
Vegan/Veggie Twist
Swap the cream cheese for a vegan cream cheese alternative and use dairy‑free candy melts. The texture stays creamy, and the coating remains glossy, making this version inclusive for plant‑based diets.
Storing and Bringing It Back to Life
Fridge Storage
Place the finished balls in an airtight container lined with parchment paper. They’ll stay fresh for up to five days in the refrigerator. If you notice any condensation, pat the balls gently with a paper towel before resealing.
Freezer Friendly
These cake balls freeze beautifully. Arrange them on a baking sheet, flash‑freeze for 30 minutes, then transfer to a zip‑top freezer bag. They’ll keep for up to three months. When you’re ready to serve, let them thaw in the fridge for an hour, then give them a quick 30‑second microwave zap (covered with a damp paper towel) to revive the coating.
Best Reheating Method
To bring them back to that just‑out‑of‑the‑oven sparkle, place the balls on a microwave‑safe plate, add a tiny splash (about a teaspoon) of water to the plate, and microwave on low for 10‑15 seconds. The steam created by the water gently re‑melts the outer shell, restoring that glossy finish without melting the interior.