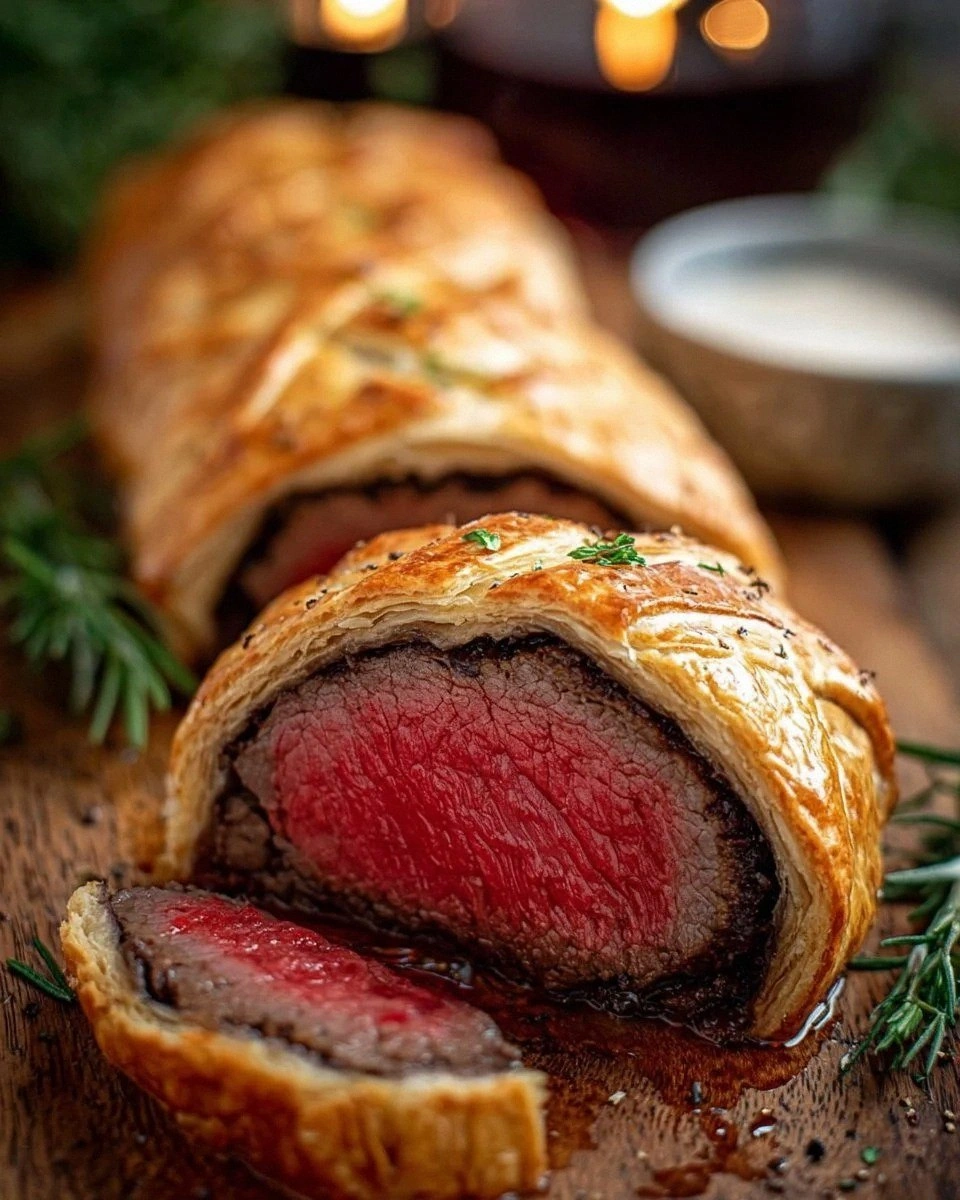
I was standing in my tiny kitchen, the kind of place where the countertops are a battlefield of spatulas and the oven light is the only thing that ever feels like a spotlight. I had just tried to make a classic Beef Wellington for a dinner party, and what came out of the oven looked more like a sad, soggy blanket than the regal masterpiece I’d imagined. The pastry cracked, the beef was overcooked, and my guests politely pretended not to notice while I desperately Googled “how to fix a Wellington disaster.” That night, I made a promise to myself: I would create a version that was foolproof, bite‑size, and so delicious that even the most skeptical palate would be converted.
Fast forward a few weeks, and after countless trial runs (and a few secret midnight tastings that I’ll never admit to), I finally nailed the perfect mini version. Picture this: golden, flaky puff pastry hugging a juicy, seasoned beef patty that’s still pink in the middle, all topped with a thin kiss of Dijon mustard that adds a zingy snap. The aroma that fills the kitchen is a heady blend of caramelized onions, earthy mushrooms, and fresh thyme, swirling together like a symphony that makes you want to dance around the stovetop. The first bite? It’s a crunchy‑to‑soft contrast that shatters like thin ice, releasing a buttery, meaty core that practically melts on your tongue.
What makes this mini Wellington truly stand out is the secret weapon I’ve added: a quick deglaze with a splash of olive oil that lifts every flavor off the pan and locks it into the meat. Most recipes either skip this step or drown the beef in a soggy mushroom duxelles, but I dare you to taste this and not go back for seconds. I’ll be honest — I ate half the batch before anyone else got to try it, and that’s a confession I’m not ashamed of because the result is hands down the best version you’ll ever make at home.
Now, I’m ready to walk you through every single step — by the end, you’ll wonder how you ever made it any other way. Okay, ready for the game‑changer? Let’s dive into the details, because the journey from raw ingredients to a plate of perfection is about to become your new favorite kitchen adventure.
What Makes This Version Stand Out
- Flavor Explosion: The combination of sautéed mushrooms, onions, and fresh thyme creates a depth that rivals a restaurant‑grade duxelles, while the Dijon mustard adds a bright, tangy finish.
- Texture Harmony: The puff pastry stays crisp on the outside, yet remains tender enough to give way to the juicy beef center without becoming soggy.
- Simplicity: No fancy equipment required—just a skillet, a rolling pin, and a trusty oven.
- Unique Twist: A quick deglaze with olive oil captures all the browned bits, turning them into pure flavor gold.
- Crowd Reaction: These bite‑size wonders disappear from the platter faster than you can say “second helping,” making them perfect for parties.
- Ingredient Quality: Using Halal ground beef ensures a clean, lean taste that pairs beautifully with the buttery pastry.
- Cooking Method: Baking at a high temperature guarantees that the pastry puffs up dramatically while the beef stays perfectly pink.
- Make‑Ahead Potential: You can assemble the mini Wellingtons ahead of time and pop them in the oven when guests arrive.
Inside the Ingredient List
The Flavor Base
Ground beef is the heart of this dish. I use a pound of Halal ground beef because it’s lean enough to stay tender yet flavorful enough to stand up to the robust mushroom‑onion mixture. Skipping the beef would turn this into a simple pastry snack, and you’d lose the juicy, meaty core that defines a Wellington. If you can’t find Halal beef, a high‑quality grass‑fed beef works just as well.
The Texture Crew
Puff pastry is the unsung hero here. A single package of thawed puff pastry provides enough sheets to cut into twelve perfect squares, each ready to cradle a morsel of beef. The key is to keep the pastry cold; if it warms up, the butter melts and you’ll end up with a soggy blanket instead of a crisp crown. For a gluten‑free twist, look for a rice‑flour based puff pastry, but expect a slightly different bite.
The Unexpected Star
Mushrooms and Dijon mustard are the dynamic duo that elevate the flavor profile. The 8‑ounce blend of finely chopped mushrooms adds an earthy umami that pairs perfectly with the beef, while the mustard cuts through the richness with a bright, peppery edge. If you’re allergic to mustard, a teaspoon of whole‑grain mustard or a dash of horseradish will give a similar punch.
The Final Flourish
Fresh thyme, garlic, and a splash of olive oil bring everything together. Thyme adds a subtle piney aroma that lifts the entire dish, while garlic provides that familiar comforting backdrop. The olive oil is used both for sautéing and for a quick deglaze that captures the caramelized bits stuck to the pan—those bits are pure flavor gold. Salt and pepper are added to taste, but don’t skimp; they’re the silent conductors that make every other note sing.
Everything's prepped? Good. Let's get into the real action...
The Method — Step by Step
Start by heating 2 tablespoons of olive oil in a large skillet over medium‑high heat. Once the oil shimmers, toss in the finely chopped onion and let it sweat for about two minutes until it becomes translucent, the way a sunrise slowly reveals its colors. Add the minced garlic and continue sautéing for another 30 seconds; that sizzle when it hits the pan? Absolute perfection. Then, stir in the chopped mushrooms and thyme, seasoning with a pinch of salt and pepper. Cook, stirring occasionally, until the mushrooms release their moisture and that moisture evaporates, leaving the mixture dry and deeply browned—this is the foundation of flavor.
Now, push the vegetable mixture to the side of the pan and add the ground beef, breaking it up with a wooden spoon. Cook the beef until it’s no longer pink, about five minutes, letting it develop a caramelized crust that will later translate into that coveted “meaty” bite. As the beef browns, drizzle a splash of olive oil to deglaze the pan, scraping up every golden speck stuck to the bottom. Once the pan is deglazed, stir the beef together with the mushroom‑onion mixture, ensuring an even distribution of flavors. Finally, stir in the 2 tablespoons of Dijon mustard, coating the mixture like a glossy veil that locks in moisture.
Transfer the filling to a shallow bowl and let it cool to room temperature. This cooling step is crucial; if you wrap warm filling in puff pastry, the butter layers melt too quickly, resulting in a soggy crust. While the filling cools, preheat your oven to 400 °F (200 °C) and line a baking sheet with parchment paper. This temperature creates a rapid steam burst that puffs the pastry dramatically, giving you those lofty, golden peaks that look like miniature crowns.
Roll out the thawed puff pastry on a lightly floured surface until it’s about 1/8‑inch thick. Using a sharp knife or pizza cutter, cut the pastry into 12 equal squares—each square should be roughly 4 inches on a side. Place a generous spoonful (about 2 tablespoons) of the cooled beef mixture in the center of each square. Gently fold the corners over the filling, pinching the edges together to seal, then flip the parcel so the seam is on the bottom. The result should look like a neat little package, ready to be brushed with egg wash.
Whisk the large egg in a small bowl to create an egg wash. Lightly brush each mini Wellington with the egg wash, making sure to coat the entire surface. This egg glaze is what gives the pastry its irresistible glossy finish and deep golden color. Once brushed, place the pastries on the prepared baking sheet, leaving a little space between each so they can expand without touching.
Pop the tray into the preheated oven and bake for 20‑25 minutes, or until the pastry is puffed, golden‑brown, and the edges are crisping up like the rim of a freshly baked croissant. About halfway through, rotate the tray to ensure even browning; the aromas at this point will fill your kitchen, making you want to peek inside the oven just to inhale the scent of buttery pastry and savory beef.
After the brief rest, serve the mini Wellingtons warm, straight from the rack. They’re perfect as an appetizer, a party finger food, or even a main‑course when paired with a simple green salad. Picture yourself pulling these out of the oven, the whole kitchen smelling incredible, and watching your guests’ eyes widen as they take that first bite. I dare you to try one and not go back for seconds—if you do, you’ve clearly missed the magic.
That's it — you did it. But hold on, I've got a few more tricks that'll take this to another level...
Insider Tricks for Flawless Results
The Temperature Rule Nobody Follows
Never let the puff pastry sit at room temperature for more than five minutes before baking. The butter layers need to stay solid; if they melt, the pastry will spread rather than rise. I keep a tray of ice cubes in the fridge and slide the assembled pastries on top for a quick chill right before they go into the oven. This trick guarantees a dramatic lift and a buttery crunch that’s impossible to beat.
Why Your Nose Knows Best
When the filling is cooking, trust your sense of smell more than the clock. If you catch that earthy, nutty aroma of caramelized mushrooms, you know the duxelles is ready. A common mistake is to over‑cook the mushrooms, turning them bitter. If you hear a faint sizzling as the butter melts, that’s your cue to stop and move on.
The 5‑Minute Rest That Changes Everything
After baking, let the mini Wellingtons rest for exactly five minutes on a wire rack. This short pause allows the steam inside to redistribute, keeping the pastry crisp while the beef stays juicy. Skipping this rest is like pulling a steak off the grill too early—everything collapses and you lose that perfect texture.
Egg Wash Variations for Extra Shine
For a deeper color, mix a teaspoon of water with the egg wash. The added moisture creates a slightly thinner glaze that spreads more evenly, giving each pastry a mirror‑like sheen. If you prefer a richer flavor, substitute half the egg with heavy cream; the result is a buttery glaze that adds a subtle richness to every bite.
The Secret of the “Steam Splash”
A tiny splash of water in the oven’s lower rack creates a burst of steam that helps the pastry puff up faster. I place a small, oven‑safe dish with a tablespoon of water on the bottom rack just as I close the door. The steam prevents the pastry from drying out, ensuring a tender interior and a crisp exterior. A friend tried skipping this step once — let’s just say the pastry looked more like a flatbread than a Wellington.
Creative Twists and Variations
This recipe is a playground. Here are some of my favorite ways to switch things up:
Smoky Chipotle Kick
Add a teaspoon of chipotle powder to the beef mixture and swap Dijon mustard for a smoky chipotle mayo. The result is a southwestern spin that pairs beautifully with a cilantro‑lime dipping sauce.
Herb‑Infused Goat Cheese
Stir in 2 ounces of crumbled goat cheese and a handful of chopped fresh rosemary into the filling. The tangy cheese melts into the beef, creating a creamy pocket that surprises the palate.
Mushroom Medley Deluxe
Swap the standard button mushrooms for a mix of shiitake, cremini, and porcini. The varied textures and deeper umami notes elevate the dish to a gourmet level, perfect for a formal dinner.
Mini Breakfast Wellington
Replace the beef with a scrambled egg and chorizo mixture, add a thin slice of cheddar, and finish with a drizzle of hot sauce. These bite‑size breakfast treats are ideal for brunch gatherings.
Vegan Delight
Use a plant‑based ground “beef” substitute, dairy‑free puff pastry, and a splash of soy sauce in place of mustard. The result is a cruelty‑free version that still delivers that satisfying puff‑and‑crunch experience.
Storing and Bringing It Back to Life
Fridge Storage
Allow the cooled mini Wellingtons to come to room temperature, then store them in an airtight container in the refrigerator for up to three days. When you’re ready to enjoy them, reheat at 350 °F (175 °C) for 10‑12 minutes, covering loosely with foil to prevent over‑browning.
Freezer Friendly
Freeze the unbaked, assembled pastries on a parchment‑lined tray. Once solid, transfer them to a zip‑top freezer bag. They’ll keep for up to two months. Bake them straight from frozen at 425 °F (220 °C) for 25‑30 minutes, adding a minute or two for extra golden‑brown edges.
Best Reheating Method
To bring leftover mini Wellingtons back to life, preheat your oven to 375 °F (190 °C), place the pastries on a wire rack, and spritz a tiny splash of water on the pastry before reheating. The steam revives the flaky crust while keeping the interior moist, making them taste almost as fresh as the day they were baked.